What this article brings to you is an introduction to three ways to implement text marquees (code examples). It has certain reference value. Friends in need can refer to it. I hope it will be helpful to you.
I recently wrote a project requirement for a text marquee. I just started writing it in js and was able to complete the requirement. Later, I thought about using another method (html and css respectively) to achieve the same requirement to reduce performance consumption.
First, demand analysis:
Requirement point 1. Determine the length of the text and the length of the container. If the length of the text is greater than the length of the container, start scrolling, otherwise it will not scroll;
Demand point 2. Determine the end of scrolling and trigger events at the end time (for example: adding or subtracting styles, etc.);
1. JS implementation
Thinking :
1. Determine the length of the text and the length of the container. If the length of the text is greater than the length of the container, start scrolling, otherwise it will not scroll. (offsetWidth)
2. Get the distance from the scroll bar to the left side of the element, and scroll recursively until the scrolled distance is equal to the length of the text and exit the recursion. (scrollLeft)
Rendering

Note: The text jitter phenomenon is due to the long recording time, and the GIF file produced by PS can only be 500 frames Below, text jitter appears by lowering the frame rate.
Code part
HTML:
<div class="box">
    <div class="content">
        <p class="text">1.文字如果超出了宽度自动向左滚动文字如果超出了宽度自动向左滚动。</p>
    </div>
</div>CSS:
*{
  margin:0;
  padding:0;
}
.box{
  margin-left: 200px;
  margin-top: 100px;
  color: #FFF;
  white-space: nowrap;
  overflow: hidden;
  width: 300px;
  background: #000;
}
.content p{
  display:inline-block;
}
.content p.padding{
  padding-right: 300px;
}JS:
let [box, content, text] = [
  document.querySelector('.box'),
  document.querySelector('.content'),
  document.querySelector('.text')
]
let [textWidth, boxWidth] = [
  text.offsetWidth,
  box.offsetWidth
]
window.onload=function checkScrollLeft(){
  // 判断文字长度是否大于盒子长度
  if(boxWidth > textWidth){ return false}
  content.innerHTML += content.innerHTML
  document.querySelector('.text').classList.add('padding')
  // 更新
  textWidth = document.querySelector('.text').offsetWidth
  toScrollLeft()
}
function toScrollLeft(){
  //  如果文字长度大于滚动条距离,则递归拖动
  if(textWidth > box.scrollLeft){
    box.scrollLeft++
    setTimeout('toScrollLeft()', 18);
  }
  else{
    // setTimeout("fun2()",2000);
  }
}Summary
The js method can perfectly satisfy sub-need point 1 and self-need point 2.
The length of text and container can be judged by offsetWidth. If the text is longer than the container, scrolling begins.
window.onload=function checkScrollLeft(){
  // 判断文字长度是否大于盒子长度
  if(boxWidth >= textWidth){ return false}
  content.innerHTML += content.innerHTML
  document.querySelector('.text').classList.add('padding')
  // 更新
  textWidth = document.querySelector('.text').offsetWidth
  // 开始滚动  触发事件
  toScrollLeft()
}Judge the end of scrolling based on the distance from the scroll bar to the left side of the element and the length of the text. If the distance from the scroll bar to the left side of the element is equal to the length of the text, the scrolling will end.
function toScrollLeft(){
  //  如果文字长度大于滚动条距离,则递归拖动
  if(textWidth > box.scrollLeft){
    box.scrollLeft++
    setTimeout('toScrollLeft()', 18);
  }
  else{
    // 滚动结束 触发事件
  }
}2. HTML implementation
Rendering:

Code part:
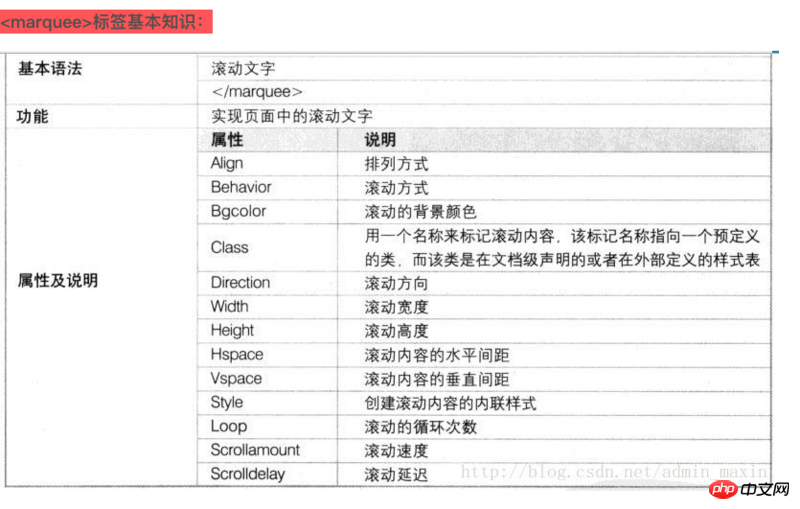
<marquee behavior="behavior" width="200" loop="2">1.文字如果超出了宽度自动向左滚动文字如果超出了宽度自动向左滚动。</marquee>
Very concise code~,~
marquee’s API

3. CSS implementation
Rendering
<div class="wrap">
  <div class="cont">
    <p class="txt">1.文字如果超出了宽度自动向左滚动文字如果超出了宽度自动向左滚动。</p>
    <p class="txt">1.文字如果超出了宽度自动向左滚动文字如果超出了宽度自动向左滚动。</p>
  </div>
</div>*{
padding: 0;
margin: 0;
box-sizing: border-box;
}
.wrap{
margin:10% auto;
background: #ddd;
font-size: 0;
/* 固宽,溢出隐藏 */
width: 300px;
height: 40px;
overflow: hidden;
white-space: nowrap;
/* 相对定位 */
position: relative;
}
.wrap .cont{
position: absolute;
top: 0;
left: 0;
height: 100%;
/* 关键 */
width: 200%;
transition:left 10s linear;
}
.wrap .txt{
display: inline-block;
font-size: 18px;
line-height: 30px;
margin-top: 5px;
color: #fff;
background: #000;
}var cont = document.querySelector('.cont')
var wrap = document.querySelector('.wrap')
var text = document.querySelector('.txt')
var wrapWidth = wrap.offsetWidth
var textWidth = text.offsetWidth
window.onload=function checkScrollLeft(){
// 判断文字长度是否大于盒子长度 开始滚动
if(textWidth > wrapWidth) {
text.style.paddingRight = '300px'
cont.style.left = "-870px"
}
// 滚动结束
document.addEventListener("transitionend", function (){
    console.log("end")
}, false)
}window.onload=function checkScrollLeft(){
// 判断文字长度是否大于盒子长度
if(textWidth > wrapWidth) {
// 开始滚动 触发事件
text.style.paddingRight = '300px'
cont.style.left = "-870px"
}
}// 滚动结束
document.addEventListener("transitionend", function (){
console.log("end")
}, false)Conclusion
Review of requirementsRequirement point 1. Determine the length of the text and the length of the container. If the text length is greater than the container length, start scrolling , otherwise it will not scroll; Requirement point 2. Determine the end of scrolling and trigger events at the end time (for example: adding or subtracting styles, etc.);Comparison of the advantages and disadvantages of implementation methods| html realizes the marquee effect | css realizes the marquee effect Effect | ||
|---|---|---|---|
| ✔️ | ✘ | ✔️ | |
| ✔️ | ✘ | ✔️ | |
| ✔️ | ✘ | ✘ |

<div class="wrap">
  <div class="cont">
    <p class="txt">1.文字如果超出了宽度自动向左滚动文字如果超出了宽度自动向左滚动。</p>
    <p class="txt">2.文字如果超出了宽度自动向左滚动文字如果超出了宽度自动向左滚动。</p>
  </div>
</div>*{
padding: 0;
margin: 0;
box-sizing: border-box;
}
.wrap{
position: relative;
width: 40%;
height: 40px;
margin:10% auto;
background: #ddd;
font-size: 0;
overflow: hidden;
}
.wrap .cont{
position: absolute;
top: 0;
left: 0;
/* 宽度 大于容器的两倍即可 */
width: 200%;
-webkit-animation:5s move infinite linear;
}
.wrap .txt{
font-size: 18px;
color: #fff;
display: inline-block;
/* 宽度 等于容器的宽度 */
width: 50%;
height: 30px;
border-left:1px solid #fff;
line-height: 30px;
text-align: center;
margin-top: 5px;
background: #000;
}
.wrap:hover .cont{
-webkit-animation-play-state:paused;
}
@-webkit-keyframes move{
/* 原理 left值的变化 移动一个容器的宽度 */
0%{
left: 0;
}
100%{
left: -100%;
}
}The above is the detailed content of Introduction to three ways to implement text ticker (code examples). For more information, please follow other related articles on the PHP Chinese website!