This article brings you a detailed introduction to Vue data communication (with examples). It has certain reference value. Friends in need can refer to it. I hope it will be helpful to you.
Components are one of the most powerful features of vue.js, and the scopes of component instances are independent of each other, which means that between different components The data cannot reference each other. How to transfer data between components is crucial. This article lists some common data transfer methods as much as possible, such as props, $emit/$on and vuex, as well as the new $attrs/$listeners and provide/inject, I will use easy-to-understand examples to describe the differences. I hope it will be of some help to my friends.
Parent component A passes to child component B through props, and B to A is implemented through $emit in component B and v-on in component A.
prop is one-way bound. When the properties of the parent component change, it will be transmitted to the child component, but not vice versa.
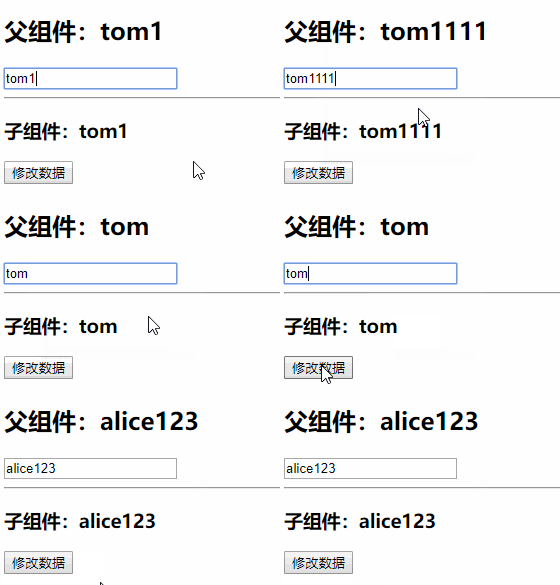
And it is not allowed to change prop directly inside a child component, otherwise it will Report an error. Then sometimes if we want to modify the passed prop, there are the following methods:
<div>
<h2>父组件:{{name}}</h2>
<input>
<my-hello></my-hello>
</div>
<template>
<div>
<h3>子组件{{username}}</h3>
<button>修改数据</button>
</div>
</template>
<script>
var vm = new Vue({ //父组件
el: '#itany',
data: {
name: "tom"
},
components: {
'my-hello': { //子组件
props: ["name"],
template: '#hello',
data() {
return {
username: this.name
}
},
// computed: {
// changeName() { //如果要实时监测父组件数据的变化,还必须用到计算属性,
然而计算属性不能直接被更改
// return this.name
// }
// },
methods: {
change() {
this.username = "alice";
// this.changeName = "alice";该方法无效,不能直接更改计算属性
}
},
}
}
});
</script>Although this method can affect the data passed by the parent component by operating another variable, a big disadvantage is that from now on, the child component cannot change as the data of the parent component changes. At this time, if you use calculated properties, although the changes can be synchronized, the subcomponent cannot change the passed data. Therefore this method is less commonly used.
a. Use .sync (supported in version 1.0, not in version 2.0 Supported (supported again in version 2.3) needs to explicitly trigger an update event.
<div>
<h2>父组件:{{name}}</h2>
<input>
<hr>
<my-hello></my-hello>
</div>
<template>
<div>
<h3>子组件:{{name}}</h3>
<button>修改数据</button>
</div>
</template>
<script>
var vm = new Vue({ //父组件
el: '#itany',
data: {
name: 'tom'
},
components: {
'my-hello': { //子组件
template: '#hello',
props: ['name'],
methods: {
change() {
// this.name='alice';这种写法不行
this.$emit('update:name', 'alice123');
//方式2:a.使用.sync,需要显式地触发一个更新事件
}
}
}
}
});
</script>
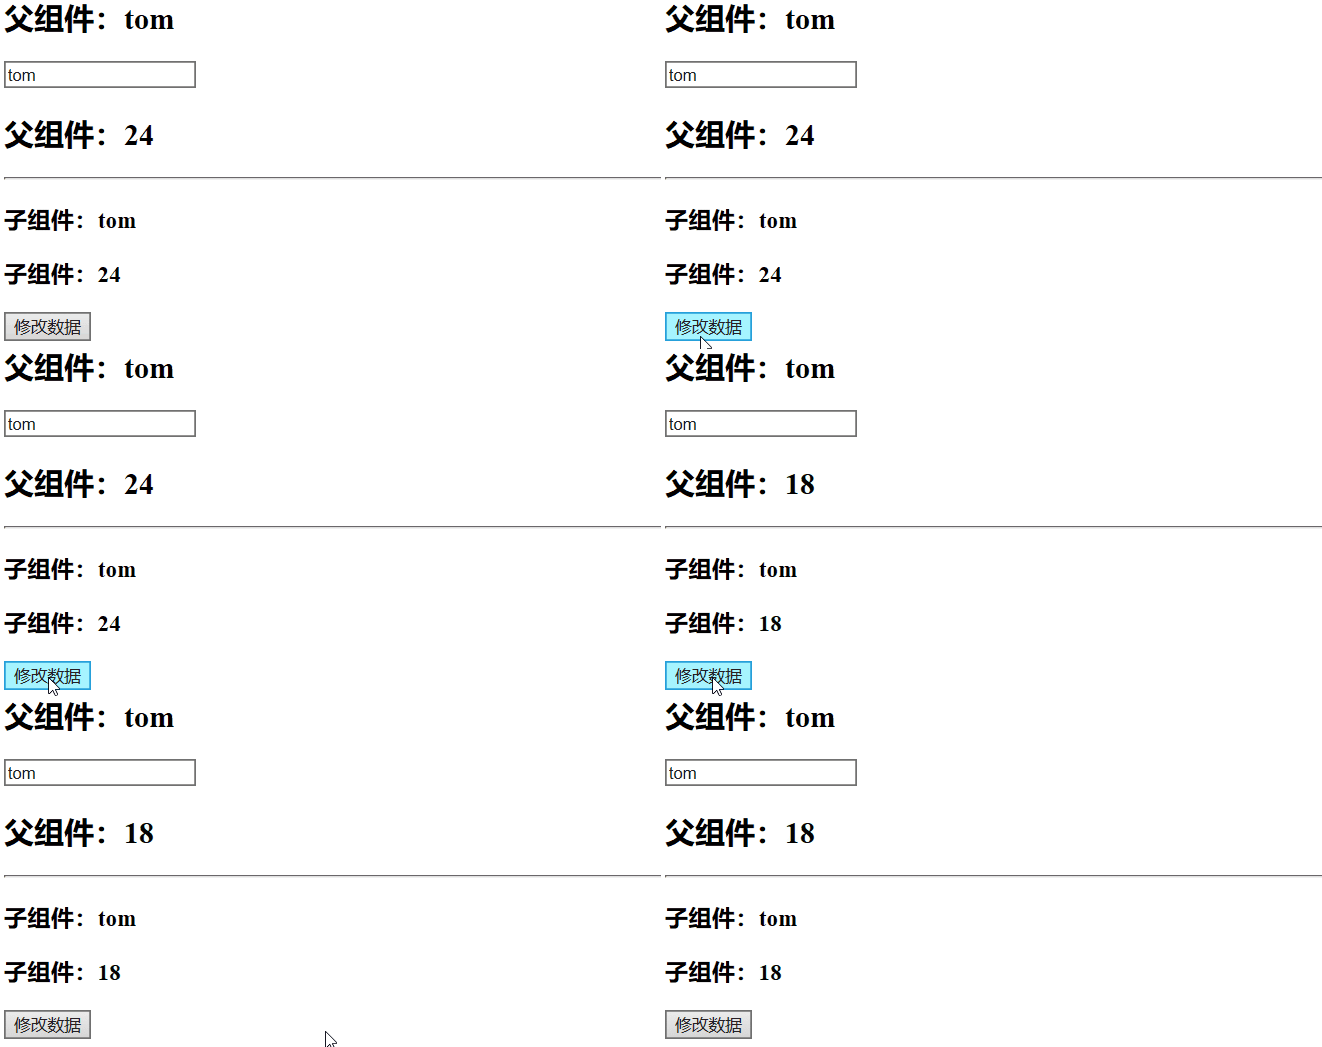
b. You can wrap the data in the parent component into an object, and then modify the properties of the object in the child component (Because the object is a reference type and points to the same memory space), it is recommended
<div>
<h2>父组件:{{name}}</h2>
<input>
<h2>父组件:{{user.age}}</h2>
<hr>
<my-hello></my-hello>
</div>
<template>
<div>
<h3>子组件:{{name}}</h3>
<h3>子组件:{{user.age}}</h3>
<button>修改数据</button>
</div>
</template>
<script>
var vm = new Vue({ //父组件
el: '#itany',
data: {
name: 'tom',
user: { //父组件中的数据包装成对象
name: 'zhangsan',
age: 24
}
},
components: {
'my-hello': { //子组件
template: '#hello',
props: ['name', 'user'],
methods: {
change() {
this.user.age = 18;
}
}
}
}
});
</script>
This This is because objects and arrays are passed in by reference in JavaScript, so for an array or object type prop, changing the object or array itself in the child component will affect the state of the parent component.
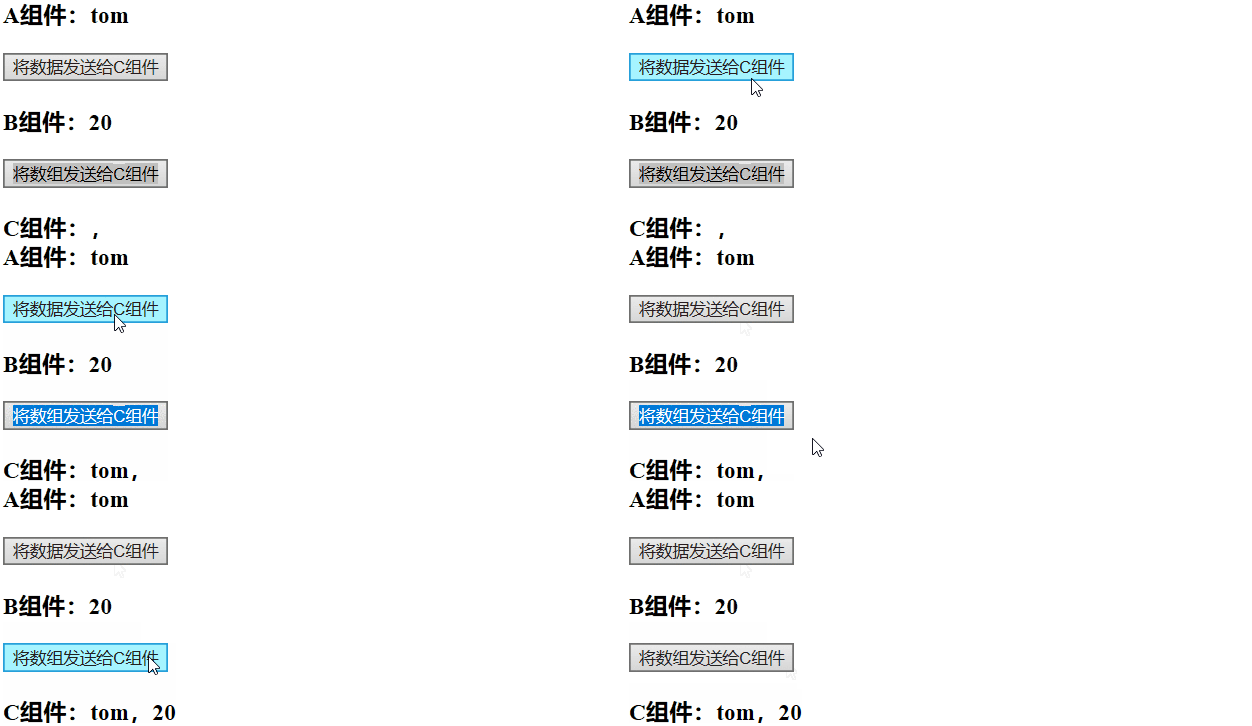
This method uses an empty Vue instance as the central event bus (event center), and uses it to trigger events and listen for events, cleverly It lightweightly implements communication between any components, including parent-child, brother, and cross-level. When our project is relatively large, we can choose vuex, a better state management solution.
    var Event=new Vue();
    Event.$emit(事件名,数据);
Event.$on(事件名,data => {});<div>
<my-a></my-a>
<my-b></my-b>
<my-c></my-c>
</div>
<template>
<div>
<h3>A组件:{{name}}</h3>
<button>将数据发送给C组件</button>
</div>
</template>
<template>
<div>
<h3>B组件:{{age}}</h3>
<button>将数组发送给C组件</button>
</div>
</template>
<template>
<div>
<h3>C组件:{{name}},{{age}}</h3>
</div>
</template>
<script>
var Event = new Vue();//定义一个空的Vue实例
var A = {
template: '#a',
data() {
return {
name: 'tom'
}
},
methods: {
send() {
Event.$emit('data-a', this.name);
}
}
}
var B = {
template: '#b',
data() {
return {
age: 20
}
},
methods: {
send() {
Event.$emit('data-b', this.age);
}
}
}
var C = {
template: '#c',
data() {
return {
name: '',
age: ""
}
},
mounted() {//在模板编译完成后执行
Event.$on('data-a',name => {
this.name = name;//箭头函数内部不会产生新的this,这边如果不用=>,this指代Event
})
Event.$on('data-b',age => {
this.age = age;
})
}
}
var vm = new Vue({
el: '#itany',
components: {
'my-a': A,
'my-b': B,
'my-c': C
}
});
</script>

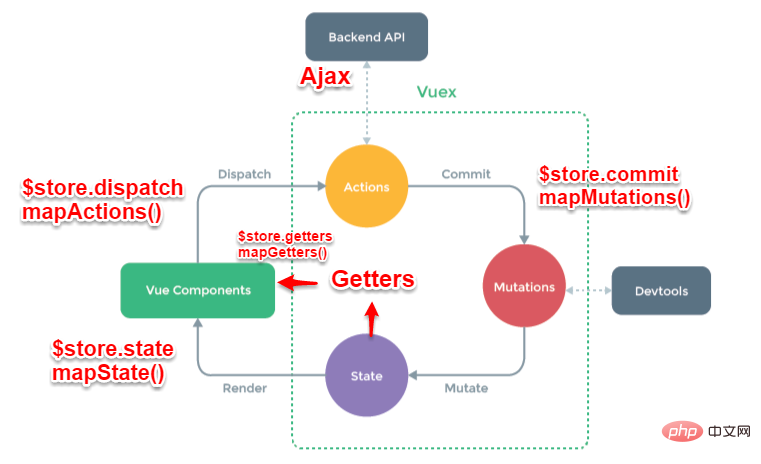
actions:操作行为处理模块,由组件中的$store.dispatch('action 名称', data1)来触发。然后由commit()来触发mutation的调用 , 间接更新 state。负责处理Vue Components接收到的所有交互行为。包含同步/异步操作,支持多个同名方法,按照注册的顺序依次触发。向后台API请求的操作就在这个模块中进行,包括触发其他action以及提交mutation的操作。该模块提供了Promise的封装,以支持action的链式触发。
commit:状态改变提交操作方法。对mutation进行提交,是唯一能执行mutation的方法。
mutations:状态改变操作方法,由actions中的commit('mutation 名称')来触发。是Vuex修改state的唯一推荐方法。该方法只能进行同步操作,且方法名只能全局唯一。操作之中会有一些hook暴露出来,以进行state的监控等。
state:页面状态管理容器对象。集中存储Vue components中data对象的零散数据,全局唯一,以进行统一的状态管理。页面显示所需的数据从该对象中进行读取,利用Vue的细粒度数据响应机制来进行高效的状态更新。
getters:state对象读取方法。图中没有单独列出该模块,应该被包含在了render中,Vue Components通过该方法读取全局state对象。
如果你想深入了解,请点击从头开始学习Vuex这篇文章
HTML5中新增了本地存储的解决方案----WebStorage,它分成两类:sessionStorage和localStorage。localStorage保存的数据长期存在,除非被清除,下一次访问该网站的时候,网页可以直接读取以前保存的数据。
localStorage保存的数据,以“键值对”的形式存在。也就是说,每一项数据都有一个键名和对应的值。所有的数据都是以文本格式保存。
存入数据使用setItem方法。它接受两个参数,第一个是键名,第二个是保存的数据。localStorage.setItem("key","value");
读取数据使用getItem方法。它只有一个参数,就是键名。var valueLocal = localStorage.getItem("key");
如果想深入了解,请点击浏览器存储这篇文章
vuex 是 vue 的状态管理器,存储的数据是响应式的。但是并不会保存起来,刷新之后就回到了初始状态,具体做法应该在vuex里数据改变的时候把数据拷贝一份保存到localStorage里面,刷新之后,如果localStorage里有保存的数据,取出来再替换store里的state。
let defaultCity = "上海"
try {   // 用户关闭了本地存储功能,此时在外层加个try...catch
  if (!defaultCity){
    defaultCity = JSON.parse(window.localStorage.getItem('defaultCity'))
  }
}catch(e){}
export default new Vuex.Store({
  state: {
    city: defaultCity
  },
  mutations: {
    changeCity(state, city) {
      state.city = city
      try {
      window.localStorage.setItem('defaultCity', JSON.stringify(state.city));
      // 数据改变的时候把数据拷贝一份保存到localStorage里面
      } catch (e) {}
    }
  }
})由于vuex里,我们保存的状态,都是数组,而localStorage只支持字符串,所以需要用JSON转换:
JSON.stringify(state.subscribeList);   // array -> string
JSON.parse(window.localStorage.getItem("subscribeList")); // string -> array多级组件嵌套需要传递数据时,通常使用的方法是通过vuex。但如果仅仅是传递数据,而不做中间处理,使用 vuex 处理,未免有点大材小用。为此Vue2.4 版本提供了另一种方法,当一个组件没有声明任何 prop 时,这里会包含所有父作用域的绑定 (class 和 style 除外),并且可以通过 v-bind="$attrs" 传入内部组件。通常配合 interitAttrs 选项一起使用。
// demo.vue
<template>
<div>
<foo>
</foo>
</div>
<script>
const childCom = ()=> import('./childCom1.vue')
export default {
data () {
return {
foo: 'Hello World!',
boo: 'Hello Javascript!',
coo: 'Hello Vue',
doo: 'Last'
}
},
components: { childCom }
}
</script></template>// childCom1.vue
<template>
<div>
<p>foo: {{ foo }}</p>
<p>attrs: {{ $attrs }}</p>
<child-com2></child-com2>
</div>
</template>
<script>
const childCom2 = ()=> import('./childCom2.vue')
export default {
props: ['foo'], // foo作为props属性绑定
inheritAttrs: false,
created () {
console.log(this.$attrs) // { boo: 'Hello Javascript!', coo: 'Hello Vue', doo: 'Last' }
}
}
</script>// childCom2.vue
<template>
<div>
<p>boo: {{ boo }}</p>
<p>attrs: {{ $attrs }}</p>
<child-com3></child-com3>
</div>
</template>
<script>
const childCom3 = ()=> import('./childCom3.vue')
export default {
props: ['boo'] // boo作为props属性绑定
inheritAttrs: false,
created () {
console.log(this.$attrs) // { coo: 'Hello Vue', doo: 'Last' }
}
}
</script><span style="font-family: 微软雅黑, Microsoft YaHei;">$attrs表示没有继承数据的对象,格式为{属性名:属性值}。Vue2.4提供了$attrs , $listeners 来传递数据与事件,跨级组件之间的通讯变得更简单</span>
Vue2.2.0新增API,这对选项需要一起使用,以允许一个祖先组件向其所有子孙后代注入一个依赖,不论组件层次有多深,并在起上下游关系成立的时间里始终生效。一言而蔽之:祖先组件中通过provider来提供变量,然后在子孙组件中通过inject来注入变量。
// 父组件
  export default {
    name: "Parent",
    provide: {
      parent: "父组件的值"
    }
}// 子组件
export default {
name: "",
inject: ['parent'],
data() {
return {
demo: this.parent //"父组件的值"
}
}
}上例中子组件中inject注入了父组件provide提供的变量parent,并将它提供给了data属性
如果需要源代码,请戳源代码
The above is the detailed content of Detailed introduction to Vue data communication (with examples). For more information, please follow other related articles on the PHP Chinese website!