How to use maven to package and release springboot
The content of this article is about how to use maven to package and publish springboot. It has certain reference value. Friends in need can refer to it. I hope it will be helpful to you.
This article shares how to use maven to facilitate us to create springboot release packages; I use the idea development tool here, and first create a project structure of multiple modules, as shown in the figure:

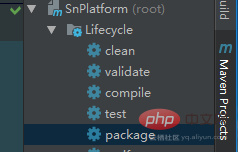
To package projects of multiple modules, the packaged plug-ins are generally configured in the parent pom. The pom of other modules does not require special configuration. When the configuration is completed, click The package of the maven tool in idea can perform a series of packaging operations;

Here first use the maven-jar-plugin plug-in and add the following configuration in the parent pom:
<!--通过maven-jar-plugin插件打jar包-->
<plugin>
    <groupId>org.apache.maven.plugins</groupId>
    <artifactId>maven-jar-plugin</artifactId>
    <version>2.4</version>
    <configuration>
        <archive>
            <manifest>
                <addClasspath>true</addClasspath>
                <classpathPrefix>lib/</classpathPrefix>
                <!--main入口-->
                <mainClass>com.platform.WebApplication</mainClass>
            </manifest>
        </archive>
        <!--包含的配置文件-->
        <includes>
        </includes>
        <excludes>
        </excludes>
    </configuration>
</plugin>We need to pay attention to the following nodes in the above configuration:
mainClass: We need to specify the main entrance, of course This is not necessary. If there are multiple main entries in the same project, it is only needed when packaging. Only one main entry is actually ignored;
classpathPrefix: Specify to add to the classpath The prefix folder name where the dependent package is located
addClasspath: the dependent package is added to the classpath, the default is true
includes: needs to be included in the jar The files in are generally not configured (note: if the configuration path is inappropriate, the class may be excluded)
excludes: If you are making an external configuration file for the jar package, you need to do this here Use excludes to exclude these configuration files and package them in the jar together.
Use the maven-jar-plugin plug-in to package the project. At this time, you can package it through the maven package command and you can see the jar. There is a lib folder (default), which contains third-party dependency packages introduced in the project. Through java -jar xxx.jar, you can see that the jar is successfully started:

In standard projects, there are generally dev, test, uat, pro and other environments. Different configurations are required for these environments. In springboot, different configurations can be distinguished by application-dev|test|...yml. Just add spring.profiles.active=dev|test... to the default application.yml;
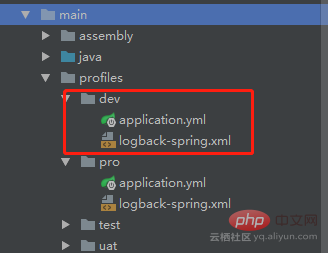
This method has inconveniences, such as local debugging or publishing and online need to be modified back and forth. The active value (of course, when starting through jar, you can also set the command line active parameter) is not very convenient; below, configure profiles in the pom, and then select the configuration used for startup by clicking on the idea interface; first, in the main layer Create the configuration file directory with the following structure:

In order to distinguish the tests, server.port is set for different environment configuration files to specify different ports (dev: 3082, pro: 3182)
Then, configure the following profiles information in the parent pom:
<profiles>
        <profile>
            <id>dev</id>
            <!--默认运行配置-->
            <activation>
                <activeByDefault>true</activeByDefault>
            </activation>
            <properties>
                <activeProfile>dev</activeProfile>
            </properties>
        </profile>
        <profile>
            <id>test</id>
            <properties>
                <activeProfile>test</activeProfile>
            </properties>
        </profile>
        <profile>
            <id>uat</id>
            <properties>
                <activeProfile>uat</activeProfile>
            </properties>
        </profile>
        <profile>
            <id>pro</id>
            <properties>
                <activeProfile>pro</activeProfile>
            </properties>
        </profile>
</profiles>Node description:
activeByDefault :Set as the default running configuration
activeProfile: The selected startup configuration, its value corresponds to the dev|test|pro folder under the profiles created above
Then, add the resources node configuration to the build in the pom:
<resources>
    <!--指定所使用的配置文件目录-->
    <resource>
        <directory>src/main/profiles/${activeProfile}</directory>
    </resource>
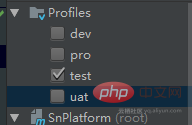
</resources>At this moment our configuration is complete. Under normal circumstances, the maven module on the idea can see such a picture. Surface:

At this time, we only need to check these buttons. Whether it is debugging or final packaging, follow this to obtain the required configuration files.
The above is the detailed content of How to use maven to package and release springboot. For more information, please follow other related articles on the PHP Chinese website!

Hot AI Tools

Undresser.AI Undress
AI-powered app for creating realistic nude photos

AI Clothes Remover
Online AI tool for removing clothes from photos.

Undress AI Tool
Undress images for free

Clothoff.io
AI clothes remover

AI Hentai Generator
Generate AI Hentai for free.

Hot Article

Hot Tools

Notepad++7.3.1
Easy-to-use and free code editor

SublimeText3 Chinese version
Chinese version, very easy to use

Zend Studio 13.0.1
Powerful PHP integrated development environment

Dreamweaver CS6
Visual web development tools

SublimeText3 Mac version
God-level code editing software (SublimeText3)

Hot Topics
 Java Maven build tool advancement: optimizing compilation speed and dependency management
Apr 17, 2024 pm 06:42 PM
Optimize Maven build tools: Optimize compilation speed: Take advantage of parallel compilation and incremental compilation. Optimize dependencies: Analyze dependency trees and use BOM (bill of materials) to manage transitive dependencies. Practical case: illustrate optimizing compilation speed and dependency management through examples.
 How to install Maven on mac
Jan 23, 2024 pm 05:00 PM
Steps to install Maven on mac: 1. Open the terminal; 2. Configure Java environment variables; 3. Install Homebrew; 4. Install Maven; 5. Verify the installation results; 6. Configure environment variables. Detailed introduction: 1. Open the terminal and you can find the terminal in the Utilities folder in the application folder. If you are using MacOS Catalina or higher, you can directly enter "terminal" in the Spotlight search to find it; 2 , configure Java environment variables, etc.
 Avoid common mistakes in Maven environment configuration: Solve configuration problems
Feb 19, 2024 pm 04:56 PM
Maven is a Java project management and build tool that is widely used in the development of Java projects. In the process of using Maven to build projects, you often encounter some common environment configuration problems. This article will answer these common questions and provide specific code examples to help readers avoid common configuration errors. 1. Maven environment variables are incorrectly configured. Problem description: When using Maven, if the environment variables are incorrectly configured, Maven may not work properly. Solution: Make sure
 Guide to setting up Maven local libraries: efficiently manage project dependencies
Feb 19, 2024 am 11:47 AM
Maven local warehouse configuration guide: Easily manage project dependencies. With the development of software development, project dependency package management has become more and more important. As an excellent build tool and dependency management tool, Maven plays a vital role in the project development process. Maven will download project dependencies from the central warehouse by default, but sometimes we need to save some specific dependency packages to the local warehouse for offline use or to avoid network instability. This article will introduce how to configure Maven local warehouse for easy management
 Detailed explanation of Maven Alibaba Cloud image configuration
Feb 21, 2024 pm 10:12 PM
Detailed explanation of Maven Alibaba Cloud image configuration Maven is a Java project management tool. By configuring Maven, you can easily download dependent libraries and build projects. The Alibaba Cloud image can speed up Maven's download speed and improve project construction efficiency. This article will introduce in detail how to configure Alibaba Cloud mirroring and provide specific code examples. What is Alibaba Cloud Image? Alibaba Cloud Mirror is the Maven mirror service provided by Alibaba Cloud. By using Alibaba Cloud Mirror, you can greatly speed up the downloading of Maven dependency libraries. Alibaba Cloud Mirror
 Maven Advanced Tutorial: In-depth exploration of various methods of Jar package import
Feb 23, 2024 pm 02:57 PM
Title: Maven Advanced Tutorial: In-depth exploration of various methods of Jar package import. As a Java project management tool, Maven is widely used in project construction, dependency management, etc. In the actual development process, we often use Jar packages of various third-party libraries, and how to effectively import Jar packages has become a skill that must be mastered. This article will delve into the methods of importing Jar packages in Maven, including using local Jar packages, remote warehouse Jar packages, and custom Jar packages, and give specific details.
 A complete guide to installing and configuring Maven on Mac systems
Jan 28, 2024 am 09:42 AM
Detailed explanation of the methods and techniques of installing Maven on Mac system. As a developer, installing Maven on Mac system is a very common requirement, because Maven is a very popular build tool for managing the dependencies and build process of Java projects. This article will introduce in detail the methods and techniques of installing Maven on Mac system, and provide specific code examples. 1. Download Maven first, you need to download it from the official website (https://maven.apache.org/down
 Smooth build: How to correctly configure the Maven image address
Feb 20, 2024 pm 08:48 PM
Smooth build: How to correctly configure the Maven image address When using Maven to build a project, it is very important to configure the correct image address. Properly configuring the mirror address can speed up project construction and avoid problems such as network delays. This article will introduce how to correctly configure the Maven mirror address and give specific code examples. Why do you need to configure the Maven image address? Maven is a project management tool that can automatically build projects, manage dependencies, generate reports, etc. When building a project in Maven, usually


