Introduction to the usage of core features in ES6 (with examples)
This article brings you an introduction to the usage of core features in ES6 (with examples). It has certain reference value. Friends in need can refer to it. I hope it will be helpful to you.
Although ES6 provides many new features, they are not used frequently in our actual work. According to the 28-20 rule, we should use 80% of our energy and time to do a good job Specializing in these 20% of core features will yield miraculous results with twice the result with half the effort!
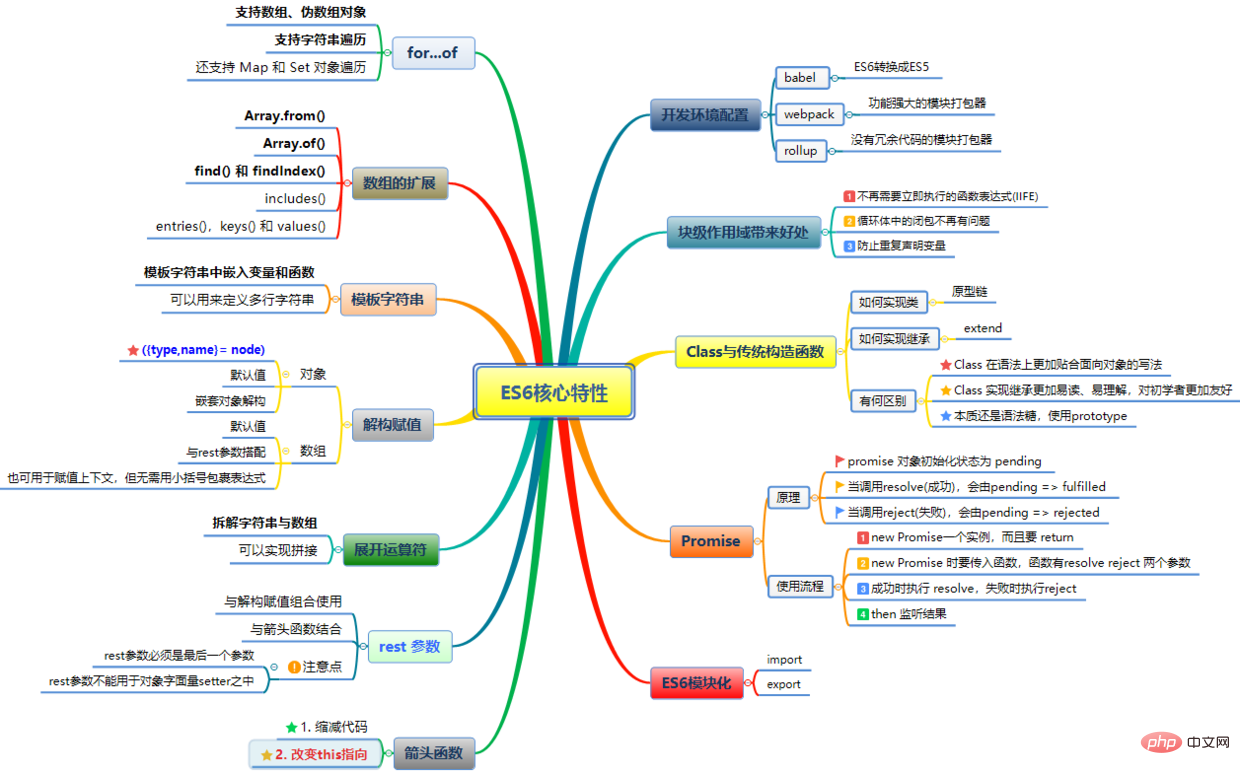
##1. Development environment configuration
This part focuses on Introduction: babel compiles ES6 syntax and how to use webpack to achieve modularity.1.babel
Why do you need babel? ES6 provides many new features, but not all browsers can fully support them. The figure below is a list of ES6 compatibility of various browsers (taking export as an example)
1 2 3 4 5 |
|
1 2 3 4 5 |
|
1 2 3 |
|
1 2 3 4 |
|
Why use WebPack?
Many web pages today can actually be regarded as feature-rich applications. They have complex JavaScript codes and a lot of dependency packages, and rapid modeling tools have emerged. Among them, the webpack function Powerful and loved by people.
The way Webpack works is: treat your project as a whole, through a given main file (such as: index.js), Webpack will find all the dependent files of your project starting from this file, and use loaders to process it They are finally packaged into one (or more) JavaScript files that can be recognized by the browser.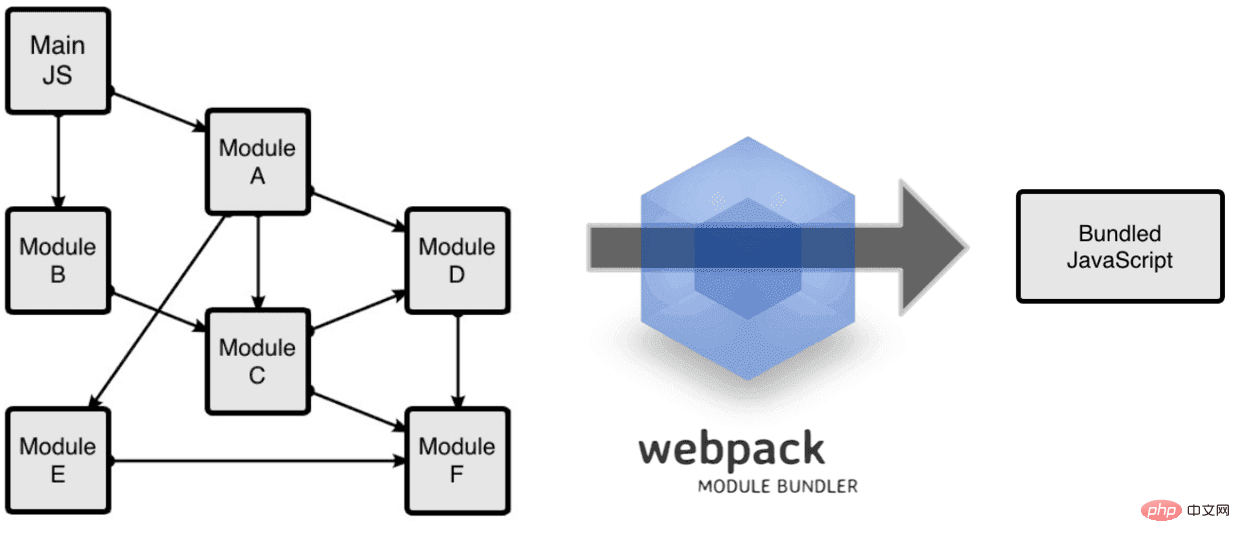
1 2 3 4 |
|
1 2 3 4 5 6 7 8 9 10 11 12 13 14 15 |
|
1 2 3 4 5 |
|
ES5 only has global scope and function scope (for example, we must wrap the code in a function to limit scope), which leads to many problems:
Case 1: Inner variables cover outer variables1 2 3 4 5 6 7 |
|
1 2 |
|
In ES5, we need to construct an immediately executed function expression to ensure that we do not pollute the global scope. In ES6, we can use simpler braces ({}) and then use const or let instead of var to achieve the same effect.
2. Closures in the loop body no longer have problemsIn ES5, if a closure is generated in the loop body and variables outside the closure are accessed, Will cause problems. In ES6, you can use "let" to avoid problems.

ES6 does not allow using let or in the same scope const Repeated declaration of variables with the same name. This is very helpful to prevent duplicate declarations of function expressions in different js libraries.
3. Array expansion1. Array.from(): Convert a pseudo array object or a traversable object into a real array
If all the key names of an object are positive integers or zero and have a length attribute, then the object looks like an array and is called a pseudo array. Typical pseudo-arrays are function arguments objects, most sets of DOM elements, and strings.
1 2 3 4 5 6 7 8 9 10 11 12 |
|
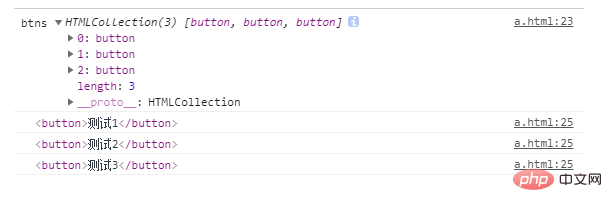
For pseudo arrays, there is no general method for arrays, and direct traversal will cause errors. ES6 adds the Array.from() method to provide a clear and clear way to solve this need.
1 |
|
当调用 new Array( )构造器时,根据传入参数的类型与数量的不同,实际上会导致一些不同的结果, 例如:
1 2 3 4 |
|
1 2 3 4 |
|
当使用单个数值参数来调用 Array 构造器时,数组的长度属性会被设置为该参数。 如果使用多个参数(无论是否为数值类型)来调用,这些参数也会成为目标数组的项。数组的这种行为既混乱又有风险,因为有时可能不会留意所传参数的类型。
ES6 引入了Array.of( )方法来解决这个问题。该方法的作用非常类似Array构造器,但在使用单个数值参数的时候并不会导致特殊结果。Array.of( )方法总会创建一个包含所有传入参数的数组,而不管参数的数量与类型:
1 2 3 4 5 6 7 |
|
Array.of基本上可以用来替代Array()或newArray(),并且不存在由于参数不同而导致的重载,而且他们的行为非常统一。
3.数组实例的 find() 和 findIndex()
数组实例的find方法,用于找出第一个符合条件的数组成员。它的参数是一个回调函数,所有数组成员依次执行该回调函数,直到找出第一个返回值为true的成员,然后返回该成员。如果没有符合条件的成员,则返回undefined。
1 2 3 |
|
4.数组实例的includes()
Array.prototype.includes方法返回一个布尔值,表示某个数组是否包含给定的值。该方法的第二个参数表示搜索的起始位置,默认为0。如果第二个参数为负数,则表示倒数的位置,如果这时它大于数组长度(比如第二个参数为-4,但数组长度为3),则会重置为从0开始。
1 2 3 |
|
没有该方法之前,我们通常使用数组的indexOf方法,检查是否包含某个值。indexOf方法有两个缺点,一是不够语义化,它的含义是找到参数值的第一个出现位置,所以要去比较是否不等于-1,表达起来不够直观。二是,它内部使用严格相等运算符(===)进行判断,这会导致对NaN的误判。
1 2 |
|
5.数组实例的 entries(),keys() 和 values()
ES6 提供entries(),keys()和values(),用于遍历数组。它们都返回一个遍历器对象,可以用for...of循环进行遍历,唯一的区别是keys()是对键名的遍历、values()是对键值的遍历,entries()是对键值对的遍历。
1 2 3 4 5 6 7 8 9 10 11 12 13 14 15 16 17 |
|
四、箭头函数
ES6 允许使用“箭头”(=>)定义函数。它主要有两个作用:缩减代码和改变this指向,接下来我们详细介绍:
1. 缩减代码
1 2 3 4 5 6 7 |
|
多个参数记得加括号
1 |
|
如果箭头函数的代码块部分多于一条语句,就要使用大括号将它们括起来,并且使用return语句返回。
1 2 3 4 |
|
由于大括号被解释为代码块,所以如果箭头函数直接返回一个对象,必须在对象外面加上括号,否则会报错。
1 2 3 4 |
|
此外还有个好处就是简化回调函数
1 2 3 4 5 6 |
|
2. 改变this指向
长期以来,JavaScript 语言的this对象一直是一个令人头痛的问题,在对象方法中使用this,必须非常小心。箭头函数”绑定”this,很大程度上解决了这个困扰。我们不妨先看一个例子:
1 2 3 4 5 6 7 8 9 10 |
|
teamSummary函数里面又嵌了个函数,这导致内部的this的指向发生了错乱。
那如何修改:
方法一、let self = this
1 2 3 4 5 6 7 8 9 10 11 |
|
方法二、bind函数
1 2 3 4 5 6 7 8 9 10 11 |
|
方法三、 箭头函数
1 2 3 4 5 6 7 8 9 10 11 |
|
3.使用注意点
(1)函数体内的this对象,就是定义时所在的对象,而不是使用时所在的对象。
(2)不可以当作构造函数,也就是说,不可以使用new命令,否则会抛出一个错误。
(3)不可以使用arguments对象,该对象在函数体内不存在。如果要用,可以用 rest 参数代替。
(4)不可以使用yield命令,因此箭头函数不能用作 Generator 函数。
五、rest 参数
ES6 引入 rest 参数(形式为...变量名),用于获取函数的多余参数,这样就不需要使用arguments对象了。
rest 参数搭配的变量是一个数组,该变量将多余的参数放入数组中。
我们举个例子:如何实现一个求和函数?
传统写法:
1 2 3 4 5 6 7 |
|
ES6写法:
1 2 3 4 5 6 |
|
也可以与解构赋值组合使用
1 2 3 4 5 |
|
rest 参数还可以与箭头函数结合
1 2 |
|
注意:①每个函数最多只能声明一个rest参数,而且 rest参数必须是最后一个参数,否则报错。
②rest参数不能用于对象字面量setter之中
1 2 3 4 5 |
|
六、展开运算符
与剩余参数关联最密切的就是扩展运算符。剩余参数允许你把多个独立的参数合并到一个数组中;而扩展运算符则允许将一个数组分割,并将各个项作为分离的参数传给函数。
当用在字符串或数组前面时称为扩展运算符,个人觉得可以理解为rest参数的逆运算,用于将数组或字符串进行拆解。有些时候,函数不允许传入数组,此时使用展开运算符就很方便,不信的话,咱们看个例子:Math.max()方法,它接受任意数量的参数,并会返回其中的最大值。
1 2 3 |
|
但若想处理数组中的值,此时该如何找到最大值?Math.max()方法并不允许你传入一个数组。其实你可以像使用rest参数那样在该数组前添加...,并直接将其传递给 Math.max()
1 2 3 |
|
扩展运算符还可以与其他参数混用
1 2 |
|
扩展运算符拆解字符串与数组
1 2 3 4 |
|
还可以实现拼接
1 2 3 4 5 |
|
七、解构赋值----更方便的数据访问
ES6 新增了解构,这是将一个数据结构分解为更小的部分的过程。
1.解构为何有用?
在ES5及更早版本中,从对象或数组中获取信息、并将特定数据存入本地变量,需要书写许多并且相似的代码。例如:
1 2 3 4 5 6 7 |
|
此代码提取了expense对象的type与amount值,并将其存在同名的本地变量上。虽然 这段代码看起来简单,但想象一下若有大量变量需要处理,你就必须逐个为其赋值;并且若有一个嵌套的数据结构需要遍历以寻找信息,你可能会为了一点数据而挖掘整个结构。
这就是ES6为何要给对象与数组添加解构。当把数据结构分解为更小的部分时,从中提取你要的数据会变得容易许多。
2.对象
上个例子中如果采用对象解构的方法,就很容易获取expense对象的type与amount值。
1 2 |
|
我们再来看个例子:
1 2 3 4 5 |
|
注意:你必须用圆括号包裹解构赋值语句,这是因为暴露的花括号会被解析为代码块语句,而块语句不允许在赋值操作符(即等号)左侧出现。圆括号标示了里面的花括号并不是块语句、而应该被解释为表达式,从而允许完成赋值操作。
默认值:
可以选择性地定义一个默认值,以便在指定属性不存在时使用该值。若要这么做,需要在 属性名后面添加一个等号并指定默认值,就像这样:
1 2 3 4 5 6 7 8 9 10 11 12 |
|
嵌套对象解构:
使用类似于对象字面量的语法,可以深入到嵌套的对象结构中去提取你想要的数据。
1 2 3 4 5 6 7 8 9 10 11 12 13 14 15 16 17 |
|
本例中的解构模式使用了花括号,表示应当下行到node对象的loc属性内部去寻找start属性。
必须传值的解构参数
1 2 3 4 5 6 7 8 9 |
|
在此函数内,name与value参数是必需的,而secure、path、domain与expires则不是。默认情况下调用函数时未给参数解构传值会抛出错误。像上例中如果setCookie不传第三个参数,就会报错。若解构参数是可选的,可以给解构的参数提供默认值来处理这种错误。
1 2 3 4 5 6 7 |
|
3.数组
1 2 3 4 5 |
|
用{}解构返回数组个数
1 2 |
|
数组解构也可以用于赋值上下文,但不需要用小括号包裹表达式。这点跟对象解构的约定不同。
1 2 3 4 5 6 |
|
默认值:数组解构赋值同样允许在数组任意位置指定默认值。当指定位置的项不存在、或其值为undefined,那么该默认值就会被使用。
1 2 3 4 |
|
与rest参数搭配
在ES5中常常使用concat()方法来克隆数组,例如:
1 2 3 4 |
|
在ES6中,你可以使用剩余项的语法来达到同样效果
1 2 3 4 |
|
接下我们看个例子:如何将数组转化为对象
1 2 3 4 5 6 7 8 9 10 11 12 13 14 15 16 17 18 19 20 |
|
混合解构
1 2 3 4 5 6 7 8 9 10 11 12 13 |
|
4.注意点
当使用解构来配合var、let、const来声明变量时,必须提供初始化程序(即等号右边的值)。下面的代码都会因为缺失初始化程序而抛出语法错误:
1 2 3 |
|
八、模板字符串(template string)
模板字符串是增强版的字符串,用反引号(`)标识。**它可以当作普通字符串使用,也可以用来定义多行字符串,或者在字符串中嵌入变量。
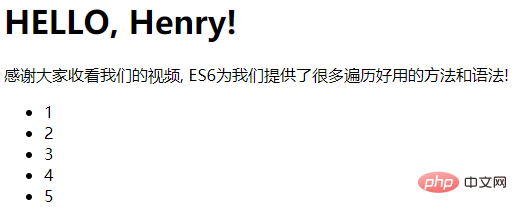
模板字符串中嵌入变量和函数,需要将变量名写在${}之中。**
1 2 3 4 5 6 7 8 9 |
|
- 1
- 2
- 3
- 4
- 5
再举个例子,工作中常用到ElementUI库,在自定义一个弹出框时,使用模板字符串就很方便:
1 2 3 4 5 6 7 8 |
|
九、Class 和传统构造函数有何区别
从概念上讲,在 ES6 之前的 JS
中并没有和其他面向对象语言那样的“类”的概念。长时间里,人们把使用 new 关键字通过函数(也叫构造器)构造对象当做“类”来使用。由于 JS
不支持原生的类,而只是通过原型来模拟,各种模拟类的方式相对于传统的面向对象方式来说非常混乱,尤其是处理当子类继承父类、子类要调用父类的方法等等需求时。
ES6提供了更接近传统语言的写法,引入了Class(类)这个概念,作为对象的模板。通过class关键字,可以定义类。但是类只是基于原型的面向对象模式的语法糖。
对比在传统构造函数和 ES6 中分别如何实现类:
1 2 3 4 5 6 7 8 9 10 |
|
1 2 3 4 5 6 7 8 9 10 11 12 |
|
这两者有什么联系?其实这两者本质是一样的,只不过是语法糖写法上有区别。所谓语法糖是指计算机语言中添加的某种语法,这种语法对语言的功能没有影响,但是更方便程序员使用。比如这里class语法糖让程序更加简洁,有更高的可读性。
1 2 |
|
对比在传统构造函数和 ES6 中分别如何实现继承:
1 2 3 4 5 6 7 8 9 10 11 12 13 14 15 |
|
1 2 3 4 5 6 7 8 9 10 11 12 13 14 15 16 17 18 19 20 21 |
|
Class之间可以通过extends关键字实现继承,这比ES5的通过修改原型链实现继承,要清晰和方便很多。
Class 和传统构造函数有何区别
Class 在语法上更加贴合面向对象的写法
Class 实现继承更加易读、易理解,对初学者更加友好
本质还是语法糖,使用prototype
十、Promise的基本使用和原理
在JavaScript的世界中,所有代码都是单线程执行的。由于这个“缺陷”,导致JavaScript的所有网络操作,浏览器事件,都必须是异步执行。Promise 是异步编程的一种解决方案,比传统的解决方案(回调函数和事件)更合理和更强大。
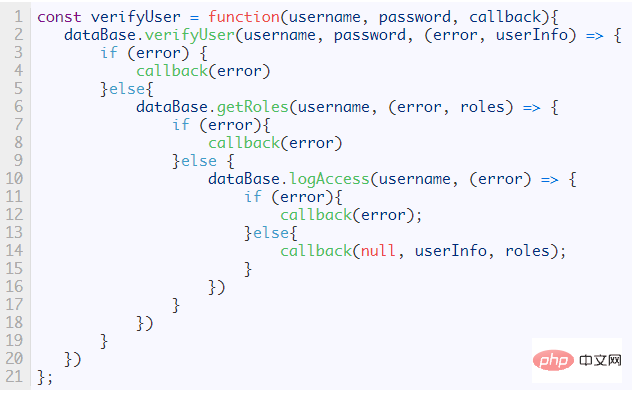
ES6中的promise的出现给我们很好的解决了回调地狱的问题,所谓的回调地狱是指当太多的异步步骤需要一步一步执行,或者一个函数里有太多的异步操作,这时候就会产生大量嵌套的回调,使代码嵌套太深而难以阅读和维护。ES6认识到了这点问题,现在promise的使用,完美解决了这个问题。
Promise原理
一旦状态改变,就不会再变,任何时候都可以得到这个结果。Promise对象的状态改变,只有两种可能:从pending变为fulfilled和从pending变为rejected。promise 对象初始化状态为 pending ;当调用resolve(成功),会由pending => fulfilled ;当调用reject(失败),会由pending => rejected。具体流程见下图:
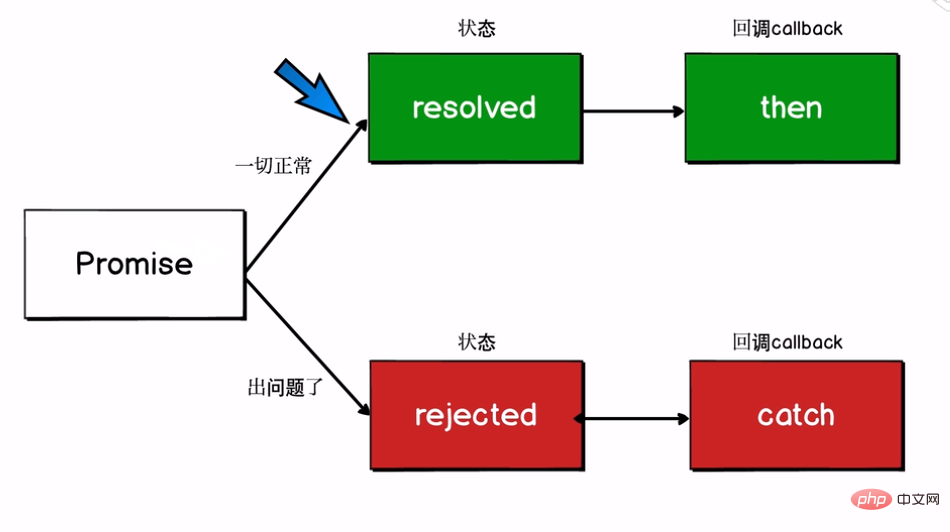
Promise的使用流程
new Promise一个实例,而且要 return
new Promise 时要传入函数,函数有resolve reject 两个参数
成功时执行 resolve,失败时执行reject
then 监听结果
1 2 3 4 5 6 7 8 9 10 11 12 13 14 15 16 17 18 19 20 21 22 23 |
|
promise会让代码变得更容易维护,像写同步代码一样写异步代码,同时业务逻辑也更易懂。
十一、Iterator 和 for...of 循环
JavaScript 原有的表示“集合”的数据结构,主要是数组(Array)和对象(Object),ES6 又添加了Map和Set。这样就需要一种统一的接口机制,来处理所有不同的数据结构。遍历器(Iterator)就是这样一种机制。它是一种接口,为各种不同的数据结构提供统一的访问机制。任何数据结构只要部署 Iterator 接口,就可以完成遍历操作(即依次处理该数据结构的所有成员)。
1.Iterator的作用:
为各种数据结构,提供一个统一的、简便的访问接口;
使得数据结构的成员能够按某种次序排列
ES6创造了一种新的遍历命令for...of循环,Iterator接口主要供for...of消费。
2.原生具备iterator接口的数据(可用for of遍历)
Array
set容器
map容器
String
函数的 arguments 对象
NodeList 对象
1 2 3 4 |
|
1 2 3 4 |
|
1 2 3 4 5 6 7 |
|
3.几种遍历方式比较
for of 循环不仅支持数组、大多数伪数组对象,也支持字符串遍历,此外还支持 Map 和 Set 对象遍历。
for in循环可以遍历字符串、对象、数组,不能遍历Set/Map
forEach 循环不能遍历字符串、对象,可以遍历Set/Map
十二、ES6模块化
ES6 在语言标准的层面上,实现了模块功能,而且实现得相当简单,旨在成为浏览器和服务器通用的模块解决方案。其模块功能主要由两个命令构成:export和import。export命令用于规定模块的对外接口,import命令用于输入其他模块提供的功能。
1 2 3 4 5 6 7 8 9 10 11 |
|
如上例所示,使用import命令的时候,用户需要知道所要加载的变量名或函数名,否则无法加载。为了给用户提供方便,让他们不用阅读文档就能加载模块,就要用到export default命令,为模块指定默认输出。
1 2 3 4 |
|
上面代码是一个模块文件export-default.js,它的默认输出是一个函数。
其他模块加载该模块时,import命令可以为该匿名函数指定任意名字。
1 2 3 |
|
上面代码的import命令,可以用任意名称指向export-default.js输出的方法,这时就不需要知道原模块输出的函数名。需要注意的是,这时import命令后面,不使用大括号。
The above is the detailed content of Introduction to the usage of core features in ES6 (with examples). For more information, please follow other related articles on the PHP Chinese website!

Hot AI Tools

Undresser.AI Undress
AI-powered app for creating realistic nude photos

AI Clothes Remover
Online AI tool for removing clothes from photos.

Undress AI Tool
Undress images for free

Clothoff.io
AI clothes remover

Video Face Swap
Swap faces in any video effortlessly with our completely free AI face swap tool!

Hot Article

Hot Tools

Notepad++7.3.1
Easy-to-use and free code editor

SublimeText3 Chinese version
Chinese version, very easy to use

Zend Studio 13.0.1
Powerful PHP integrated development environment

Dreamweaver CS6
Visual web development tools

SublimeText3 Mac version
God-level code editing software (SublimeText3)

Hot Topics
 1393
1393
 52
52
 1205
1205
 24
24
 Table Border in HTML
Sep 04, 2024 pm 04:49 PM
Guide to Table Border in HTML. Here we discuss multiple ways for defining table-border with examples of the Table Border in HTML.
 Nested Table in HTML
Sep 04, 2024 pm 04:49 PM
This is a guide to Nested Table in HTML. Here we discuss how to create a table within the table along with the respective examples.
 HTML margin-left
Sep 04, 2024 pm 04:48 PM
Guide to HTML margin-left. Here we discuss a brief overview on HTML margin-left and its Examples along with its Code Implementation.
 HTML Table Layout
Sep 04, 2024 pm 04:54 PM
Guide to HTML Table Layout. Here we discuss the Values of HTML Table Layout along with the examples and outputs n detail.
 HTML Input Placeholder
Sep 04, 2024 pm 04:54 PM
Guide to HTML Input Placeholder. Here we discuss the Examples of HTML Input Placeholder along with the codes and outputs.
 Moving Text in HTML
Sep 04, 2024 pm 04:45 PM
Guide to Moving Text in HTML. Here we discuss an introduction, how marquee tag work with syntax and examples to implement.
 HTML Ordered List
Sep 04, 2024 pm 04:43 PM
Guide to the HTML Ordered List. Here we also discuss introduction of HTML Ordered list and types along with their example respectively
 HTML onclick Button
Sep 04, 2024 pm 04:49 PM
Guide to HTML onclick Button. Here we discuss their introduction, working, examples and onclick Event in various events respectively.


