 Web Front-end
 H5 Tutorial
 How to use HTML5 to implement drag-and-drop functionality for multiple elements
How to use HTML5 to implement drag-and-drop functionality for multiple elements
By using the drag and drop function of HTML5 we can drag and drop HTML page elements. In Previous article, we introduced the code that can drag and drop a single element. In the next article, we will introduce the code that allows multiple elements to be dragged and dropped.

Without further ado, let’s look directly at the example
Example 1: Drag and drop multiple elements using UL tags
The code is as follows:
ListDragDrop.html
<!DOCTYPE html>
<html>
<head>
<meta charset="utf-8" />
<title></title>
<link rel="stylesheet" href="ListDragDrop.css"/>
<script>
function load() {
var delbox = document.getElementById('del');
delbox.addEventListener('dragover', onDragOver, false);
delbox.addEventListener('drop', onDrop, false);
var elems = document.querySelectorAll('ul#list1 > li');
for (var i = 0; i < elems.length; i++) {
el = elems[i];
el.setAttribute('draggable', 'true');
el.addEventListener('dragstart', onDragStart, false);
}
}
function onDragStart(e) {
e.dataTransfer.effectAllowed = 'copy';
e.dataTransfer.setData('text', this.id);
}
function onDragOver(e) {
e.preventDefault();
}
function onDrop(e) {
if (e.stopPropagation) e.stopPropagation();
var eid = e.dataTransfer.getData('text');
var elem = document.getElementById(eid);
elem.parentNode.removeChild(elem);
}
</script>
</head>
<body onload="load();">
<div id="del">删除</div>
<ul id="list1">
<li id="1">海豚</li>
<li id="2">鲸鱼</li>
<li id="3">企鹅</li>
<li id="4">北极熊</li>
<li id="5">雪狐</li>
</ul>
</ul>
</body>
</html>ListDragDrop.css
#del{
  width:120px;
  height:60px;
  border: solid 2px #ff6a00;
  }
ul#list1 > li {
  display: block;
  width: 150px;
  border: 1px solid #808080;
}Description:
Execute the loading function when the page is loaded. The following code in the load function assigns the dragover and drop events to the [Delete] div. When an element is dragged to the Delete box, the onDragOver function is called, and when it is deleted, the onDrop function is called.
var delbox = document.getElementById('del');
  delbox.addEventListener('dragover', onDragOver, false);
  delbox.addEventListener('drop', onDrop, false);
Call the querySelectorAll method to get the li element in the ul tag. The for loop repeatedly processes the array of elements obtained in and sets the "draggable" attribute of each element to true. This process sets it as a draggable object. It also assigns a dragstart event.
var elems = document.querySelectorAll('ul#list1 > li');
for (var i = 0; i < elems.length; i++) {
el = elems[i];
el.setAttribute('draggable', 'true');
el.addEventListener('dragstart', onDragStart, false);
}When dragging a list item, the following onDragStart function will be called. Call the setData method of the dataTransfer object to store the ID of the element in the dataTransfer object.
function onDragStart(e) {
      e.dataTransfer.effectAllowed = 'copy';
      e.dataTransfer.setData('text', this.id);
}When an item in the list is dragged in the drag and drop area, the following onDragOver function will be called. Since DragOver has no special handling, it calls the PreventDefault method to cancel the event.
function onDragOver(e) {
      e.preventDefault();
}If the item of the list is deleted within the drag and drop area, the onDrop function can be called. Call the stopPropagation method to cancel event processing. Then we get the ID from the dataTransfer object. By getting the ID, you can get the dropped element in the drop zone. Call the getElementById method and get the LI-tagged object from the ID. By accessing the parent node using the parentNode property of the obtained LI object, calling the removeChild method, the items of the discarded list are removed.
function onDrop(e) {
if (e.stopPropagation) e.stopPropagation();
var eid = e.dataTransfer.getData('text');
var elem = document.getElementById(eid);
      elem.parentNode.removeChild(elem);
}Running results:
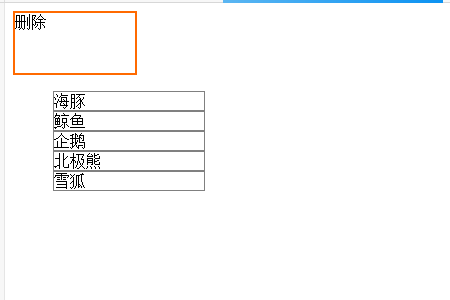
Use a web browser to display the above HTML file. The effect shown below will be displayed.

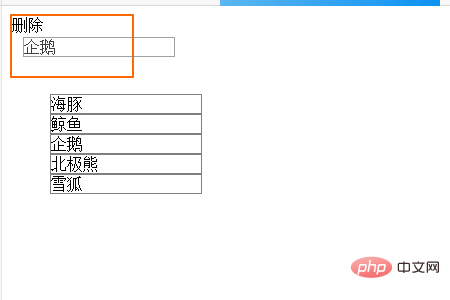
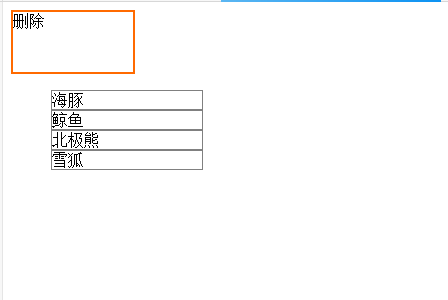
#Items in the list at the bottom of the page can be dragged. For example, drag the item "Penguin" to the delete area, and then there will be no third item "Penguin" in the list items below. The specific effect is as shown in the figure below


# Dragging other items has the same effect, and all five items can be deleted.
The above is the detailed content of How to use HTML5 to implement drag-and-drop functionality for multiple elements. For more information, please follow other related articles on the PHP Chinese website!

Hot AI Tools

Undresser.AI Undress
AI-powered app for creating realistic nude photos

AI Clothes Remover
Online AI tool for removing clothes from photos.

Undress AI Tool
Undress images for free

Clothoff.io
AI clothes remover

AI Hentai Generator
Generate AI Hentai for free.

Hot Article

Hot Tools

Notepad++7.3.1
Easy-to-use and free code editor

SublimeText3 Chinese version
Chinese version, very easy to use

Zend Studio 13.0.1
Powerful PHP integrated development environment

Dreamweaver CS6
Visual web development tools

SublimeText3 Mac version
God-level code editing software (SublimeText3)

Hot Topics
 1386
1386
 52
52
 How to run the h5 project
Apr 06, 2025 pm 12:21 PM
Running the H5 project requires the following steps: installing necessary tools such as web server, Node.js, development tools, etc. Build a development environment, create project folders, initialize projects, and write code. Start the development server and run the command using the command line. Preview the project in your browser and enter the development server URL. Publish projects, optimize code, deploy projects, and set up web server configuration.
 What exactly does H5 page production mean?
Apr 06, 2025 am 07:18 AM
H5 page production refers to the creation of cross-platform compatible web pages using technologies such as HTML5, CSS3 and JavaScript. Its core lies in the browser's parsing code, rendering structure, style and interactive functions. Common technologies include animation effects, responsive design, and data interaction. To avoid errors, developers should be debugged; performance optimization and best practices include image format optimization, request reduction and code specifications, etc. to improve loading speed and code quality.
 How to make h5 click icon
Apr 06, 2025 pm 12:15 PM
The steps to create an H5 click icon include: preparing a square source image in the image editing software. Add interactivity in the H5 editor and set the click event. Create a hotspot that covers the entire icon. Set the action of click events, such as jumping to the page or triggering animation. Export H5 documents as HTML, CSS, and JavaScript files. Deploy the exported files to a website or other platform.
 What is the H5 programming language?
Apr 03, 2025 am 12:16 AM
H5 is not a standalone programming language, but a collection of HTML5, CSS3 and JavaScript for building modern web applications. 1. HTML5 defines the web page structure and content, and provides new tags and APIs. 2. CSS3 controls style and layout, and introduces new features such as animation. 3. JavaScript implements dynamic interaction and enhances functions through DOM operations and asynchronous requests.
 What application scenarios are suitable for H5 page production
Apr 05, 2025 pm 11:36 PM
H5 (HTML5) is suitable for lightweight applications, such as marketing campaign pages, product display pages and corporate promotion micro-websites. Its advantages lie in cross-platformity and rich interactivity, but its limitations lie in complex interactions and animations, local resource access and offline capabilities.
 How to make pop-up windows with h5
Apr 06, 2025 pm 12:12 PM
H5 pop-up window creation steps: 1. Determine the triggering method (click, time, exit, scroll); 2. Design content (title, text, action button); 3. Set style (size, color, font, background); 4. Implement code (HTML, CSS, JavaScript); 5. Test and deployment.
 Is H5 page production a front-end development?
Apr 05, 2025 pm 11:42 PM
Yes, H5 page production is an important implementation method for front-end development, involving core technologies such as HTML, CSS and JavaScript. Developers build dynamic and powerful H5 pages by cleverly combining these technologies, such as using the <canvas> tag to draw graphics or using JavaScript to control interaction behavior.
 What Does H5 Refer To? Exploring the Context
Apr 12, 2025 am 12:03 AM
H5referstoHTML5,apivotaltechnologyinwebdevelopment.1)HTML5introducesnewelementsandAPIsforrich,dynamicwebapplications.2)Itsupportsmultimediawithoutplugins,enhancinguserexperienceacrossdevices.3)SemanticelementsimprovecontentstructureandSEO.4)H5'srespo


