Detailed steps for Laravel to implement API user authorization using JWT
The content of this article is about the detailed steps for Laravel to use JWT to implement API user authorization. It has certain reference value. Friends in need can refer to it. I hope it will be helpful to you.
Part 1 Installing JWT
The first step. Use Composer to install tymon/jwt-auth:
`composer require tymon/jwt -auth 1.0.0-rc.3
Step 2. Add the service provider (Laravel 5.4 and below, no need to add 5.5 and above),
Add the following line Go to the providers array of the config/app.php file:
<?php // 文件:app.php 'providers' => [ // other code Tymon\JWTAuth\Providers\LaravelServiceProvider::class, ]
Step 3. Publish the configuration file,
Run the following command to publish the jwt-auth configuration file:
php artisan vendor:publish --provider="Tymon\JWTAuth\Providers\LaravelServiceProvider"
Step 4. Generate the key,
This command will add a new line to your .env file JWT_SECRET=secret.
php artisan jwt:secret
The second part starts the configuration
The fifth step. Configure Auth guard, `
In config/auth .php file, you need to update guards/driver to jwt,
This can only be used when using Laravel 5.2 and above.
<?php 'defaults' => [ 'guard' => 'api', 'passwords' => 'users', ], // other code 'guards' => [ 'api' => [ 'driver' => 'jwt', 'provider' => 'users', ], ],
Step 6. Change the User Model,
Implement the TymonJWTAuthContractsJWTSubject interface on the User Model,
Implement the two methods getJWTIdentifier() and getJWTCustomClaims().
<?php namespace App;

use Tymon\JWTAuth\Contracts\JWTSubject;

class User extends Authenticatable implements JWTSubject
{
    // other code

    // Rest omitted for brevity

    /**
     * Get the identifier that will be stored in the subject claim of the JWT.
     *
     * @return mixed
     */
    public function getJWTIdentifier()
    {
        return $this->getKey();
    }

    /**
     * Return a key value array, containing any custom claims to be added to the JWT.
     *
     * @return array
     */
    public function getJWTCustomClaims()
    {
        return [];
    }
}Part 3 Quickly create DEMO test
Step 7. Add some basic authentication routes:
<?php Route::group([
'middleware' => 'api',
'prefix' => 'auth'
], function ($router) {
Route::post('login', 'AuthController@login');
Route::post('register', 'AuthController@register');
Route::post('logout', 'AuthController@logout');
Route::post('refresh', 'AuthController@refresh');
Route::post('me', 'AuthController@me');
});Step 8. Create AuthController controller=> php artisan make:controller AuthController:<?php namespace App\Http\Controllers;
use App\User;
use Illuminate\Http\Request;
use Illuminate\Support\Facades\Validator;
class AuthController extends Controller
{
/**
* Create a new AuthController instance.
*
* @return void
*/
public function __construct()
{
$this->middleware('auth:api', ['except' => ['login', 'register']]);
}
/**
* 用户使用邮箱密码获取JWT Token.
*
* @return \Illuminate\Http\JsonResponse
*/
public function login()
{
$credentials = request(['email', 'password']);
if (! $token = auth()->attempt($credentials)) {
return response()->json(['error' => 'Unauthorized'], 401);
}
return $this->respondWithToken($token);
}
/**
* 注册新用户
*/
public function register(Request $request)
{
// 数据校验
// 数据验证
$validator = Validator::make($request->all(), [
'name' => 'required',
'email' => 'required|email',
'password' => 'required',
'c_password' => 'required|same:password'
]);
if ($validator->fails()) {
return response()->json(['error'=>$validator->errors()], 401);
}
// 读取参数并保存数据
$input = $request->all();
$input['password'] = bcrypt($input['password']);
$user = User::create($input);
// 创建Token并返回
return $user;
}
/**
* 获取经过身份验证的用户.
*
* @return \Illuminate\Http\JsonResponse
*/
public function me()
{
return response()->json(auth()->user());
}
/**
* 刷新Token.
*
* @return \Illuminate\Http\JsonResponse
*/
public function refresh()
{
return $this->respondWithToken(auth()->refresh());
}
/**
* Get the token array structure.
*
* @param string $token
*
* @return \Illuminate\Http\JsonResponse
*/
protected function respondWithToken($token)
{
return response()->json([
'access_token' => $token,
'token_type' => 'bearer',
'expires_in' => auth()->factory()->getTTL() * 60
]);
}
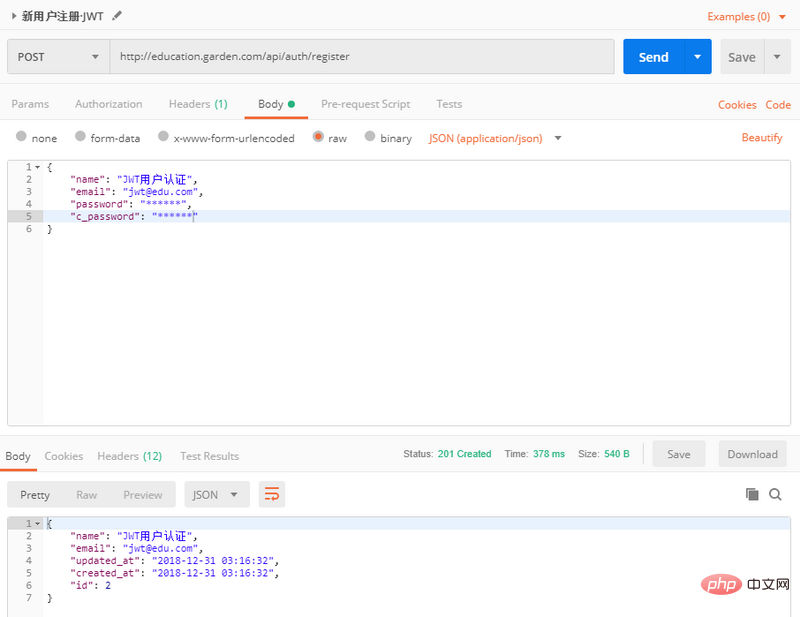
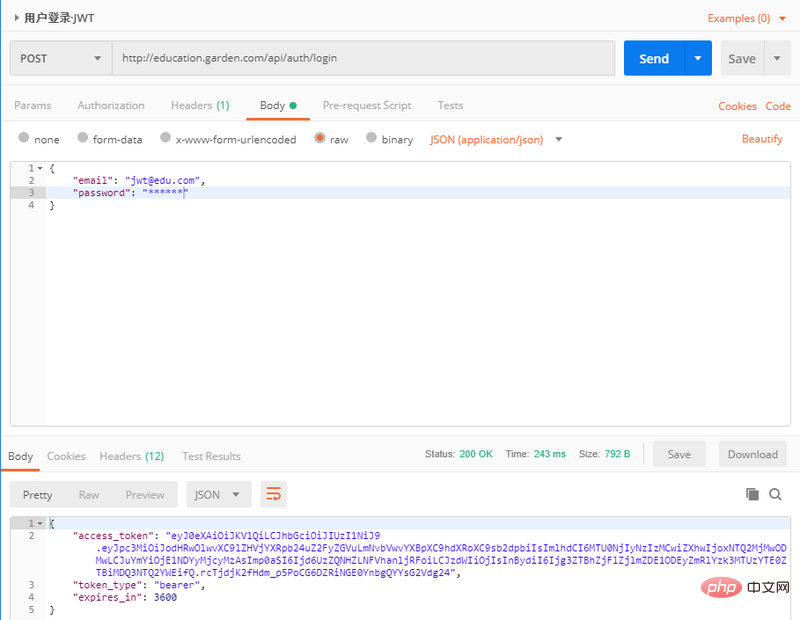
}Step 9. Use Postman to test the API:


To test API data acquisition, you need to add Token in the headers; format
key=Authorization, value=Bearer space token

Token refresh:

The above is the detailed content of Detailed steps for Laravel to implement API user authorization using JWT. For more information, please follow other related articles on the PHP Chinese website!

Hot AI Tools

Undresser.AI Undress
AI-powered app for creating realistic nude photos

AI Clothes Remover
Online AI tool for removing clothes from photos.

Undress AI Tool
Undress images for free

Clothoff.io
AI clothes remover

AI Hentai Generator
Generate AI Hentai for free.

Hot Article

Hot Tools

Notepad++7.3.1
Easy-to-use and free code editor

SublimeText3 Chinese version
Chinese version, very easy to use

Zend Studio 13.0.1
Powerful PHP integrated development environment

Dreamweaver CS6
Visual web development tools

SublimeText3 Mac version
God-level code editing software (SublimeText3)

Hot Topics
 1377
1377
 52
52
 PHP 8.4 Installation and Upgrade guide for Ubuntu and Debian
Dec 24, 2024 pm 04:42 PM
PHP 8.4 brings several new features, security improvements, and performance improvements with healthy amounts of feature deprecations and removals. This guide explains how to install PHP 8.4 or upgrade to PHP 8.4 on Ubuntu, Debian, or their derivati
 CakePHP Date and Time
Sep 10, 2024 pm 05:27 PM
To work with date and time in cakephp4, we are going to make use of the available FrozenTime class.
 Discuss CakePHP
Sep 10, 2024 pm 05:28 PM
CakePHP is an open-source framework for PHP. It is intended to make developing, deploying and maintaining applications much easier. CakePHP is based on a MVC-like architecture that is both powerful and easy to grasp. Models, Views, and Controllers gu
 CakePHP File upload
Sep 10, 2024 pm 05:27 PM
To work on file upload we are going to use the form helper. Here, is an example for file upload.
 CakePHP Creating Validators
Sep 10, 2024 pm 05:26 PM
Validator can be created by adding the following two lines in the controller.
 How To Set Up Visual Studio Code (VS Code) for PHP Development
Dec 20, 2024 am 11:31 AM
Visual Studio Code, also known as VS Code, is a free source code editor — or integrated development environment (IDE) — available for all major operating systems. With a large collection of extensions for many programming languages, VS Code can be c
 CakePHP Quick Guide
Sep 10, 2024 pm 05:27 PM
CakePHP is an open source MVC framework. It makes developing, deploying and maintaining applications much easier. CakePHP has a number of libraries to reduce the overload of most common tasks.
 How do you parse and process HTML/XML in PHP?
Feb 07, 2025 am 11:57 AM
This tutorial demonstrates how to efficiently process XML documents using PHP. XML (eXtensible Markup Language) is a versatile text-based markup language designed for both human readability and machine parsing. It's commonly used for data storage an


