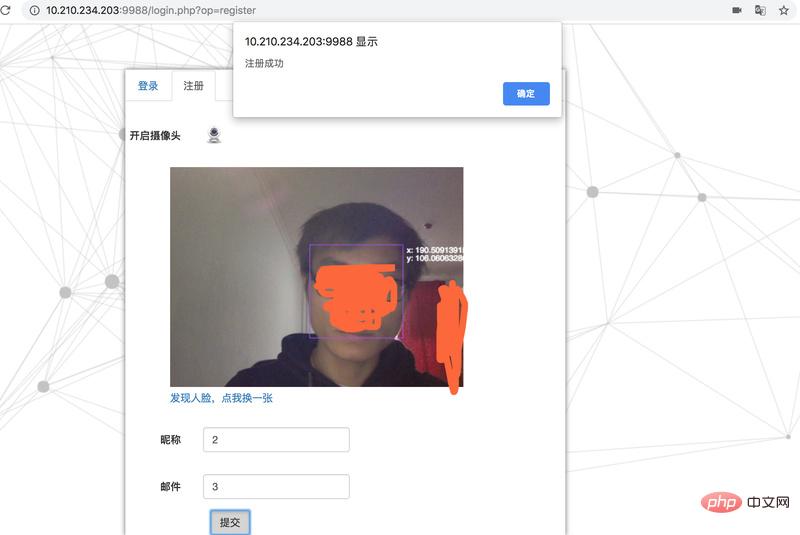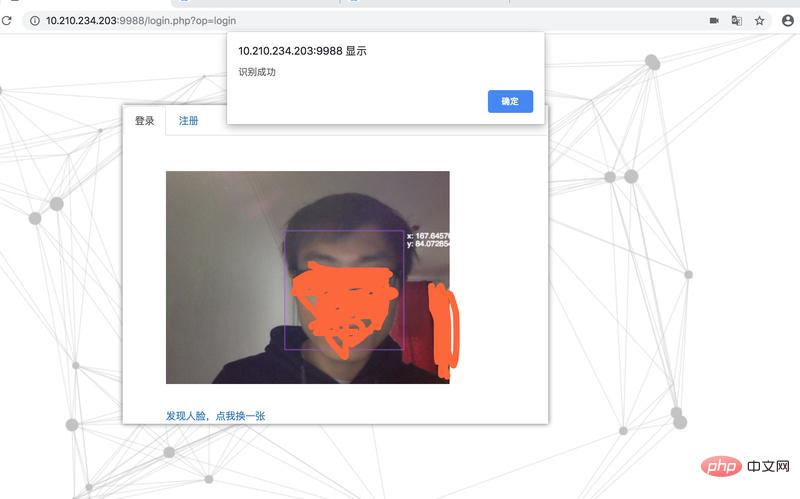
This article mainly introduces the detailed methods of face detection and recognition involved in the system. The system is based on the python2.7.10/opencv2/tensorflow1.7.0 environment and implements the functions of reading video from the camera, detecting faces, and recognizing faces. , that is, implementing a face recognition login system based on mtcnn/facenet/tensorflow.

Because the model file is too large, git cannot upload it. The entire project source code is placed on Baidu Cloud Disk
Address: https://pan. baidu.com/s/1TaalpwQwPTqlCIfXInS_LA
Face recognition is a hot spot in the field of computer vision research. At present, in laboratory environments, many face recognitions have caught up with (exceeded) the accuracy of manual recognition (accuracy rate: 0.9427~0.9920), such as face, DeepID3, FaceNet, etc. (For details, please refer to: Face recognition technology based on deep learning review).
However, due to various factors such as light, angle, expression, age, etc., face recognition technology cannot be widely used in real life. This article is based on the python/opencv/tensorflow environment and uses FaceNet (LFW: 0.9963) to build a real-time face detection and recognition system to explore the difficulties of face recognition systems in real-life applications.
The main content below is as follows:
1. Use the htm5 video tag to open the camera to collect avatars and use the jquery.faceDeaction component to roughly detect faces
2. Upload the face image to the server and use mtcnn to detect the face
3. Use the affine transformation of opencv to align the face and save the aligned face
4. Use The pre-trained facenet embedding the detected faces into 512-dimensional features;
5. Create an efficient annoy index for face embedding features for face detection
Face collection
The html5 video tag can be used to easily read video frames from the camera. The following code implements reading the video frames from the camera. After faceDection recognizes the face Capture the image and upload it to the server. Add video to the html file and canvas tag
<div class="booth">
    <video id="video" width="400" height="300" muted class="abs" ></video>
    <canvas id="canvas" width="400" height="300"></canvas>
</div>Open the webcam
var video = document.getElementById('video'),var vendorUrl = window.URL || window.webkitURL;
//媒体对象
navigator.getMedia = navigator.getUserMedia || navagator.webkitGetUserMedia || navigator.mozGetUserMedia || navigator.msGetUserMedia;
navigator.getMedia({video: true, //使用摄像头对象audio: false  //不适用音频}, function(strem){
    video.src = vendorUrl.createObjectURL(strem);
    video.play();
});Use jquery's facetDection component to detect faces
$('#canvas').faceDetection()
Detect people If you have a face, take a screenshot and convert the image to base64 format for easy uploading
context.drawImage(video, 0, 0, video.width, video.height);
var base64 = canvas.toDataURL('images/png');
Upload the image in base64 format to the server
//上传人脸图片
function upload(base64) {
  $.ajax({
      "type":"POST",
      "url":"/upload.php",
      "data":{'img':base64},
      'dataType':'json',
      beforeSend:function(){},
      success:function(result){
          console.log(result)
          img_path = result.data.file_path
      }
  });
}The image server accepts the code and is implemented in PHP language
function base64_image_content($base64_image_content,$path){
    //匹配出图片的格式
    if (preg_match('/^(data:\s*image\/(\w+);base64,)/', $base64_image_content, $result)){
        $type = $result[2];
        $new_file = $path."/";
        if(!file_exists($new_file)){
            //检查是否有该文件夹,如果没有就创建,并给予最高权限
            mkdir($new_file, 0700,true);
        }
        $new_file = $new_file.time().".{$type}";
        if (file_put_contents($new_file, base64_decode(str_replace($result[1], '', $base64_image_content)))){
            return $new_file;
        }else{
            return false;
        }
    }else{
        return false;
    }
}Face Detection
There are many face detection methods, such as the face Haar feature classifier and dlib face detection method that come with opencv. The face detection method of opencv is simple and fast; the problem is that the face detection effect is not good. This method can detect faces that are frontal/vertical/with good lighting, while faces that are sideways/skewed/with poor lighting cannot be detected.
Therefore, this method is not suitable for field application. For the dlib face detection method, the effect is better than the opencv method, but the detection intensity is also difficult to meet the field application standards.
In this article, we use the mtcnn face detection system (mtcnn: Joint Face Detection and Alignment using Multi-task Cascaded Convolutional Neural Networks) based on deep learning methods.
The mtcnn face detection method is more robust to changes in light, angle and facial expression in the natural environment, and has better face detection results; at the same time, it consumes little memory and can achieve real-time face detection.
The mtcnn used in this article is based on the implementation of python and tensorflow (the code comes from davidsandberg, the caffe implementation code can be found at: kpzhang93)
model= os.path.abspath(face_comm.get_conf('mtcnn','model'))
class Detect:
    def __init__(self):
        self.detector = MtcnnDetector(model_folder=model, ctx=mx.cpu(0), num_worker=4, accurate_landmark=False)
    def detect_face(self,image):
        img = cv2.imread(image)
        results =self.detector.detect_face(img)
        boxes=[]
        key_points = []
        if results is not None:
            #box框
            boxes=results[0]
            #人脸5个关键点
            points = results[1]
            for i in results[0]:
                faceKeyPoint = []
                for p in points:
                    for i in range(5):
                        faceKeyPoint.append([p[i], p[i + 5]])
                key_points.append(faceKeyPoint)
return {"boxes":boxes,"face_key_point":key_points}For specific code, please refer to fcce_detect.py
Face Alignment
Sometimes the faces and avatars we capture may be crooked. In order to improve the quality of detection, we need to correct the faces to the same standard position. , this position is defined by us. Assume that the standard detection avatar we set is like this

Assume that the coordinates of the three points of the eyes and nose are a(10,30 ) b(20,30) c(15,45), for specific settings, please refer to the config.ini file alignment block configuration item
Use opencv affine transformation for alignment and obtain the affine transformation matrix
dst_point=【a,b,c】
tranform = cv2.getAffineTransform(source_point, dst_point)
Affine transformation:
img_new = cv2.warpAffine(img, tranform, imagesize)
For specific code, refer to the face_alignment.py file
Generate features
after alignment The avatar is put into the pre-trained facenet to embedding the detected face, embedding it into 512-dimensional features, and saving it in the lmdb file in the form of (id, vector)
facenet.load_model(facenet_model_checkpoint)
 images_placeholder = tf.get_default_graph().get_tensor_by_name("input:0")
 embeddings = tf.get_default_graph().get_tensor_by_name("embeddings:0")
 phase_train_placeholder = tf.get_default_graph().get_tensor_by_name("phase_train:0")

 face=self.dectection.find_faces(image)
 prewhiten_face = facenet.prewhiten(face.image)
 # Run forward pass to calculate embeddings
 feed_dict = {images_placeholder: [prewhiten_face], phase_train_placeholder: False}
return self.sess.run(embeddings, feed_dict=feed_dict)[0]For specific code, please refer to face_encoder. py
Facial feature index:
人脸识别的时候不能对每一个人脸都进行比较,太慢了,相同的人得到的特征索引都是比较类似,可以采用KNN分类算法去识别,这里采用是更高效annoy算法对人脸特征创建索引,annoy索引算法的有个假设就是,每个人脸特征可以看做是在高维空间的一个点,如果两个很接近(相识),任何超平面 都无法把他们分开,也就是说如果空间的点很接近,用超平面去分隔,相似的点一定会分在同一个平面空间(具体参看:https://github.com/spotify/annoy)
#人脸特征先存储在lmdb文件中格式(id,vector),所以这里从lmdb文件中加载
lmdb_file = self.lmdb_file
if os.path.isdir(lmdb_file):
    evn = lmdb.open(lmdb_file)
    wfp = evn.begin()
    annoy = AnnoyIndex(self.f)
    for key, value in wfp.cursor():
        key = int(key)
        value = face_comm.str_to_embed(value)
        annoy.add_item(key,value)

    annoy.build(self.num_trees)
annoy.save(self.annoy_index_path)具体代码可参看face_annoy.py
人脸识别
经过上面三个步骤后,得到人脸特征,在索引中查询最近几个点并就按欧式距离,如果距离小于0.6(更据实际情况设置的阈值)则认为是同一个人,然后根据id在数据库查找到对应人的信息即可
#根据人脸特征找到相似的
def query_vector(self,face_vector):
    n=int(face_comm.get_conf('annoy','num_nn_nearst'))
return self.annoy.get_nns_by_vector(face_vector,n,include_distances=True)具体代码可参看face_annoy.py
安装部署
系统采用有两个模块组成:
face_web:提供用户注册登录,人脸采集,php语言实现
face_server: 提供人脸检测,裁剪,对齐,识别功能,python语言实现
模块间采用socket方式通信通信格式为: length+content
face_server相关的配置在config.ini文件中
1.使用镜像
face_serverdocker镜像: shareclz/python2.7.10-face-image
face_web镜像: skiychan/nginx-php7
假设项目路径为/data1/face-login
2.安装face_server容器
docker run -it --name=face_server --net=host  -v /data1:/data1  shareclz/python2.7.10-face-image /bin/bash
cd /data1/face-login
python face_server.py
3.安装face_web容器
docker run -it --name=face_web --net=host  -v /data1:/data1  skiychan/nginx-php7 /bin/bash
cd /data1/face-login;
php -S 0.0.0.0:9988 -t ./web/
最终效果:
face_server加载mtcnn模型和facenet模型后等待人脸请求

未注册识别失败

人脸注册

注册后登录成功

感谢PHP中文网热心网友的投稿,其GitHub地址为:https://github.com/chenlinzhong/face-login
The above is the detailed content of Implementing face login system based on mtcnn and facenet. For more information, please follow other related articles on the PHP Chinese website!
 Which mobile phone models does Hongmeng OS 3.0 support?
 A memory that can exchange information directly with the CPU is a
 Dual graphics card notebook
 The role of index.html
 webstorm adjust font size
 webservice calling method
 Introduction to carriage return and line feed characters in java
 Learn C# from scratch
 How to apply for registration of email address