 Backend Development
 PHP Tutorial
 Introduction to version control of Yii2.0 RESTful API (code example)
Introduction to version control of Yii2.0 RESTful API (code example)
This article brings you an introduction to the version control of Yii2.0 RESTful API (code examples). It has certain reference value. Friends in need can refer to it. I hope it will be helpful to you.
I have written two articles before about how to build Yii2.0 RESTful API, as well as authentication and other processing, but they did not involve version management. Today I will talk about how to implement version management.
Let’s just start from scratch and build it step by step. However, some concepts and usage will not be explained one by one in this article. You can refer to the first Yii2.0 RESTful API basic configuration tutorial for configuration
Install Yii2.0
Install via Composer
This is the preferred method to install Yii2.0. If you don't have Composer installed yet, you can follow the instructions here to install it.
After installing Composer, run the following command to install the Composer Asset plug-in:
composer global require "fxp/composer-asset-plugin:^1.2.0"
To install the advanced application template, run the following command:
composer create-project yiisoft/yii2-app-advanced yii-api 2.0.14
Copy backend directory, named api
Open api\config\main.php and modify the id, controllerNamespace:
return [
    'id' => 'app-api',
    'basePath' => dirname(__DIR__),
    'controllerNamespace' => 'api\controllers',
]
Initialize the advanced template
Before initializing, you may wish to read this article
cd advanced
php init
Open common\config\main.php to enable url routing beautification rules
'urlManager' => [
    'enablePrettyUrl' => true,
    'showScriptName' => false,
    'rules' => [
    ],
],
Open common\config\bootstrap.php and add the following alias
Yii::setAlias('@api', dirname(dirname(__DIR__)) . '/api');ok, the above work is ready, let’s get to the point,
For more information about the version, you can refer to the authoritative guide, but I won’t explain too much here (PS: Mainly, I don’t know how to...)
My understanding:
You can understand the versions of Yii2 as different modules. Each version is a new module, such as the common v1, v2, etc.
Building the module
Regarding how to generate the module, we can use GII to generate it.
Configuring GII
Open the api/config/main-local.php file and modify it as follows:
if (!YII_ENV_TEST) {
    // configuration adjustments for 'dev' environment
    $config['bootstrap'][] = 'debug';
    $config['modules']['debug'] = [
        'class' => 'yii\debug\Module',
    ];

    $config['bootstrap'][] = 'gii';
    $config['modules']['gii'] = [
        'class' => 'yii\gii\Module',
        'allowedIPs' => ['127.0.0.1', '*']
    ];
}Because I am using Homestead, access to GII is not allowed by default, so I have to add 'allowedIPs' => ; ['127.0.0.1', '*'], otherwise Forbidden (#403) will appear. You can configure it according to your own needs, or do not configure it
Generate Modules
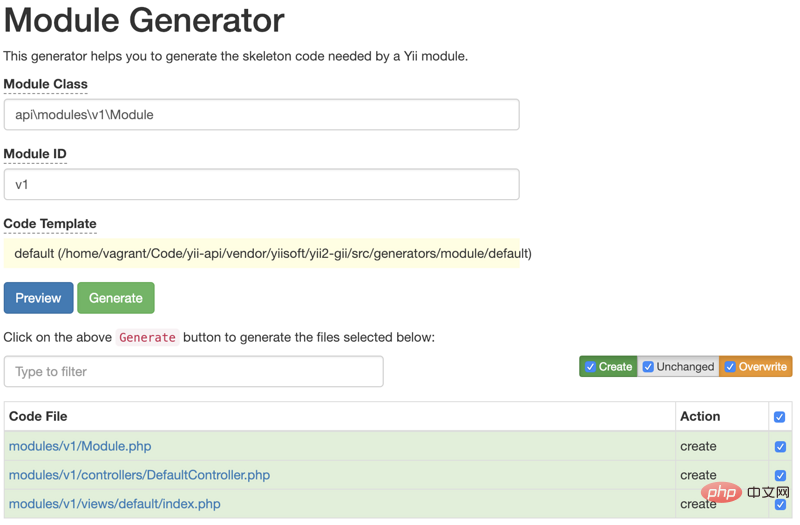
Browse Enter http://your host/gii into the generator, you can see the Module Generator, click Start
Modules Class and enter: api\modules\v1\Module
Module ID and enter v1, (Generally it will be entered automatically)
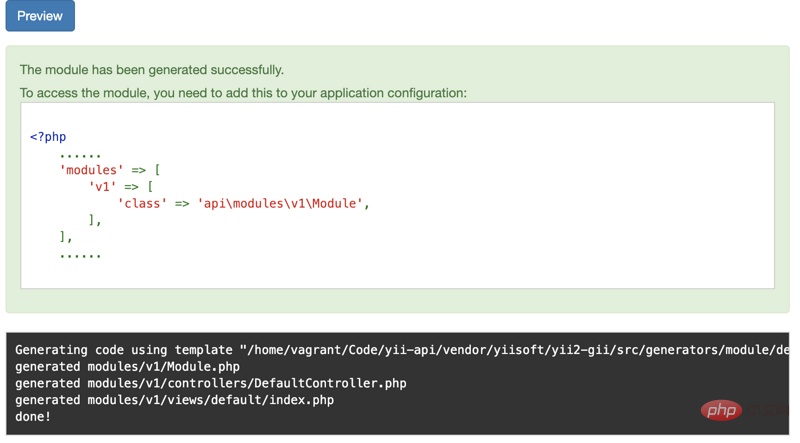
Click Preview


'modules' => [
    'v1'=>[
        'class'=>'api\modules\v1\Module',
    ],
],
'urlManager' => [
    'enablePrettyUrl' => true,
    'enableStrictParsing' => true,
    'showScriptName' => false,
    'rules' => [
        ['class' => 'yii\rest\UrlRule',
            'controller' => 'v1/default',
            'extraPatterns'=>[
                'GET index'=>'index',
            ],
        ],
    ],
],
http://localhost/v1/defaults
. In fact, the defaults we just visited These two files are the same as traditional web projects. The controller renders the view
Create a new UserController under modules\v1\controllers
<?php namespace api\modules\v1\controllers;
use yii\rest\Controller;
/**
* User controller for the `v1` module
*/
class UserController extends Controller
{
/**
* @return string
*/
public function actionIndex()
{
return 'this is v1/user';
}
}'urlManager' => [ 'enablePrettyUrl' => true, 'enableStrictParsing' => true, 'showScriptName' => false, 'rules' => [ ['class' => 'yii\rest\UrlRule', 'controller' => 'v1/default', 'extraPatterns'=>[ 'GET index'=>'index', ], ], ['class' => 'yii\rest\UrlRule', 'controller' => 'v1/user', 'extraPatterns'=>[ 'GET index'=>'index', ], ], ], ],
http://localhost/v1/users/index
Formatted response
Modify api/config/main. php add response'response' => [
'class' => 'yii\web\Response',
'on beforeSend' => function ($event) {
$response = $event->sender;
$response->data = [
'success' => $response->isSuccessful,
'code' => $response->getStatusCode(),
'message' => $response->statusText,
'data' => $response->data,
];
$response->statusCode = 200;
},
],in the components array
The above is the detailed content of Introduction to version control of Yii2.0 RESTful API (code example). For more information, please follow other related articles on the PHP Chinese website!

Hot AI Tools

Undresser.AI Undress
AI-powered app for creating realistic nude photos

AI Clothes Remover
Online AI tool for removing clothes from photos.

Undress AI Tool
Undress images for free

Clothoff.io
AI clothes remover

AI Hentai Generator
Generate AI Hentai for free.

Hot Article

Hot Tools

Notepad++7.3.1
Easy-to-use and free code editor

SublimeText3 Chinese version
Chinese version, very easy to use

Zend Studio 13.0.1
Powerful PHP integrated development environment

Dreamweaver CS6
Visual web development tools

SublimeText3 Mac version
God-level code editing software (SublimeText3)

Hot Topics
 CakePHP Project Configuration
Sep 10, 2024 pm 05:25 PM
In this chapter, we will understand the Environment Variables, General Configuration, Database Configuration and Email Configuration in CakePHP.
 PHP 8.4 Installation and Upgrade guide for Ubuntu and Debian
Dec 24, 2024 pm 04:42 PM
PHP 8.4 brings several new features, security improvements, and performance improvements with healthy amounts of feature deprecations and removals. This guide explains how to install PHP 8.4 or upgrade to PHP 8.4 on Ubuntu, Debian, or their derivati
 CakePHP Date and Time
Sep 10, 2024 pm 05:27 PM
To work with date and time in cakephp4, we are going to make use of the available FrozenTime class.
 CakePHP File upload
Sep 10, 2024 pm 05:27 PM
To work on file upload we are going to use the form helper. Here, is an example for file upload.
 CakePHP Routing
Sep 10, 2024 pm 05:25 PM
In this chapter, we are going to learn the following topics related to routing ?
 Discuss CakePHP
Sep 10, 2024 pm 05:28 PM
CakePHP is an open-source framework for PHP. It is intended to make developing, deploying and maintaining applications much easier. CakePHP is based on a MVC-like architecture that is both powerful and easy to grasp. Models, Views, and Controllers gu
 CakePHP Working with Database
Sep 10, 2024 pm 05:25 PM
Working with database in CakePHP is very easy. We will understand the CRUD (Create, Read, Update, Delete) operations in this chapter.
 CakePHP Creating Validators
Sep 10, 2024 pm 05:26 PM
Validator can be created by adding the following two lines in the controller.


