This article brings you an introduction to the method of setting up a proxy server with node and express. It has certain reference value. Friends in need can refer to it. I hope it will be helpful to you.
This example uses a proxy server built by node and express. , the expected goals are as follows:
1. Open a certain service A, which can implement several functions, such as ordinary restful requests, file uploads, static resource access, etc.
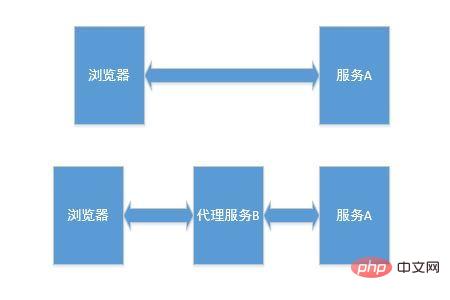
2. Open node proxy service B, point to service A, access proxy service B, and access any function of service A.
As shown in the figure below: 
The upper part of the figure is for direct access to the service, and the off-duty part is accessed through the proxy server Serve.
When using a proxy server, the browser requests data from the proxy server, and the proxy server forwards the request and returns the received data to the browser, that is, all data is forwarded through the proxy server.
With this goal in mind, we will describe how to implement this function.
Since it is request and response forwarding, let us understand what a request is.
http requests and responses are mainly composed of three parts: message header, blank line and message body.
We don’t need to care about empty lines. In fact, for us, as long as we complete the forwarding of the message header and message body, we can say that the proxy function has been achieved.
The entire process of requests and responses through the proxy is as follows:
1. After the proxy server receives the request, it must maintain the request before returning the target service data to the browser.
2. Extract the request path, request header, request body and other data.
3. Use the data extracted in 2 as a parameter to send a request to the target server.
4. Receive the data returned by the target server, extract the response header, response body and other data.
5. Return the data extracted in 4 to the client (browser).
6. Disconnect.
After these steps, the agent is implemented.
The following is the code directly, and then some explanations. The agent function is as follows:
const http = require('http');
const querystring = require('querystring');

//获取请求的cookie和query等
let getHeader = (reqClient) => {
    let headers = reqClient.headers;
    headers.path = reqClient.path;
    headers.query = reqClient.query;
    headers.cookie = reqClient.get('cookie') || '';

    return headers;
}

//代理函数,options是代理设置,包括目标服务器ip,port等
let proxy = (options) => {
    let reqOptions = {
        hostname: options.host,
        port: options.port
    }
    //返回请求处理函数,reqClient浏览器的请求,resClient是响应浏览器的对象
    return function (reqClient, resClient) {
        //设置目标服务器的请求参数,头中的各项参数
        let headers = getHeader(reqClient);
        reqOptions.headers = reqClient.headers;
        let query = [];
        if (headers.query) {
            Object.keys(headers.query).map(key => {
                query.push(key + '=' + headers.query[key]);
            });
            reqOptions.path = headers.path + (query.length === 0 ? '' : ('?' + query.join('&')));

        }
        reqOptions.cookie = headers.cookie;
        reqOptions.method = reqClient.method;
        //向目标服务器发送请求,reqProxy是向目标服务器的请求,resProxy是目标服务器的响应。
        let reqProxy = http.request(reqOptions, (resProxy) => {
            resProxy.setEncoding('utf8');
            //设置返回http头
            resClient.set(resProxy.headers);
            resClient.status(resProxy.statusCode);
            //接收从目标服务器返回的数据
            resProxy.on('data', (chunk) => {
                //接收目标服务器数据后,以流的方式向浏览器返回数据
                resClient.write(chunk);
            });

            //接收目标服务器数据结束
            resProxy.on('end', () => {
                //向浏览器写数据结束。
                resClient.end();
            });
            //目标服务器响应错误
            resProxy.on('error', () => {
                //响应错误,结束向浏览器返回数据
                resClient.end();
            });
        });

        //接收浏览器数据
        reqClient.on('data', (chunk) => {
           //以流的方式向目标服务器发送数据
            reqProxy.write(chunk);
        });
        //接收数据结束
        reqClient.on('end', () => {
          //向目标服务器写数据结束
            reqProxy.end();
        });

        //普通JSON数据代理
         if (Object.keys(reqClient.body).length) {
             reqProxy.write(querystring.stringify(reqClient.body));
             reqProxy.end();
         }
    }
}

module.exports = proxy;The above is the core code of the node agent. Supports ordinary requests, static resource proxy, file upload and download proxy and other functions.
git address: https://github.com/xubaodian/...
In the demo, the core code is in common/proxy. In js, I also implemented two test services.
The app.js and app2.js under the server file are the entry files of the two services.
app2.js is the target server, with three test pages
1, http://localhost:20000/json.html post request test, corresponding to the '/json' interface, Data can be sent, f12 to check whether the request is successful
2, http://localhost:20000/upload.html file upload test, corresponding to the interface '/upload' interface, upload files, f12 to check whether the request is successful, and at the same time There will be files in the server upload folder.
3. http://localhost:20000/get.html get request test, corresponding to the interface '/get', similarly f12 view
app2 is the target server and has 3 interfaces.
1. '/upload' interface, test the file upload function. The uploaded file will be placed in the uploads folder. The file name of the uploaded file is a uuid without a suffix. Add the suffix to check whether the file is complete. . It has been tested and there is no problem in transferring 1G files. No matter how large the file is, it has not been tried. If necessary, you can try
2, '/json' to test the POST request.
3. '/get', test GET request.
app.js is a proxy server, the listening port is 18000, and all requests are forwarded to app2, that is, all interface static resources of app2 are consistent when accessed in the app.
Test steps:
1. Open the target server and test the function through three pages.
2. Turn on the proxy server and visit the following three pages:
http://localhost:18000/json.html
http://localhost:18000/upload .html
http://localhost:18000/get.html
Test the same function. If the same function as step 1 is achieved, the proxy service function has been implemented.
After testing, the proxy function is no problem.
If you have any questions, please leave a message or send an email to 472784995@qq.com.
As for the performance, I have not tested it, because the number of visits in my own application scenario is not large, so it can be used.
The above is the detailed content of Introduction to how to build a proxy server with node and express. For more information, please follow other related articles on the PHP Chinese website!