 Web Front-end
 CSS Tutorial
 Summary of shadow effects implemented by the box-shadow attribute in CSS3
Summary of shadow effects implemented by the box-shadow attribute in CSS3
This article brings you a summary of the shadow effect achieved by the box-shadow attribute in CSS3. It has certain reference value. Friends in need can refer to it. I hope it will be helpful to you.
CSS3 box-shadow property is used to describe one or more shadow effects of an element. This property allows you to achieve almost any shadow effect you want. However, the box-shadow attribute syntax and value are very flexible, which is a bit difficult for novices to understand. Today we will summarize the syntax and various shadow effects of the box-shadow attribute.
Syntax
/* offset-x | offset-y | color */
box-shadow: 60px -16px teal;
/* offset-x | offset-y | blur-radius | color */
box-shadow: 10px 5px 5px black;
/* offset-x | offset-y | blur-radius | spread-radius | color */
box-shadow: 2px 2px 2px 1px rgba(0, 0, 0, 0.2);
/* inset | offset-x | offset-y | color */
box-shadow: inset 5em 1em gold;
/* Any number of shadows, separated by commas */
box-shadow: 3px 3px red, -1em 0 0.4em olive;
/* Global keywords */
box-shadow: inherit;
box-shadow: initial;
box-shadow: unset;
Value description:
inset: The default shadow is outside the border. After using inset, the shadow is within the border (even a transparent border), above the background and below the content. Some people also like to put this value at the end, and browsers also support it.
I found a few pictures on the Internet. You can look at them accordingly to make it easier to understand.
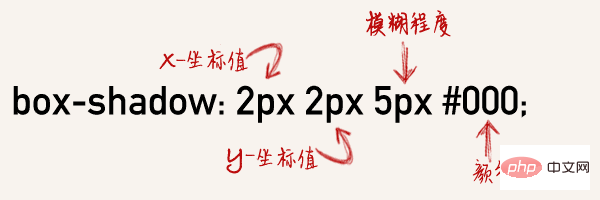
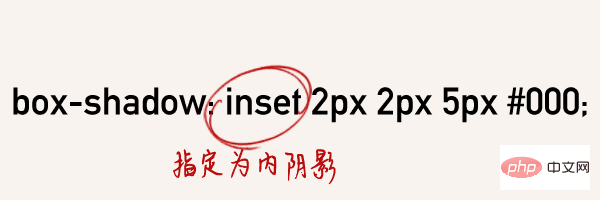
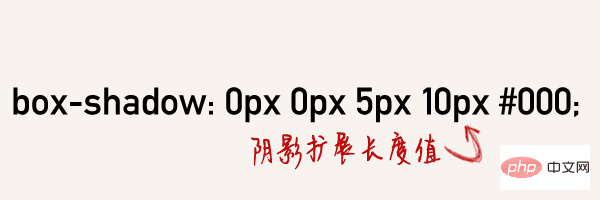
Let’s be more specific:
div {
    width: 150px;
    height: 150px;
    background-color: #fff;

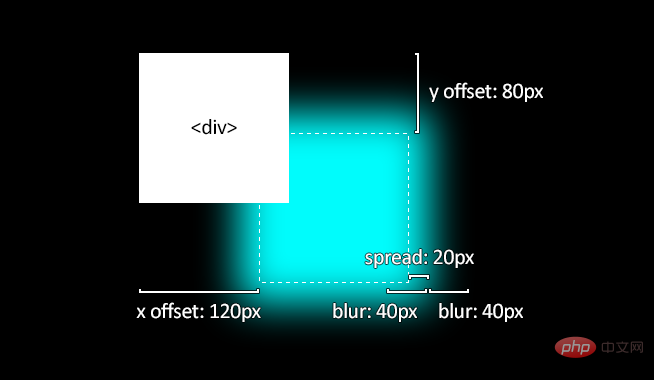
    box-shadow: 120px 80px 40px 20px #0ff;
    /* 顺序为: offset-x, offset-y, blur-size, spread-size, color */
    /* blur-size 和 spread-size 是可选的 (默认为 0) */
}Here’s a diagram:
The simplest general effect
The following are some of the simplest shadow effects, which should be very easy to understand by looking at the code:
HTML
<div class="flex">
  <div class="flex-item">
    <h3 id="内阴影示例">内阴影示例</h3>
    <div class="box boxshadow1"></div>
  </div>
  <div class="flex-item">
    <h3 id="边内影示例">3边内影示例</h3>
    <div class="box boxshadow2"></div>
  </div>
  <div class="flex-item">
    <h3 id="外阴影示例">外阴影示例</h3>
    <div class="box boxshadow3"></div>
  </div>
  <div class="flex-item">
    <h3 id="右下外阴影示例">右下外阴影示例</h3>
    <div class="box boxshadow4"></div>
  </div>
  <div class="flex-item">
    <h3 id="扩大阴影示例">扩大阴影示例</h3>
    <div class="box boxshadow5"></div>
  </div>
  <div class="flex-item">
    <h3 id="半透明阴影色示例">半透明阴影色示例</h3>
    <div class="box boxshadow6"></div>
  </div>
</div>CSS
.flex{display:flex;flex-wrap:wrap;}
.flex-item{margin-right:30px;}

.box {  background-color: #CCCCCC; border-radius:10px; width: 200px; height: 200px;  }
.boxshadow1{ box-shadow:inset 0px 0px 5px 1px #000; }
.boxshadow2{ box-shadow:inset 0 1px 2px 1px #000; }
.boxshadow3{box-shadow:0 0 10px #000;}
.boxshadow4{box-shadow:2px 2px 5px #000;}
.boxshadow5{box-shadow:0 0 5px 15px #000;}
.boxshadow6{box-shadow: 12px 12px 2px 1px rgba(0, 0, 255, .2);}The effect is as follows
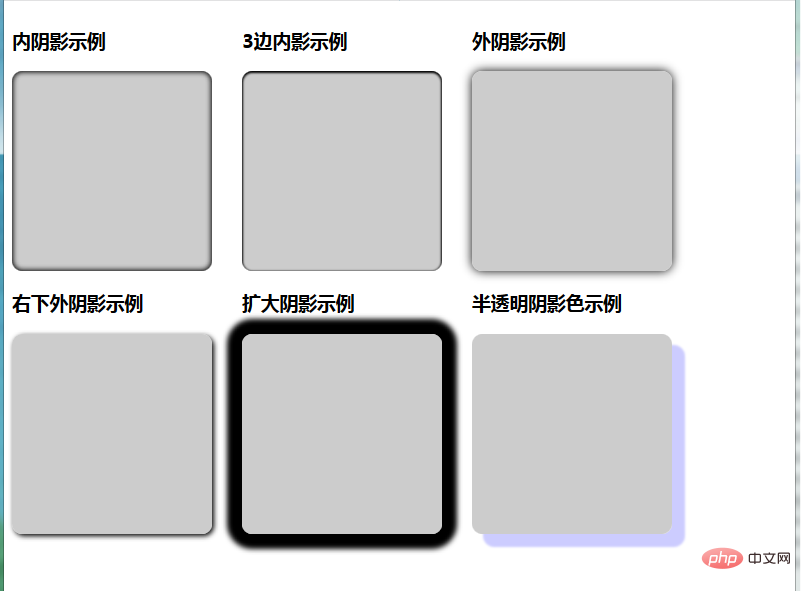
##Single Edge shadow effect
The single edge shadow effect can create some effects, such as strokes, small shadows in special scenes, and some transition colors. HTML<div class="flex">
<div class="flex-item">
<h3 id="上边内阴影示例">上边内阴影示例</h3>
<div class="box boxshadow1"></div>
</div>
<div class="flex-item">
<h3 id="右边内阴影示例">右边内阴影示例</h3>
<div class="box boxshadow2"></div>
</div>
<div class="flex-item">
<h3 id="下边外阴影示例">下边外阴影示例</h3>
<div class="box boxshadow3"></div>
</div>
<div class="flex-item">
<h3 id="右边外阴影示例">右边外阴影示例</h3>
<div class="box boxshadow4"></div>
</div>
<div class="flex-item">
<h3 id="下边细线示例">下边细线示例</h3>
<div class="box boxshadow5"></div>
</div>
</div>.flex{display:flex;flex-wrap:wrap;}
.flex-item{margin-right:30px;}
.box { background-color: #CCCCCC; width: 200px; height: 200px; }
.boxshadow1{ box-shadow:inset 0px 15px 10px -15px #000; }
.boxshadow2{ box-shadow:inset -15px 0px 10px -15px #000;}
.boxshadow3{box-shadow:0px 12px 8px -12px #000; border-radius:10px; }
.boxshadow4{box-shadow:3px 0 8px -4px #000;}
.boxshadow5{ box-shadow: inset 0px -1px 0px 0px rgb(0, 0, 0) ;}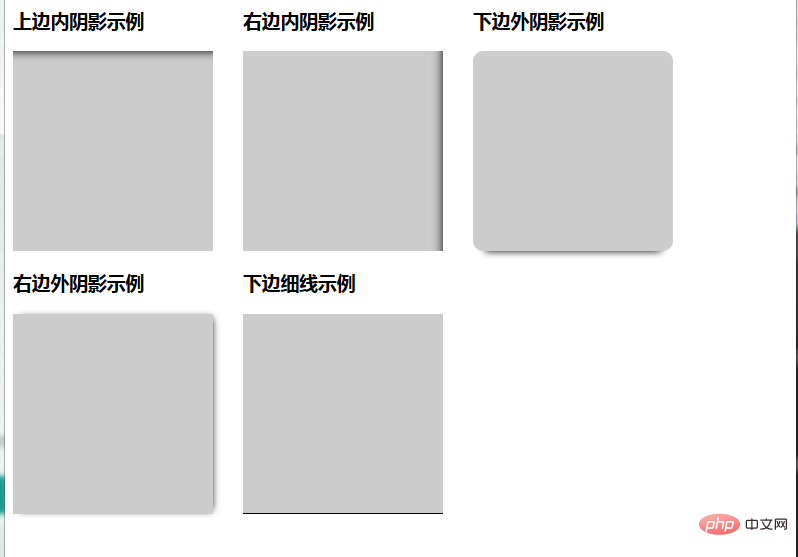
HTML
<div class="flex">
  <div class="flex-item">
    <h3 id="上下边内阴影示例">上下边内阴影示例</h3>
    <div class="box boxshadow1"></div>
  </div>

  <div class="flex-item">
    <h3 id="左右边外阴影示例">左右边外阴影示例</h3>
    <div class="box boxshadow2"></div>
  </div>
  <div class="flex-item">
    <h3 id="多层阴影示例">多层阴影示例</h3>
    <div class="box boxshadow3"></div>
  </div>
</div>CSS
.flex{display:flex;flex-wrap:wrap;}
.flex-item{margin-right:30px;}

.box {  background-color: #CCCCCC;  width: 200px; height: 200px;  }

.boxshadow1{
  box-shadow:inset 0px 15px 15px -15px #000,
             inset 0px -15px 15px -15px #000;
}
.boxshadow2{
  box-shadow:15px 0 15px -15px #000,
             -15px 0 15px -15px #000;
}
.boxshadow3{ border-radius:10px;
  box-shadow:0px 0px 0px 3px #bb0a0a,
             0px 0px 0px 6px #2e56bf,
             0px 0px 0px 9px #ea982e;
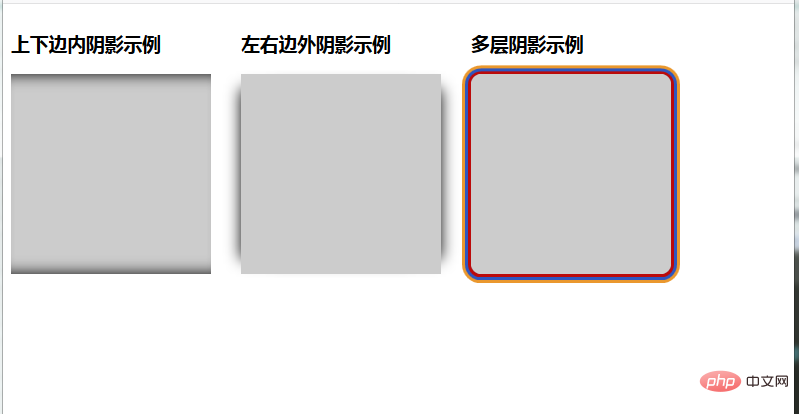
}The effect is as follows
Using the pseudo-elements ::before and ::after, we can create very realistic shadow effects that only pictures can achieve. Let me look at an example:
HTML
<div class="box11 shadow"></div>
CSS
.box11 {
	width: 300px;
	height: 100px;
	background: #ccc;
	border-radius: 10px;
	margin: 10px;
}

.shadow {
	position: relative;
	max-width: 270px;
	box-shadow: 0px 1px 4px rgba(0,0,0,0.3),
				0px 0px 20px rgba(0,0,0,0.1) inset;
}

.shadow::before,
.shadow::after {
   content:"";
   position:absolute;
   z-index:-1;
}

.shadow::before,
.shadow::after {
   content:"";
   position:absolute;
   z-index:-1;
   bottom:15px;
   left:10px;
   width:50%;
   height:20%;
}

.shadow::before,
.shadow::after {
   content:"";
   position:absolute;
   z-index:-1;
   bottom:15px;
   left:10px;
   width:50%;
   height:20%;
   box-shadow:0 15px 10px rgba(0, 0, 0, 0.7);
   transform:rotate(-3deg);
}

.shadow::after{
   right:10px;
   left:auto;
   transform:rotate(3deg);
}The effect is as follows
 Come again Some effects:
HTML
<div class="wrap">
  <div class="box box1 shadow1">
    <h3 id="Shadow-nbsp">Shadow 1</h3>
  </div>
  <div class="box box2 shadow2">
    <h3 id="Shadow-nbsp">Shadow 2</h3>
  </div>
  <div class="box box3 shadow3">
    <h3 id="Shadow-nbsp">Shadow 3</h3>
  </div>
  <div class="box box4 shadow4">
    <h3 id="Shadow-nbsp">Shadow 4</h3>
  </div>
  <div class="box box5 shadow5">
    <h3 id="Shadow-nbsp">Shadow 5</h3>
  </div>
  <div class="box box6 shadow6">
    <h3 id="Shadow-nbsp">Shadow 6</h3>
  </div>
  <div class="box box7 shadow7">
    <h3 id="Shadow-nbsp">Shadow 7</h3>
  </div>
  <div class="box box8 shadow8">
    <h3 id="Shadow-nbsp">Shadow 8</h3>
  </div>
</div>CSS
body{
  background:#E6EEF6;
}
.wrap{
  margin-left:20px;
}
.box{
  width:40%;
  height:200px;
  float:left;
  background-color:white;
  margin:25px 15px;
  border-radius:5px;
}
.box h3{
  font-family: 'Didact Gothic', sans-serif;
  font-weight:normal;
  text-align:center;
  padding-top:60px;
  color:#fff;
}
.box1{
  background-color: #EBA39E;
}
.box2{
  background-color: #EDE89A;
}
.box3{
  background-color: #9EEBA1;
}
.box4{
  background-color: #9EEBBF;
}
.box5{
  background-color: #9ED9EB;
}
.box6{
  background-color: #9EB3EB;
}
.box7{
  background-color: #DB9EEB;
}
.box8{
  background-color: #C49EEB;
}
.shadow1, .shadow2, .shadow3,.shadow4,.shadow5,.shadow6,.shadow7,.shadow8{
  position:relative;
}
.shadow1,.shadow2,.shadow3,.shadow4,.shadow5,.shadow6,.shadow7,.shadow8{
    box-shadow:0 1px 4px rgba(0, 0, 0, 0.3), 0 0 20px rgba(0, 0, 0, 0.1) inset;
}
/*****************************************************************dashed border
****************************************************************/
.shadow1 h3, .shadow2 h3, .shadow3 h3, .shadow4 h3, .shadow5 h3, .shadow6 h3, .shadow7 h3, .shadow8 h3{
  width:87%;
  height:100px;
  margin-left:6%;
  border:2px dashed #F7EEEE;
  border-radius:5px;
}
/****************************************************************
*styling shadows
****************************************************************/
.shadow1:before, .shadow1:after{
  position:absolute;
  content:"";
  bottom:12px;left:15px;top:80%;
  width:45%;
  background:#9B7468;
  z-index:-1;
  -webkit-box-shadow: 0 20px 15px #9B7468;
  -moz-box-shadow: 0 20px 15px #9B7468;
  box-shadow: 0 20px 15px #9B7468;
  -webkit-transform: rotate(-6deg);
  -moz-transform: rotate(-6deg);
  transform: rotate(-6deg);
}
.shadow1:after{
  -webkit-transform: rotate(6deg);
  -moz-transform: rotate(6deg);
  transform: rotate(6deg);
  right: 15px;left: auto;
}
.shadow2:before{
  position:absolute;
  content:"";
  width:80%;
  top:140px;bottom:15px;left:30px;
  background-color:#9F8641;
  z-index:-1;
  -webkit-box-shadow:0 23px 17px 0 #9F8641;
  -moz-box-shadow:0 23px 17px 0 #9F8641;
  box-shadow: 0 23px 17px 0 #9F8641;
  -webkit-transform:rotate(-4deg);
  -moz-transform:rotate(-4deg);
  transform:rotate(-4deg);
}
.shadow3:before, .shadow3:after{
  content:"";
  position:absolute;
  bottom:0;top:2px;left:15px;right:15px;
  z-index:-1;
  border-radius:100px/30px;
 -webkit-box-shadow:0 0 30px 2px #479F41;
  -moz-box-shadow:0 0 30px 2px #479F41;
  box-shadow: 0 0 30px 2px #479F41;
}
.shadow4:before, .shadow4:after{
  position:absolute;
  content:"";
  top:14px;bottom:14px;left:0;right:0;
  box-shadow:0 0 25px 3px #548E7F;
  border-radius:100px/10px;
  z-index:-1;
}
.shadow5:before, .shadow5:after{
  position:absolute;
  content:"";
  box-shadow:0 10px 25px 20px #518C96;
  top:40px;left:10px;bottom:50px;
  width:15%;
  z-index:-1;
  -webkit-transform: rotate(-8deg);
  -moz-transform: rotate(-8deg);
  transform: rotate(-8deg);
}
.shadow5:after{
  -webkit-transform: rotate(8deg);
  -moz-transform: rotate(8deg);
  transform: rotate(8deg);
  right: 10px;left: auto;
}
.shadow6:before, .shadow6:after{
  position:absolute;
  content:"";
  top:100px;bottom:5px;left:30px;right:30px;
  z-index:-1;
  box-shadow:0 0 40px 13px #486685;
  border-radius:100px/20px;
}
.shadow7:before, .shadow7:after{
  position:absolute;
  content:"1";
  top:25px;left:20px;bottom:150px;
  width:80%;
  z-index:-1;
  -webkit-transform: rotate(-6deg);
  -moz-transform: rotate(-6deg);
  transform: rotate(-6deg);
}
.shadow7:before{
  box-shadow:10px -10px 30px 15px #984D8E;
}
.shadow7:after{
  -webkit-transform: rotate(7deg);
  -moz-transform: rotate(7deg);
  transform: rotate(7deg);
  bottom: 25px;top: auto;
  box-shadow:10px 10px 30px 15px #984D8E;
}
.shadow8{
  box-shadow:
 -6px -6px 8px -4px rgba(250,254,118,0.75),
  6px -6px 8px -4px rgba(254,159,50,0.75),
  6px 6px 8px -4px rgba(255,255,0,0.75),
  6px 6px 8px -4px rgba(0,0,255,2.75);
}The effects are as follows
The above is the detailed content of Summary of shadow effects implemented by the box-shadow attribute in CSS3. For more information, please follow other related articles on the PHP Chinese website!

Hot AI Tools

Undresser.AI Undress
AI-powered app for creating realistic nude photos

AI Clothes Remover
Online AI tool for removing clothes from photos.

Undress AI Tool
Undress images for free

Clothoff.io
AI clothes remover

AI Hentai Generator
Generate AI Hentai for free.

Hot Article

Hot Tools

Notepad++7.3.1
Easy-to-use and free code editor

SublimeText3 Chinese version
Chinese version, very easy to use

Zend Studio 13.0.1
Powerful PHP integrated development environment

Dreamweaver CS6
Visual web development tools

SublimeText3 Mac version
God-level code editing software (SublimeText3)

Hot Topics
 1377
1377
 52
52
 Working With GraphQL Caching
Mar 19, 2025 am 09:36 AM
If you’ve recently started working with GraphQL, or reviewed its pros and cons, you’ve no doubt heard things like “GraphQL doesn’t support caching” or
 Making Your First Custom Svelte Transition
Mar 15, 2025 am 11:08 AM
The Svelte transition API provides a way to animate components when they enter or leave the document, including custom Svelte transitions.
 Building an Ethereum app using Redwood.js and Fauna
Mar 28, 2025 am 09:18 AM
With the recent climb of Bitcoin’s price over 20k $USD, and to it recently breaking 30k, I thought it’s worth taking a deep dive back into creating Ethereum
 Show, Don't Tell
Mar 16, 2025 am 11:49 AM
How much time do you spend designing the content presentation for your websites? When you write a new blog post or create a new page, are you thinking about
 How do you use CSS to create text effects, such as text shadows and gradients?
Mar 14, 2025 am 11:10 AM
The article discusses using CSS for text effects like shadows and gradients, optimizing them for performance, and enhancing user experience. It also lists resources for beginners.(159 characters)
 Creating Your Own Bragdoc With Eleventy
Mar 18, 2025 am 11:23 AM
No matter what stage you’re at as a developer, the tasks we complete—whether big or small—make a huge impact in our personal and professional growth.
 What the Heck Are npm Commands?
Mar 15, 2025 am 11:36 AM
npm commands run various tasks for you, either as a one-off or a continuously running process for things like starting a server or compiling code.
 A bit on ci/cd
Apr 02, 2025 pm 06:21 PM
I'd say "website" fits better than "mobile app" but I like this framing from Max Lynch:


