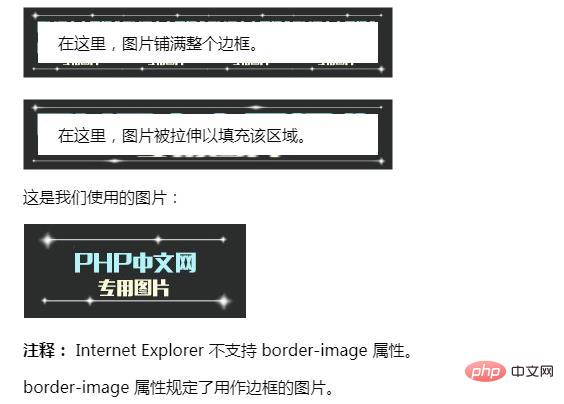
The border-image attribute is a shorthand attribute through which images can be used to create borders. The syntax for using this attribute is "border-image: source slice width outset repeat|initial|inherit;".

The operating environment of this article: Windows 7 system, CSS3 version, Dell G3 computer.
The border-image attribute is a shorthand attribute through which an image can be used to create a border.
CSS3 border-image attribute
Function: Use images to create borders
Description: Composite attribute. Sets or retrieves the object's border style to fill with an image. You can set the values of: border-image-source, border-image-slice, border-image-width, border-image-outset and border-image-repeat properties at once.
Syntax:
border-image: source slice width outset repeat|initial|inherit;
Parameters:
border-image-source: Used to specify the location of the image to be used to draw the border.
border-image-slice: The image border is offset inwards.
border-image-width: The width of the image border.
border-image-outset: Used to specify the amount of border-image-area drawn outside the border.
border-image-repeat: Used to set whether the image border should be repeated (repeat), stretched (stretch) or covered (round).
css3 border-image property usage example
<!DOCTYPE html>
<html>
<head>
<style>
div
{
border:15px solid transparent;
width:300px;
padding:10px 20px;
}

#round
{
-moz-border-image:url(https://img.php.cn/upload/article/000/005/656/5af270fd37755429.jpg) 30 30 round;	/* Old Firefox */
-webkit-border-image:url(https://img.php.cn/upload/article/000/005/656/5af270fd37755429.jpg) 30 30 round;	/* Safari and Chrome */
-o-border-image:url(https://img.php.cn/upload/article/000/005/656/5af270fd37755429.jpg) 30 30 round;		/* Opera */
border-image:url(https://img.php.cn/upload/article/000/005/656/5af270fd37755429.jpg) 30 30 round;
}

#stretch
{
-moz-border-image:url(https://img.php.cn/upload/article/000/005/656/5af270fd37755429.jpg) 30 30 stretch;	/* Old Firefox */
-webkit-border-image:url(https://img.php.cn/upload/article/000/005/656/5af270fd37755429.jpg) 30 30 stretch;	/* Safari and Chrome */
-o-border-image:url(https://img.php.cn/upload/article/000/005/656/5af270fd37755429.jpg) 30 30 stretch;	/* Opera */
border-image:url(https://img.php.cn/upload/article/000/005/656/5af270fd37755429.jpg) 30 30 stretch;
}
</style>
</head>
<body>

<div id="round">在这里,图片铺满整个边框。</div>
<br>
<div id="stretch">在这里,图片被拉伸以填充该区域。</div>

<p>这是我们使用的图片:</p>
<img  src="/static/imghw/default1.png"  data-src="https://img.php.cn/upload/article/000/000/024/5c513adf97e86533.jpg"  class="lazy"   alt="How to use border-image attribute" >

<p><b>注释:</b> Internet Explorer 不支持 border-image 属性。</p>
<p>border-image 属性规定了用作边框的图片。</p>

</body>
</html>Rendering:

The above is the entire content of this article, I hope it will be helpful to everyone's study. For more exciting content, you can pay attention to the relevant tutorial columns of the PHP Chinese website! ! !
The above is the detailed content of How to use border-image attribute. For more information, please follow other related articles on the PHP Chinese website!