 Java
Java
 javaTutorial
 Graphical tutorial on how SpringBoot implements hot deployment in IntelliJ IDEA
Graphical tutorial on how SpringBoot implements hot deployment in IntelliJ IDEA
This article brings you a graphic tutorial on how to implement hot deployment of SpringBoot in IntelliJ IDEA. It has certain reference value. Friends in need can refer to it. I hope it will be helpful to you.
During the actual development process, the code is often modified to restart the application. Each manual restart is troublesome and has low development efficiency, so hot deployment is very necessary for development. This article will introduce how to restart the application in IntelliJ IDEA (version 2018.2 .5) Implement hot deployment of SpringBoot project.
This article uses spring-boot-devtools to implement hot deployment. Just follow the following two steps to complete it.
1. Modify pom.xml
spring-boot-devtools is a module that serves developers, the most important function of which is hot deployment. The principle is to restart the application after discovering changes in the code, but it is faster than manually stopping and restarting. The underlying principle is to use two ClassLoaders. One ClassLoader loads classes that will not change (third-party Jar packages), and the other ClassLoader loads classes that will change, called restart ClassLoader. In this way, when there are code changes, the original The restart ClassLoader is discarded and a restart ClassLoader is re-created. Since there are fewer classes to be loaded, a faster restart time is achieved. That is, devtools will monitor file changes under the classpath and will immediately restart the application (occurring at the time of saving)
After configuring spring-boot-devtools, the specific pom.xml file content is as follows:
org.springframework.boot
spring-boot-starter-web
org.springframework.boot
spring-boot-starter-test
test
<!-- 引入热部署jar包 -->
org.springframework.boot
spring-boot-devtools
<!-- optional=true,依赖不会传递,该项目依赖devtools;之后依赖该项目的项目如果想要使用devtools,需要重新引入 -->
true
<!-- 引入热部署依赖插件 -->
org.springframework.boot
spring-boot-maven-plugin
<!-- IntelliJ IDEA本地测试去掉fork也生效 -->
true
2 . Turn on idea automatic compilation and automake function
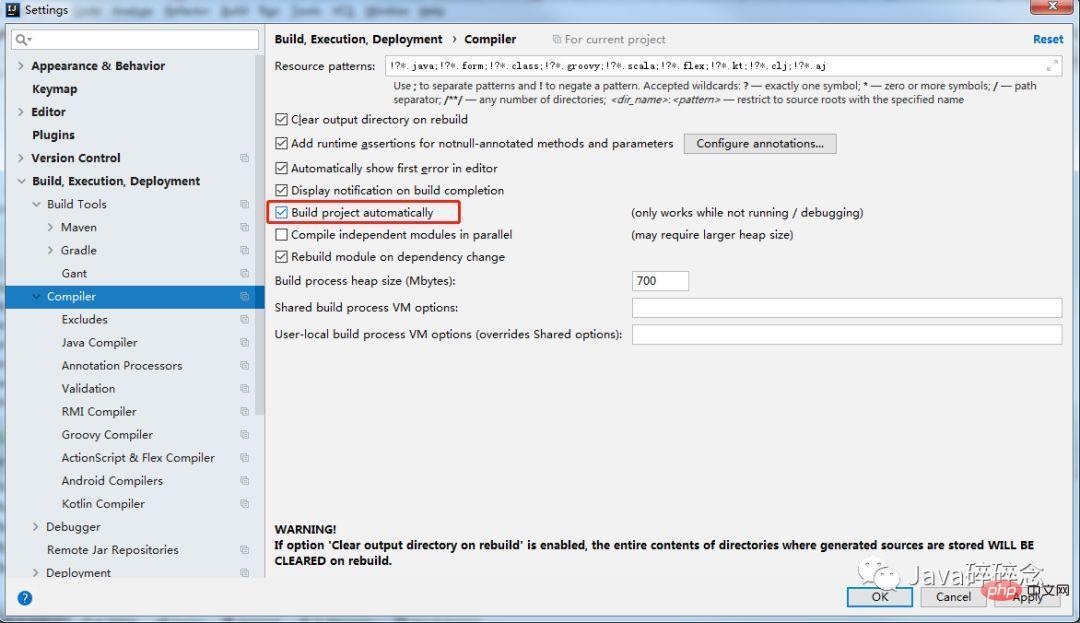
(1). Settings --> Compile --> Build project automatically --> Check

idea settings automatic compilation screenshot
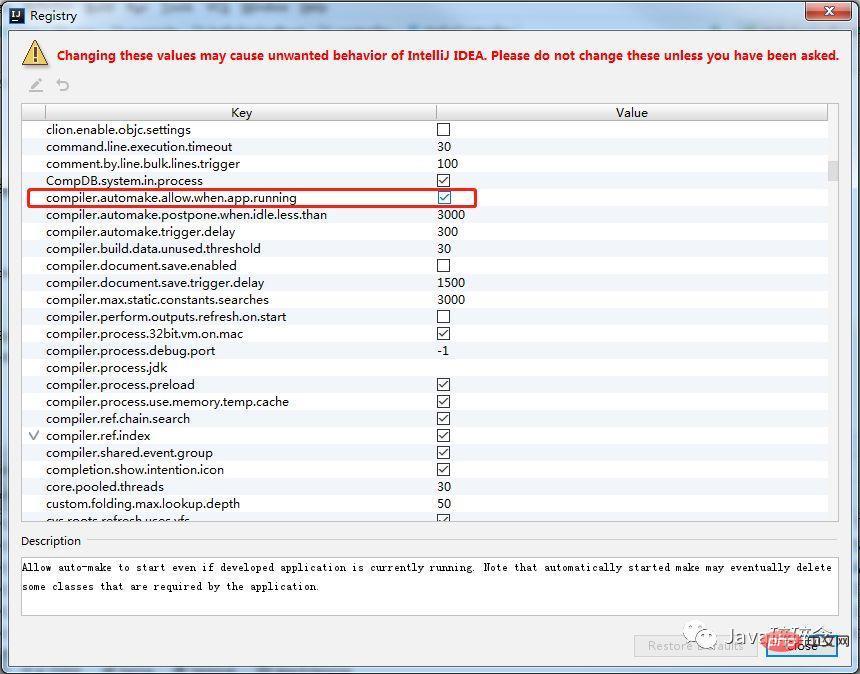
(2). CTRL SHIFT ALT / --> Find Registry --> Find and check compiler.automake.allow.when.app.running

idea settings compile.automake screenshot
After completing the above two steps, you can implement hot start in IntelliJ IDEA.
Warm reminder: After turning on the idea automatic compilation and automake functions, you must restart IntelliJ IDEA
The above is the detailed content of Graphical tutorial on how SpringBoot implements hot deployment in IntelliJ IDEA. For more information, please follow other related articles on the PHP Chinese website!

Hot AI Tools

Undresser.AI Undress
AI-powered app for creating realistic nude photos

AI Clothes Remover
Online AI tool for removing clothes from photos.

Undress AI Tool
Undress images for free

Clothoff.io
AI clothes remover

AI Hentai Generator
Generate AI Hentai for free.

Hot Article

Hot Tools

Notepad++7.3.1
Easy-to-use and free code editor

SublimeText3 Chinese version
Chinese version, very easy to use

Zend Studio 13.0.1
Powerful PHP integrated development environment

Dreamweaver CS6
Visual web development tools

SublimeText3 Mac version
God-level code editing software (SublimeText3)

Hot Topics
 1378
1378
 52
52
 How Springboot integrates Jasypt to implement configuration file encryption
Jun 01, 2023 am 08:55 AM
Introduction to Jasypt Jasypt is a java library that allows a developer to add basic encryption functionality to his/her project with minimal effort and does not require a deep understanding of how encryption works. High security for one-way and two-way encryption. , standards-based encryption technology. Encrypt passwords, text, numbers, binaries... Suitable for integration into Spring-based applications, open API, for use with any JCE provider... Add the following dependency: com.github.ulisesbocchiojasypt-spring-boot-starter2. 1.1Jasypt benefits protect our system security. Even if the code is leaked, the data source can be guaranteed.
 How SpringBoot integrates Redisson to implement delay queue
May 30, 2023 pm 02:40 PM
Usage scenario 1. The order was placed successfully but the payment was not made within 30 minutes. The payment timed out and the order was automatically canceled. 2. The order was signed and no evaluation was conducted for 7 days after signing. If the order times out and is not evaluated, the system defaults to a positive rating. 3. The order is placed successfully. If the merchant does not receive the order for 5 minutes, the order is cancelled. 4. The delivery times out, and push SMS reminder... For scenarios with long delays and low real-time performance, we can Use task scheduling to perform regular polling processing. For example: xxl-job Today we will pick
 How to use Redis to implement distributed locks in SpringBoot
Jun 03, 2023 am 08:16 AM
1. Redis implements distributed lock principle and why distributed locks are needed. Before talking about distributed locks, it is necessary to explain why distributed locks are needed. The opposite of distributed locks is stand-alone locks. When we write multi-threaded programs, we avoid data problems caused by operating a shared variable at the same time. We usually use a lock to mutually exclude the shared variables to ensure the correctness of the shared variables. Its scope of use is in the same process. If there are multiple processes that need to operate a shared resource at the same time, how can they be mutually exclusive? Today's business applications are usually microservice architecture, which also means that one application will deploy multiple processes. If multiple processes need to modify the same row of records in MySQL, in order to avoid dirty data caused by out-of-order operations, distribution needs to be introduced at this time. The style is locked. Want to achieve points
 How to solve the problem that springboot cannot access the file after reading it into a jar package
Jun 03, 2023 pm 04:38 PM
Springboot reads the file, but cannot access the latest development after packaging it into a jar package. There is a situation where springboot cannot read the file after packaging it into a jar package. The reason is that after packaging, the virtual path of the file is invalid and can only be accessed through the stream. Read. The file is under resources publicvoidtest(){Listnames=newArrayList();InputStreamReaderread=null;try{ClassPathResourceresource=newClassPathResource("name.txt");Input
 How to implement Springboot+Mybatis-plus without using SQL statements to add multiple tables
Jun 02, 2023 am 11:07 AM
When Springboot+Mybatis-plus does not use SQL statements to perform multi-table adding operations, the problems I encountered are decomposed by simulating thinking in the test environment: Create a BrandDTO object with parameters to simulate passing parameters to the background. We all know that it is extremely difficult to perform multi-table operations in Mybatis-plus. If you do not use tools such as Mybatis-plus-join, you can only configure the corresponding Mapper.xml file and configure The smelly and long ResultMap, and then write the corresponding sql statement. Although this method seems cumbersome, it is highly flexible and allows us to
 Comparison and difference analysis between SpringBoot and SpringMVC
Dec 29, 2023 am 11:02 AM
SpringBoot and SpringMVC are both commonly used frameworks in Java development, but there are some obvious differences between them. This article will explore the features and uses of these two frameworks and compare their differences. First, let's learn about SpringBoot. SpringBoot was developed by the Pivotal team to simplify the creation and deployment of applications based on the Spring framework. It provides a fast, lightweight way to build stand-alone, executable
 How SpringBoot customizes Redis to implement cache serialization
Jun 03, 2023 am 11:32 AM
1. Customize RedisTemplate1.1, RedisAPI default serialization mechanism. The API-based Redis cache implementation uses the RedisTemplate template for data caching operations. Here, open the RedisTemplate class and view the source code information of the class. publicclassRedisTemplateextendsRedisAccessorimplementsRedisOperations, BeanClassLoaderAware{//Declare key, Various serialization methods of value, the initial value is empty @NullableprivateRedisSe
 How to get the value in application.yml in springboot
Jun 03, 2023 pm 06:43 PM
In projects, some configuration information is often needed. This information may have different configurations in the test environment and the production environment, and may need to be modified later based on actual business conditions. We cannot hard-code these configurations in the code. It is best to write them in the configuration file. For example, you can write this information in the application.yml file. So, how to get or use this address in the code? There are 2 methods. Method 1: We can get the value corresponding to the key in the configuration file (application.yml) through the ${key} annotated with @Value. This method is suitable for situations where there are relatively few microservices. Method 2: In actual projects, When business is complicated, logic


