

How does HBuilder configure the PHP environment?

Configuration method: 1. Create a php project in the www directory; 2. Install the "aptana php" plug-in; 3. Click "Run - Set up web server - External web server settings - New", edit Web server configuration; 4. Change the PHP web server to the set external server URL.
HBuilder's code prompt function is very powerful. It is definitely a good assistant for web front-end development code. It may not be the best for developing PHP files. Yes, but its built-in "view while changing mode" is definitely rare, but it still requires some configuration (code configuration), which is difficult and time-consuming. Let’s introduce it in detail below:
Prerequisites:
##● Windows system ● HBuilder editor ● wampserver (not limited to version), make sure port 80 is not occupied by other programs Let’s start with the steps on how to configure the PHP running environment in HBuilder:Create a PHP project
Create a PHP project, which can be created from wampserver or HBuilder. Note: It must be created in the www directory under the wampserver directory, and the custom name cannot be Chinese.Here's how to create it from HBuilder:
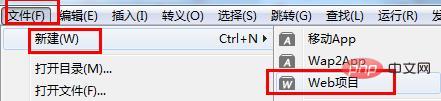
Select: File->New->web project

##HBuider PHP running server configurationBecause HBuider does not integrate the PHP running environment, it depends on wampserver. In fact, HBuider is an editor, but it only needs to implement PHP code prompts and real-time automatic browser updates. It just needs to be configured.
1. First you need to install the plug-in:1), select the tool——>Plug-in installation
# #2), check "aptana php" to install the plug-in.
 2. Configure
Select: Run——>Set web server——>External web server settings ——>New


url contains the project name: choose not to include it (to avoid errors, if it is included, the following php must be removed from the above url. For smoothness, I can choose "not included").
As for the start command and stop command, there is no need to set them, and there will be no impact.
Finally "OK" to save.
Next, change the php web server to the external server URL just set:
Click the drop-down box to select the newly built external server. Finally "OK" to save the settings.
As shown in the figure:
In this way, the external server of php is configured.
<?php
phpinfo();
?>
After writing ctrl s, save it, and see if it can be done in the "View while changing mode" A page similar to the one that appeared at the beginning of the tutorial will appear.
If not, close the editor and reopen it. Or run - Chrome to see if the browser can open the phpinfo page. That’s it. Even if you open it with a browser, it can be updated automatically in real time (after the file is saved). It’s a lot easier to write.
The effect is as follows:
At this point, the PHP environment configuration under HBuilder has been successful.The above is the entire content of this article, I hope it will be helpful to everyone's study. For more exciting content, you can pay attention to the relevant tutorial columns of the PHP Chinese website! ! !
The above is the detailed content of How does HBuilder configure the PHP environment?. For more information, please follow other related articles on the PHP Chinese website!

Hot AI Tools

Undresser.AI Undress
AI-powered app for creating realistic nude photos

AI Clothes Remover
Online AI tool for removing clothes from photos.

Undress AI Tool
Undress images for free

Clothoff.io
AI clothes remover

Video Face Swap
Swap faces in any video effortlessly with our completely free AI face swap tool!

Hot Article
Hot Tools

Notepad++7.3.1
Easy-to-use and free code editor

SublimeText3 Chinese version
Chinese version, very easy to use

Zend Studio 13.0.1
Powerful PHP integrated development environment

Dreamweaver CS6
Visual web development tools

SublimeText3 Mac version
God-level code editing software (SublimeText3)
Hot Topics
 1386
1386
 52
52

 How to import projects with hbuilder - How to import projects with hbuilder
Mar 05, 2024 pm 09:19 PM
How to import projects with hbuilder - How to import projects with hbuilder
Mar 05, 2024 pm 09:19 PM
Many programmers are using hbuilder software, but do you know how hbuilder imports projects? The following article brings you how to import projects with hbuilder. Let's take a look below. Open hbuilder and enter the main interface, prepare the downloaded project and record the path. Find "File" in the navigation bar of the hbuilder main interface, select "Import", continue to select import from the local directory, and find the prepared project file. Finally, check the hbuilder project bar and you can see that the import was successful.
 How to install php environment locally
Mar 19, 2021 am 09:07 AM
How to install php environment locally
Mar 19, 2021 am 09:07 AM
How to install the PHP environment locally: 1. Download and install Apache; 2. Download the PHP compressed package on the official website and extract it to the specified directory; 3. Download and install mysql; 4. Open the "Environment Variables" interface and configure the path variable of mysql ; 5. Open the php.ini file and modify the configuration; 6. Open the httpd.conf file and add support for PHP and the PHP installation path at the end of the file; 7. Start the Apache service.
 How does hbuilder change the font size - the specific method of hbuilder changing the font size
Mar 05, 2024 am 11:10 AM
How does hbuilder change the font size - the specific method of hbuilder changing the font size
Mar 05, 2024 am 11:10 AM
Programmers must be using the hbuilder software, but do you know how hbuilder changes the font size? The following article brings you the specific method of hbuilder changing the font size. Interested users, please come and take a look below. First, open the software and find "Tools" -> "Options" in the menu bar. Open options. Click "HBuilder"->"Theme" to open the theme. On the topic page, click "Select...". On this page you can set the font, font style, and font size. We change the font size to "Xiaoer" and click "OK". Let’s take a look at the font size before changing it. See if it looks more comfortable and clear after changing the font size.
 How to customize shortcut keys in hbuilder - the operation process of customizing shortcut keys in hbuilder
Mar 04, 2024 pm 03:40 PM
How to customize shortcut keys in hbuilder - the operation process of customizing shortcut keys in hbuilder
Mar 04, 2024 pm 03:40 PM
Speaking of hbuilder software, I believe many programmers are using it, but do you know how to customize shortcut keys for hbuilder? The following content brings you the operation process of customizing shortcut keys for hbuilder. Let us take a look below. We click the tool shortcut button on the HBuilder menu. Then we click HBuilder custom shortcut keys in the drop-down menu. At this point we can successfully open the Json file of Keybindings. Here we can copy the previous content. However, the HBuilder shortcut keys here can only be copied and cannot be modified. So we copy it to the area on the right to modify the HBuilder shortcut keys.
 What should I do if there is no prompt when writing php code in hbuilder?
Jan 20, 2023 am 09:41 AM
What should I do if there is no prompt when writing php code in hbuilder?
Jan 20, 2023 am 09:41 AM
hbuilder does not prompt when writing PHP code because hbuilderx does not have built-in PHP prompts. You need to install the "php language service" plug-in. The installation method: 1. Check "PHP IntelliSense" to view the supported PHP version; 2. Open hbuilderx and click "Tools" "Just install the PHP IntelliSense plug-in.
 PHP environment installation guide: solutions to common problems
Mar 28, 2024 pm 09:21 PM
PHP environment installation guide: solutions to common problems
Mar 28, 2024 pm 09:21 PM
The PHP environment is one of the important basic environments for developing websites and applications. Correct installation, configuration and debugging of the PHP environment is crucial for developers. Various problems are often encountered during the installation process. This article will provide you with a PHP environment installation guide, solve common problems in detail and provide specific code examples. Ensure the system environment Before installing PHP, first ensure that the system environment meets the minimum requirements for PHP. Generally speaking, PHP supports mainstream operating systems such as Windows, Linux, and Mac, but
 Does hbuilder support es6?
Oct 20, 2022 pm 04:16 PM
Does hbuilder support es6?
Oct 20, 2022 pm 04:16 PM
hbuilder supports es6. How to set JS to support es6 syntax: 1. When creating a project, directly set the Javascript version to "ECMAScript 6" in the syntax area of the pop-up interface; 2. If it is an already created project, select the project and right-click Click, click "Properties" - "Syntax & Framework", and change the Javascript version to "ECMAScript 6".
 How to install php in hbuilder
Mar 23, 2023 pm 05:20 PM
How to install php in hbuilder
Mar 23, 2023 pm 05:20 PM
HBuilder is a free open source tool mainly used for Web front-end development, which also provides a method to install PHP. Let's introduce in detail how HBuilder installs PHP.
