 Backend Development
 PHP Tutorial
 Introduction to the principle of Redis master-slave replication (picture and text)
Introduction to the principle of Redis master-slave replication (picture and text)
This article brings you an introduction to the principles of Redis master-slave replication (pictures and texts). It has certain reference value. Friends in need can refer to it. I hope it will be helpful to you.
Facing problems
Machine failure. We deploy to a Redis server. When a machine failure occurs, we need to migrate to another server and ensure that the data is synchronized. Data is the most important thing. If you don't care, you basically won't use Redis.
Capacity bottleneck. When we need to expand the Redis memory, from 16G memory to 64G, a single machine will definitely not be able to satisfy it. Of course, you can buy a new 128G machine.
Solution
To achieve greater storage capacity of the distributed database and withstand high concurrent access, we will store the data of the original centralized database separately. on multiple other network nodes.
In order to solve the problem of this single node, Redis will also replicate multiple copies of the data and deploy them to other nodes for replication to achieve high availability of Redis and redundant backup of data to ensure data and services. High availability.
Master-slave replication
What is master-slave replication

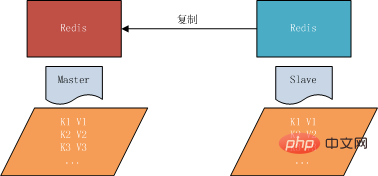
Master-slave replication refers to copying the data of a Redis server to other Redis servers. The former is called the master node, and the latter is called the slave node. Data replication is one-way, and can only be from the master node to the slave node.
By default, each Redis server is a master node; and a master node can have multiple slave nodes (or no slave nodes), but a slave node can only have one master node.
The role of master-slave replication
Data redundancy: Master-slave replication implements hot backup of data, which is a data redundancy method other than persistence.
Failure recovery: When a problem occurs on the master node, the slave node can provide services to achieve rapid failure recovery; it is actually a kind of service redundancy.
Load balancing: Based on master-slave replication, combined with read-write separation, the master node can provide write services and the slave nodes can provide read services (that is, when writing Redis data, apply the connection Master node, when reading Redis data, connect to the slave node) to share the server load; especially in scenarios where there is less writing and more reading, sharing the read load through multiple slave nodes can greatly increase the concurrency of the Redis server.
Read and write separation: It can be used to achieve read and write separation, main library writing, slave library reading. Reading and writing separation can not only improve the load capacity of the server, but also can be used according to changes in demand. Change the number of slave libraries;
Cornerstone of high availability: In addition to the above functions, master-slave replication is also the basis for the implementation of sentinels and clusters. Therefore, master-slave replication is the basis of Redis high availability. .
Enable master-slave replication
Enable master-slave replication from the slave node. There are 3 ways:
Configuration file: In Add from the server's configuration file: slaveof
Start command: Add --slaveof
after redis-server starts the command. Client command: After the Redis server is started, execute the command directly through the client: slaveof
, then the Redis instance becomes a slave node.
You can see some replication information through the info replication command
Master-slave replication principle
The master-slave replication process can be roughly divided into three stages : Connection establishment phase (i.e. preparation phase), data synchronization phase, command propagation phase.
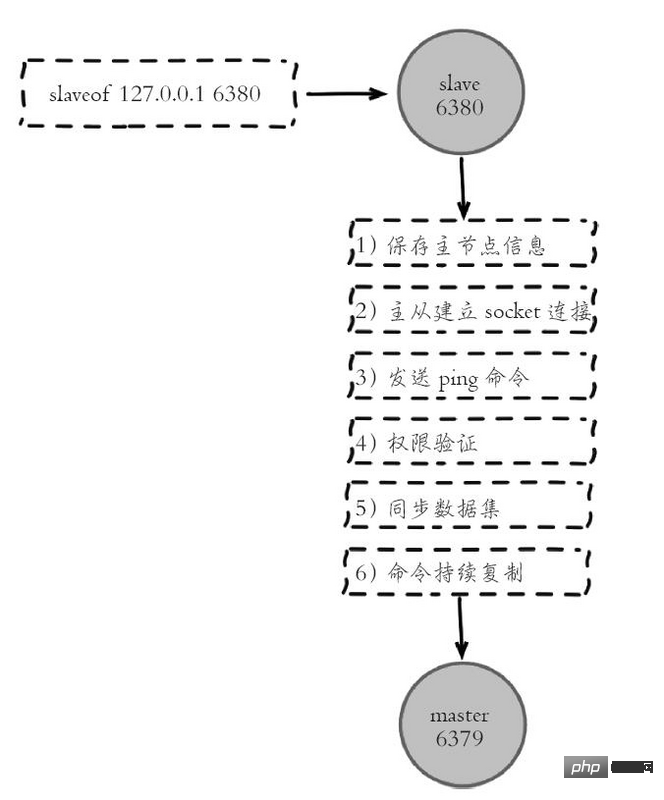
After the slave node executes the slaveof command, the replication process starts to operate. You can roughly see the picture below.
It can be seen from the picture that the replication process is roughly divided into 6 processes

The log records after the master-slave configuration can also see this process
1) Save the master node (master) information.
After executing slaveof, Redis will print the following log:

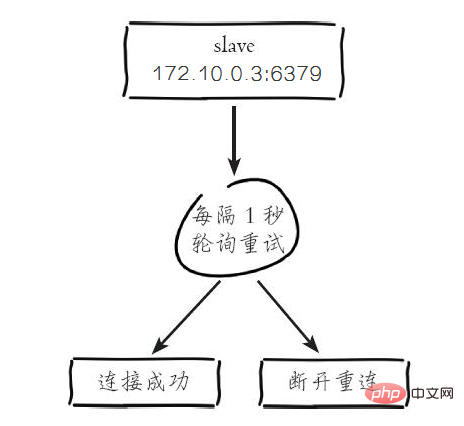
2) The slave node (slave) maintains replication-related logic through scheduled tasks that run every second. When the scheduled task After discovering the existence of a new master node, it will try to establish a network connection with the node

The slave node will establish a network connection with the master node
The slave node will establish a socket socket, the slave node establishes a socket with port 51234, which is specially used to accept replication commands sent by the master node. After the slave node is successfully connected, the following log is printed:

If the slave node cannot establish a connection, the scheduled task will retry indefinitely until the connection is successful or execute slaveof no one to cancel replication
Regarding connection failure, you can execute it on the slave node info replication View the master_link_down_since_seconds metric, which records the system time when the connection to the master node failed. When the slave node fails to connect to the master node, the following log will be printed every second to facilitate problem discovery:
# Error condition on socket for SYNC: {socket_error_reason}3) Send the ping command.
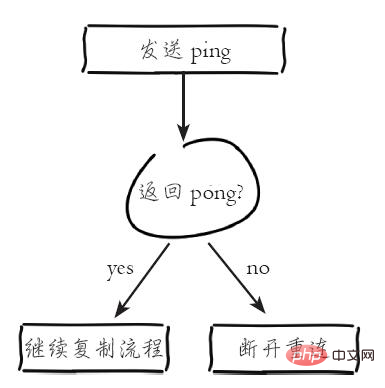
After the connection is successfully established, the slave node sends a ping request for the first communication. The main purpose of the ping request is as follows:
·Detect whether the network socket between the master and slave is available.
·Detect whether the master node can currently accept processing commands.
If after sending the ping command, the slave node does not receive the pong reply from the master node or times out, such as the network times out or the master node is blocked and cannot respond to the command, the slave node will disconnect the replication connection, and the next scheduled task will initiate a reconnection. .


The ping command sent from the node returns successfully, Redis prints the following log, and continues the subsequent replication process:

4) Permission verification. If the requirepass parameter is set on the master node, password verification is required. The slave node must configure the masterauth parameter to ensure that the password is the same as the master node to pass the verification; if the verification fails, the replication will be terminated and the slave node will reinitiate the replication process.
5) Synchronize data sets. After the master-slave replication connection communicates normally, when replication is established for the first time, the master node will send all the data it holds to the slave node. This part of the operation is the longest step.
6) The command is copied continuously. When the master node synchronizes the current data to the slave node, the replication establishment process is completed. Next, the master node will continuously send write commands to the slave nodes to ensure master-slave data consistency.
The above is the detailed content of Introduction to the principle of Redis master-slave replication (picture and text). For more information, please follow other related articles on the PHP Chinese website!

Hot AI Tools

Undresser.AI Undress
AI-powered app for creating realistic nude photos

AI Clothes Remover
Online AI tool for removing clothes from photos.

Undress AI Tool
Undress images for free

Clothoff.io
AI clothes remover

AI Hentai Generator
Generate AI Hentai for free.

Hot Article

Hot Tools

Notepad++7.3.1
Easy-to-use and free code editor

SublimeText3 Chinese version
Chinese version, very easy to use

Zend Studio 13.0.1
Powerful PHP integrated development environment

Dreamweaver CS6
Visual web development tools

SublimeText3 Mac version
God-level code editing software (SublimeText3)

Hot Topics
 PHP 8.4 Installation and Upgrade guide for Ubuntu and Debian
Dec 24, 2024 pm 04:42 PM
PHP 8.4 brings several new features, security improvements, and performance improvements with healthy amounts of feature deprecations and removals. This guide explains how to install PHP 8.4 or upgrade to PHP 8.4 on Ubuntu, Debian, or their derivati
 How To Set Up Visual Studio Code (VS Code) for PHP Development
Dec 20, 2024 am 11:31 AM
Visual Studio Code, also known as VS Code, is a free source code editor — or integrated development environment (IDE) — available for all major operating systems. With a large collection of extensions for many programming languages, VS Code can be c
 How do you parse and process HTML/XML in PHP?
Feb 07, 2025 am 11:57 AM
This tutorial demonstrates how to efficiently process XML documents using PHP. XML (eXtensible Markup Language) is a versatile text-based markup language designed for both human readability and machine parsing. It's commonly used for data storage an
 PHP Program to Count Vowels in a String
Feb 07, 2025 pm 12:12 PM
A string is a sequence of characters, including letters, numbers, and symbols. This tutorial will learn how to calculate the number of vowels in a given string in PHP using different methods. The vowels in English are a, e, i, o, u, and they can be uppercase or lowercase. What is a vowel? Vowels are alphabetic characters that represent a specific pronunciation. There are five vowels in English, including uppercase and lowercase: a, e, i, o, u Example 1 Input: String = "Tutorialspoint" Output: 6 explain The vowels in the string "Tutorialspoint" are u, o, i, a, o, i. There are 6 yuan in total
 7 PHP Functions I Regret I Didn't Know Before
Nov 13, 2024 am 09:42 AM
If you are an experienced PHP developer, you might have the feeling that you’ve been there and done that already.You have developed a significant number of applications, debugged millions of lines of code, and tweaked a bunch of scripts to achieve op
 Top 10 PHP CMS Platforms For Developers in 2024
Dec 05, 2024 am 10:29 AM
CMS stands for Content Management System. It is a software application or platform that enables users to create, manage, and modify digital content without requiring advanced technical knowledge. CMS allows users to easily create and organize content
 How to Add Elements to the End of an Array in PHP
Feb 07, 2025 am 11:17 AM
Arrays are linear data structures used to process data in programming. Sometimes when we are processing arrays we need to add new elements to the existing array. In this article, we will discuss several ways to add elements to the end of an array in PHP, with code examples, output, and time and space complexity analysis for each method. Here are the different ways to add elements to an array: Use square brackets [] In PHP, the way to add elements to the end of an array is to use square brackets []. This syntax only works in cases where we want to add only a single element. The following is the syntax: $array[] = value; Example
 Which country is the Nexo exchange from? Where is it? A comprehensive introduction to the Nexo exchange
Mar 05, 2025 pm 05:09 PM
Nexo Exchange: Swiss cryptocurrency lending platform In-depth analysis Nexo is a platform that provides cryptocurrency lending services, supporting the mortgage and lending of more than 40 crypto assets, fiat currencies and stablecoins. It dominates the European and American markets and is committed to improving the efficiency, security and compliance of the platform. Many investors want to know where the Nexo exchange is registered, and the answer is: Switzerland. Nexo was founded in 2018 by Swiss fintech company Credissimo. Nexo Exchange Geographical Location and Regulation: Nexo is headquartered in Zug, Switzerland, a well-known cryptocurrency-friendly region. The platform actively cooperates with the supervision of various governments and has been in the US Financial Crime Law Enforcement Network (FinCEN) and Canadian Finance


