The content of this article is about how to integrate JWT authentication in SpringBoot (with code). It has certain reference value. Friends in need can refer to it. I hope it will be useful to you. Helps.
1. About JWT
1.1 What is JWT
The beginning of the cliché, if we want to use such a tool, we must first know the following questions.
So what is JWT? The following is my translation of the introduction to JWT on the jwt official website.
JSON Web Token (JWT) is an open standard (RFC 7519) that defines a compact and independent method for securely transmitting information between parties using JSON objects.
Now we know that JWT is actually an open standard for securely transmitting data represented by JSON between multiple points. During the transmission process, JWT appears in our field of vision in the form of a string. The information in this string can be verified and trusted through digital signatures. (Recommended: Java Tutorial)
What are the application scenarios of JWT in actual development?
This should be considered the most common usage scenario of JWT. In the front-end interface, once the user logs in successfully, the JWT returned by the back-end will be received. Subsequent requests will include the JWT returned by the backend as credentials for access to backend routes, services, and resources.
Using JWT to transfer information between multiple parties has a certain degree of security. For example, JWT can use HMAC, RSA asymmetric encryption algorithm and ECDSA digital signature algorithm to authenticate JWT. Signing can ensure that the sender of the message is the real sender, and using the signature calculation of header and payload, we can also verify whether the sent message has been tampered with.
Generally speaking, JWT is a string composed of three parts: header.payload.signature. There are too many posts on the Internet to introduce this part. So just give a brief introduction here.
header consists of the signature algorithm used and the type of token. For example, the type of token is an open standard such as JWT, and the signature used The algorithm is HS256, which is the HmacSHA256 algorithm. Other encryption algorithms include HmacSHA512, SHA512withECDSA, etc.
Then convert this JSON object containing two attributes into a string and then use Base64 encoding to finally form the JWT header.
payload To be more straightforward, it is similar to the data in your requestBody. There are just three types, pre-declared, custom and private. Like iss sender, exp expiration time are all pre-registered statements.
Pre-declaring data in the payload is not mandatory, but is officially recommended. Then this string of JSON similar to requestBody is Base64 encoded to form the second part of the JWT.
If you want to generate signature, you need to use the secret in the jwt custom configuration item, which is the key required for Hmac algorithm encryption. Connect the previously Base64-encoded header and payload with ., then use a custom key to sign the message, and finally generate a signature.
The generated signature is used to verify that the message has not been changed during transmission. When using an asymmetric encryption algorithm for signing, it can also be used to verify whether the sender of the JWT is the same person as the sender declared in the payload.
The code is as follows.
public String createJwt(String userId, String projectId) throws IllegalArgumentException, UnsupportedEncodingException {
    Algorithm al = Algorithm.HMAC256(secret);
    Instant instant = LocalDateTime.now().plusHours(outHours).atZone(ZoneId.systemDefault()).toInstant();
    Date expire = Date.from(instant);
    String token = JWT.create()
            .withIssuer(issuer)
            .withSubject("userInfo")
            .withClaim("user_id", userId)
            .withClaim("project_id", projectId)
            .withExpiresAt(expire)
            .sign(al);
    return token;
}The two Claims passed in are the custom payloads in the project, al is the selected algorithm, and secret is the key to sign the information,subject is the subject of the token, and withExpiresAt identifies the expiration time of the token.
After the user successfully logs in to the system, the token is used as the return parameter and returned to the front end.
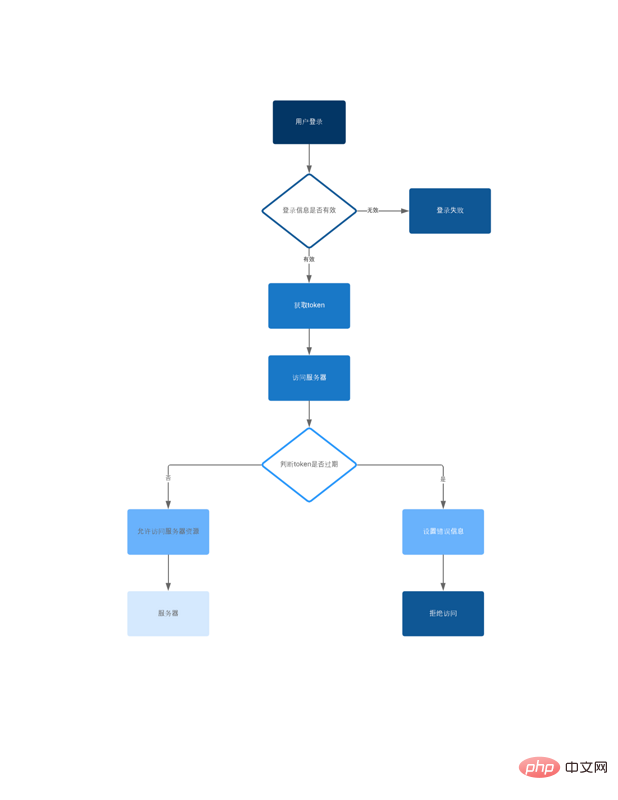
After the token is returned to the front-end, what the back-end has to do is to verify whether the token is legal and whether the server's resources can be accessed. It can be verified mainly through the following methods.
Use JWTVerifier to parse the token. This is the first step to verify whether the token is legal. For example, the token passed from the front end is a string without any Meaningful string, an error can be thrown at this step. Sample code is as follows.
try {
    Algorithm algorithm = Algorithm.HMAC256(secret);
    JWTVerifier verifier = JWT.require(algorithm).build();
    DecodedJWT jwt = verifier.verify(token);
} catch (JWTVerificationException e) {
    e.printStackTrace();
}JWTVerifier can use the algorithm that specifies the secret signature and the specified claim to verify the legitimacy of the token.
After judging that the token is valid, verify the validity of the token.
try {
    Algorithm algorithm = Algorithm.HMAC256(secret);
    JWTVerifier verifier = JWT.require(algorithm).build();
    DecodedJWT jwt = verifier.verify(token);
    if (jwt.getExpiresAt().before(new Date())) {
        System.out.println("token已过期");
        return null;
    }
} catch (JWTVerificationException e) {
    e.printStackTrace();
    return null;
}If the token expires, access to server resources is not allowed. The specific process is as follows.

The validity time of the token created above is configurable, assuming it is 2 hours, and the user logs in and works continuously for 1 hour At 59 minutes, when performing a very important operation, click OK. At this time, the token expired. If the program does not have a protection strategy, then nearly two hours of the user's work will be in vain.
When encountering such a problem, our previous process design will inevitably face a reconstruction. You may have questions, isn't it necessary to refresh the token's expiration time for each operation after the user logs in?
Then the question comes. We know that the token is composed of three pieces of content header.payload.signature, and the expiration time belongs to the payload. If the expiration time is changed, then in the end The hash of the generated payload is bound to be different from the one generated last time.
In other words, this is a brand new token. How does the front end receive this new token? The conceivable solution is nothing more than to continuously refresh the token based on the return in the response header for each request. But this method invades the business layer of front-end development. Each interface needs to refresh the token.
You may say that it is nothing more than adding an interceptor, which does not intrude too much on the business. Even though this part of the logic is written in the interceptor, the front end has this extra code because of the token authentication logic. In terms of functional division of labor, this part of the code is actually the back-end logic.
To put it more straightforwardly, refreshing the token and managing the timeliness of the token should be done by the backend. The front end does not need and should not care about this part of the logic.
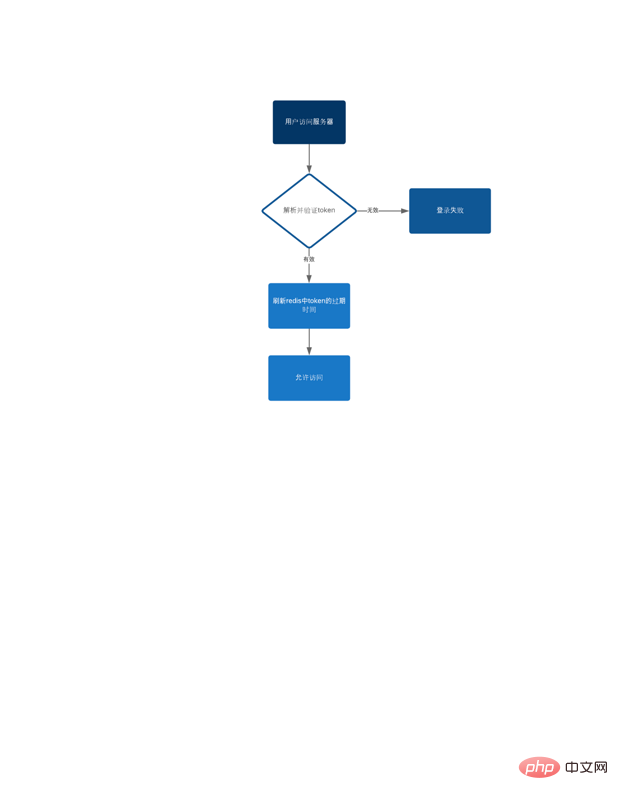
In summary, the expiration time of the refresh token must be placed on the backend, and whether the token is valid cannot be judged by judging the expire in the payload in the JWT. .
So, after the user successfully logs in and returns the token to the front end, it needs to be written into the Redis cache with a unique representation as the key and the current token as the value. And after each user request is successful, the expiration time of the token is refreshed. The process is as follows.

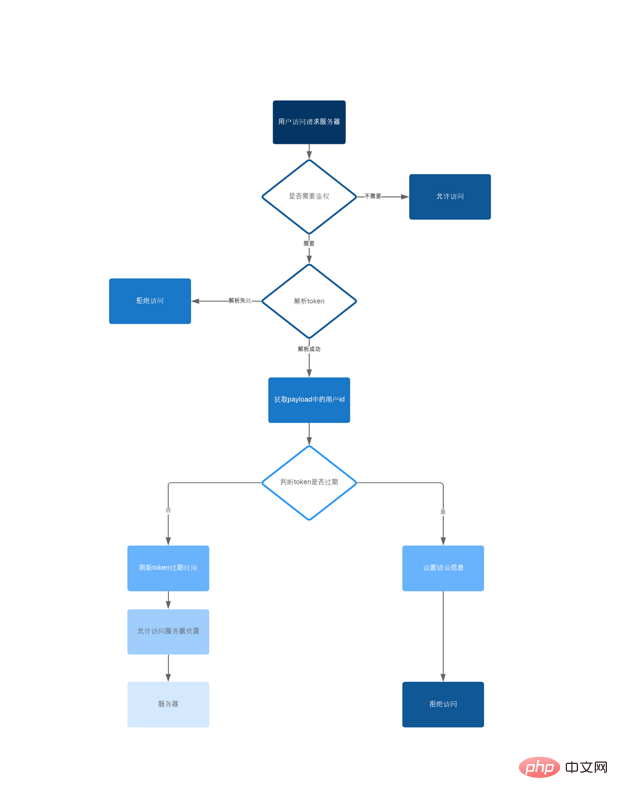
After such reconstruction, the process becomes like this.

There is an additional process to refresh the token in the process. As long as the user logs in to the system, every operation will refresh the token's expiration time, and there will be no data loss caused by sudden failure during an operation as mentioned before.
Within two hours after the user logs in, if the user does not perform any operation, then requesting the interface again after 2 hours will be directly denied access by the server.
4. Summary
Generally speaking, it is not recommended to put particularly sensitive information in JWT. If the asymmetric encryption algorithm is not used, you can directly go to the jwt official website to analyze it online after copying the token. If the request is intercepted, all information inside it is equal to transparent.
But JWT can be used as a credential to access server resources for a period of time. For example, if the JWT payload contains the userId field, then the legitimacy of the user identified by the token can be verified. For example, is the user currently locked out? Does the user identified by this userId exist in our system? etc.
And by making the token public, users can log in from multiple terminals at the same time. Creating a token after logging in like before limits the user to only be able to log in on one device at the same time.
The above is the detailed content of How to integrate JWT authentication in SpringBoot (with code). For more information, please follow other related articles on the PHP Chinese website!