 Operation and Maintenance
 Linux Operation and Maintenance
 How to safely configure Mysql database in Linux
How to safely configure Mysql database in Linux
The content of this article is to introduce how to safely configure the Mysql database in Linux. It has certain reference value. Friends in need can refer to it. I hope it will be helpful to you.
Directory:
1. Modify the password of the mysql administrator account root (2 Method)
2.Modify the mysql administrator account root
## 3.Mysql administrator root account password forgotten solution (2 methods)
4.Create database user (3 methods)
5.mysql database permission management
Local permission
Network permission
Revoke permission
Delete user
1. Change the password of mysql administrator account root
Method 1: shell command
mysqladmin -u root -p password "123"
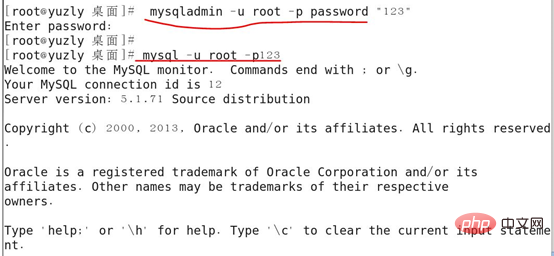
2. View the table where the password is stored

Method 2: mysql database command
mysql>use mysql;
mysql>update user set password=password('123') where user='root' and host='localhost';
mysql> FLUSH PRIVILEGES;        #刷新
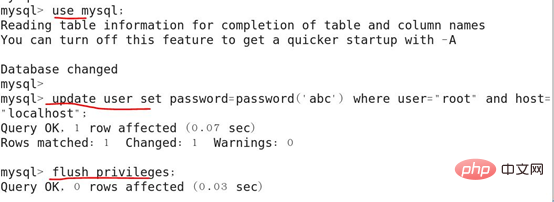
Test whether the password change is successful
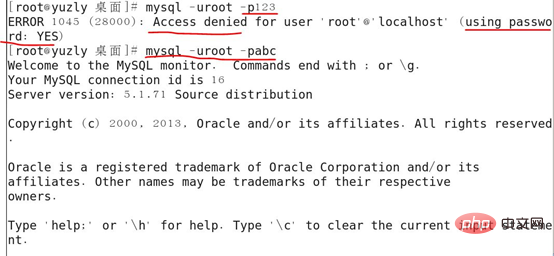
2. Modify the mysql administrator account root
##update mysql.user set user="admin" where user="root" and host="localhost";
flush privileges;

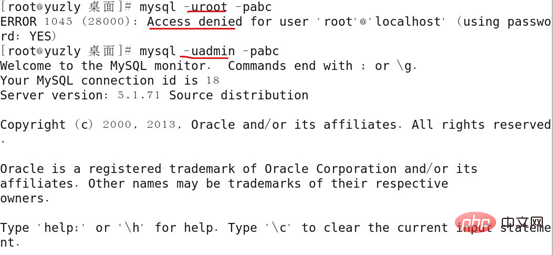
3. Mysql administrator root account password is forgotten
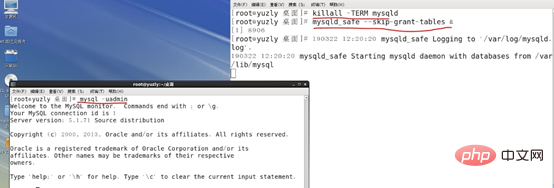
Method 1:
killall -TERM mysqld
mysqld_safe --skip-grant-tables &
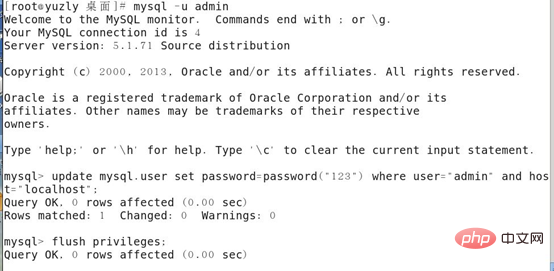
mysql -u admin
mysql>update user set password=password('123456') where user='admin' and host='localhost';
mysql> FLUSH PRIVILEGES;
MySQL> quit

Method 2:
Modify/etc/my.cnfAdd under [Mysqld]:
skip-grant-tables
mysql -u root
mysql>update user set password=password('123') where user='admin' and host='localhost';
mysql> FLUSH PRIVILEGES;
MySQL> quit
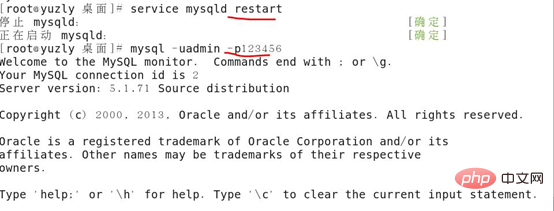
Restart MySQL, use new password to log in
Modify /etc/my.cnf Delete skip- grant-tables
Restart MySQL and log in with the new password

4. Create Database user
Method one:INSERT INTO user(host, user, password, select_priv, insert_priv, update_priv) VALUES ('localhost', 'yuzly', PASSWORD('yuzly'), 'Y', 'Y', 'Y');

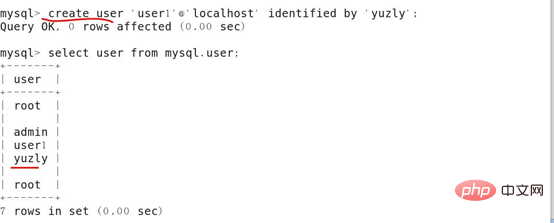
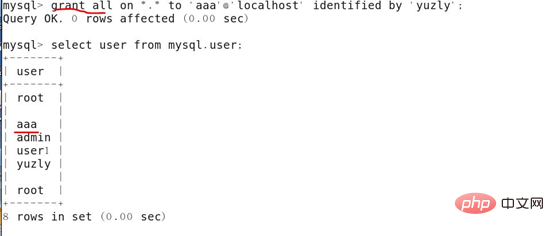
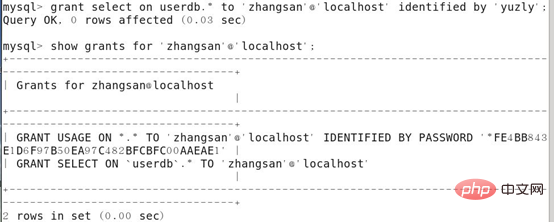
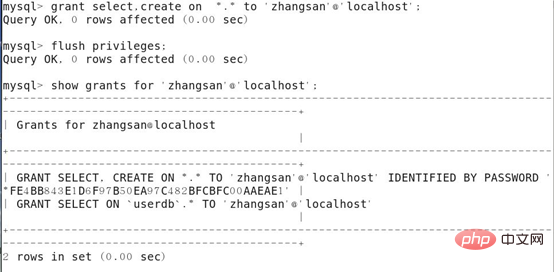
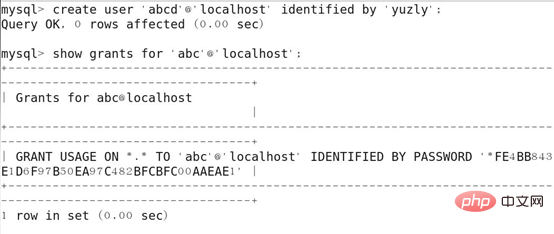
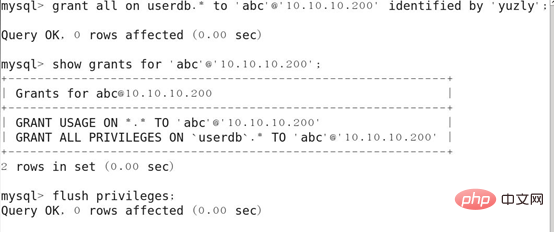
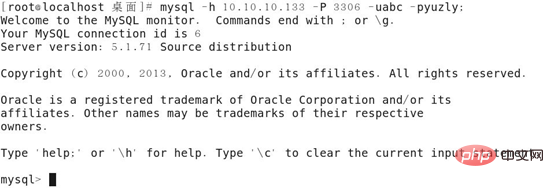
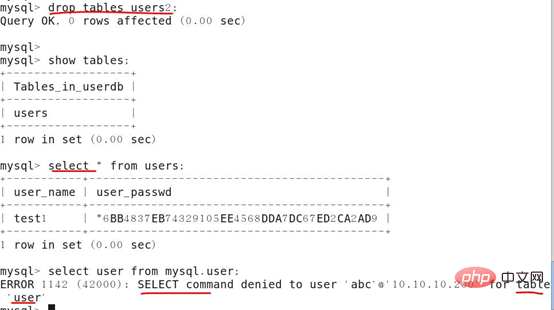
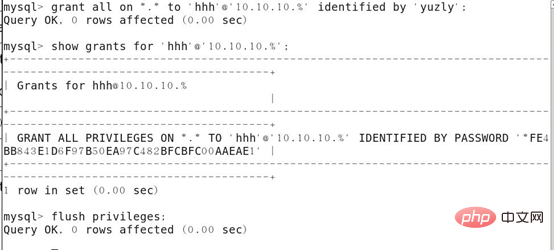
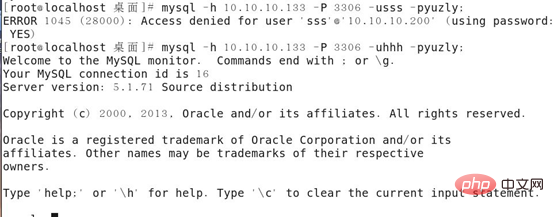
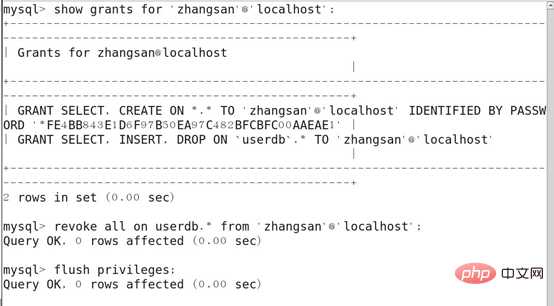
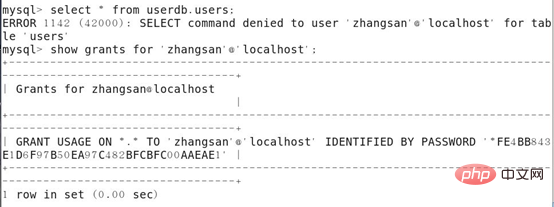
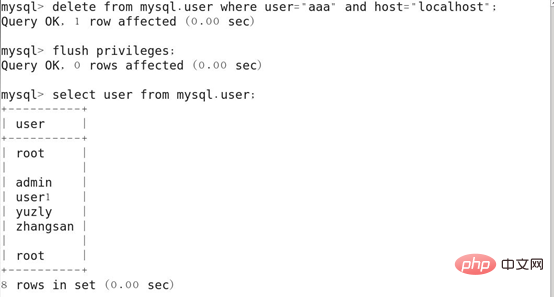
方法三:通过新用户授权创建数据库用户 五、权限管理 本地权限 1.创建一个zhang用户,只给select权限,然后查看权限 2.登录zhang用户,mysql -uzhang -pyuzly测试,创建一个表,下图显示被拒绝,当前账户没有create权限 3.登录管理员账户,给zhangsan账户添加create权限 4.重新登录zhangsan账户,测试是否具有create权限,下图说明具有create权限 5.插入一条数据,下图提示没有insert权限 6.登录管理员账户,给zhangsan账户添加insert权限 7.重新登录zhangsan账户,测试是否具有insert权限,下图说明具有insert权限 8.创建的新用户,默认没有任何权限,下图可以看到创建的用户默认是没有任何权限的 9.登录新创建的用户mysql -uabcd -pyuzly,测试,下图可以看到abcd没有select等权限,用show只能查看mysql系统自带的东西,别的用户创建的数据库等看不到 远程连接权限 1.创建一个账户,赋予远程登录权限 2.测试,从另一台Linux的Mysql客户端登录验证 3.下图可以看到,abc用户对userdb数据库具有任何权限,但对别的数据库没有任何权限,例如mysql.user 4.远程连接限制一个网段 5.测试 撤销权限 测试,撤消zhangsan账户的权限是否生效 删除账户CREATE USER 'user1'@'localhost' IDENTIFIED BY 'yuzly';




grant all on userdb.* to 'abc'@'10.10.10.200' identified by 'yuzly';
flush privileges;
revoke all on userdb.* from 'zhangsan'@'localhost';
delete from mysql.user where user="aaa" and host="localhost";
相关视频教程推荐:《MySQL教程》
以上就是本篇文章的全部内容,希望能对大家的学习有所帮助。更多精彩内容大家可以关注php中文网相关教程栏目!!!
The above is the detailed content of How to safely configure Mysql database in Linux. For more information, please follow other related articles on the PHP Chinese website!

Hot AI Tools

Undresser.AI Undress
AI-powered app for creating realistic nude photos

AI Clothes Remover
Online AI tool for removing clothes from photos.

Undress AI Tool
Undress images for free

Clothoff.io
AI clothes remover

AI Hentai Generator
Generate AI Hentai for free.

Hot Article

Hot Tools

Notepad++7.3.1
Easy-to-use and free code editor

SublimeText3 Chinese version
Chinese version, very easy to use

Zend Studio 13.0.1
Powerful PHP integrated development environment

Dreamweaver CS6
Visual web development tools

SublimeText3 Mac version
God-level code editing software (SublimeText3)

Hot Topics
 Ouyi okx installation package is directly included
Feb 21, 2025 pm 08:00 PM
Ouyi OKX, the world's leading digital asset exchange, has now launched an official installation package to provide a safe and convenient trading experience. The OKX installation package of Ouyi does not need to be accessed through a browser. It can directly install independent applications on the device, creating a stable and efficient trading platform for users. The installation process is simple and easy to understand. Users only need to download the latest version of the installation package and follow the prompts to complete the installation step by step.
 BITGet official website installation (2025 beginner's guide)
Feb 21, 2025 pm 08:42 PM
BITGet is a cryptocurrency exchange that provides a variety of trading services including spot trading, contract trading and derivatives. Founded in 2018, the exchange is headquartered in Singapore and is committed to providing users with a safe and reliable trading platform. BITGet offers a variety of trading pairs, including BTC/USDT, ETH/USDT and XRP/USDT. Additionally, the exchange has a reputation for security and liquidity and offers a variety of features such as premium order types, leveraged trading and 24/7 customer support.
 Get the gate.io installation package for free
Feb 21, 2025 pm 08:21 PM
Gate.io is a popular cryptocurrency exchange that users can use by downloading its installation package and installing it on their devices. The steps to obtain the installation package are as follows: Visit the official website of Gate.io, click "Download", select the corresponding operating system (Windows, Mac or Linux), and download the installation package to your computer. It is recommended to temporarily disable antivirus software or firewall during installation to ensure smooth installation. After completion, the user needs to create a Gate.io account to start using it.
 Ouyi Exchange Download Official Portal
Feb 21, 2025 pm 07:51 PM
Ouyi, also known as OKX, is a world-leading cryptocurrency trading platform. The article provides a download portal for Ouyi's official installation package, which facilitates users to install Ouyi client on different devices. This installation package supports Windows, Mac, Android and iOS systems. Users can choose the corresponding version to download according to their device type. After the installation is completed, users can register or log in to the Ouyi account, start trading cryptocurrencies and enjoy other services provided by the platform.
 How to automatically set permissions of unixsocket after system restart?
Mar 31, 2025 pm 11:54 PM
How to automatically set the permissions of unixsocket after the system restarts. Every time the system restarts, we need to execute the following command to modify the permissions of unixsocket: sudo...
 Why does an error occur when installing an extension using PECL in a Docker environment? How to solve it?
Apr 01, 2025 pm 03:06 PM
Causes and solutions for errors when using PECL to install extensions in Docker environment When using Docker environment, we often encounter some headaches...
 The page is blank after PHP is connected to MySQL. What is the reason for the invalid die() function?
Apr 01, 2025 pm 03:03 PM
The page is blank after PHP connects to MySQL, and the reason why die() function fails. When learning the connection between PHP and MySQL database, you often encounter some confusing things...
 gate.io official website registration installation package link
Feb 21, 2025 pm 08:15 PM
Gate.io is a highly acclaimed cryptocurrency trading platform known for its extensive token selection, low transaction fees and a user-friendly interface. With its advanced security features and excellent customer service, Gate.io provides traders with a reliable and convenient cryptocurrency trading environment. If you want to join Gate.io, please click the link provided to download the official registration installation package to start your cryptocurrency trading journey.


