What are the basic steps for PS portrait refinement?

ps is a very practical drawing tool. Many magazine blockbusters are completed with PS. If you learn PS, you can also become a master of editing. Especially girls who love beauty, if you learn PS, you can edit beautiful photos of yourself! Today we will learn about using PS to refine portraits, and reveal to you how to refine the faces of portraits in luxury blockbusters.
psBasic steps for portrait refinement:
1. First, we need to remove the obvious flaws on the character’s skin, such as acne, acne marks, etc. You can use the patch tool here to modify it (spot healing brush tool - patch tool).
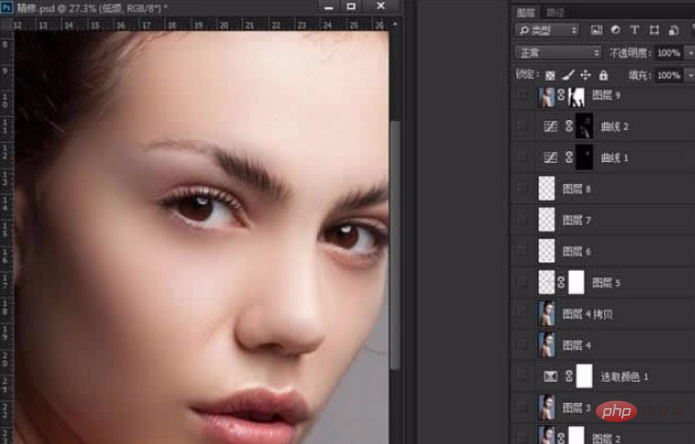
#2. Duplicate two layers in succession. Change the name of the first copied layer to "Low Frequency"; change the name of the second copied layer to "High Frequency". .

3. After modifying the low frequency, open the eyes of the high frequency. The high frequency is used to modify the skin texture. Select Filter-Other-High Contrast Preservation. The parameter setting is probably between 1 and 5.
4. Stamp the layer (CTRL SHIFT ALT E) and find the Camera Raw filter in the filter (note: the PS CC version can be found in the filter, CS6 needs to be set in Edit-Preferences-Camera Raw).

5. Add a mask to the adjusted photo, erase the excess blue in the eyes, and add optional colors to adjust blue, cyan and yellow. , adjust it to your favorite color.

#6. Stamp the layer again, use the Dodge tool, set the exposure to 30~50, use it to add the highlights and white parts of the character’s eyes. Polish it a bit too.

7. Use the pen tool to select the lips, give a feather value of 1~2, copy it (CTRL J) and give a hue and saturation (CTRL U). In the pop-up hue and saturation window, check the coloring box, and then increase the saturation of red appropriately.

#8. Next is the modification of the eyebrows. Create a new layer, switch to the brush tool, and press F5 in the brush tool to display the brush preset settings as shown below.

#9. After setting, use a brush to fill in the missing eyebrows.

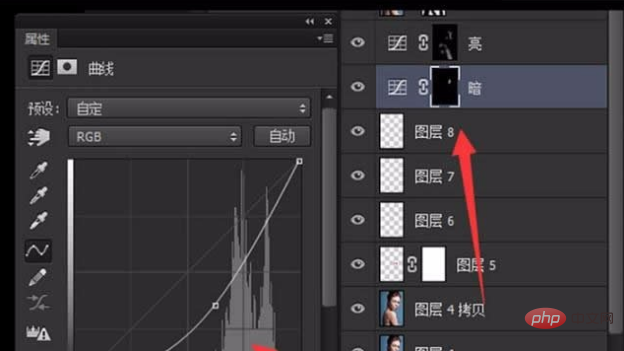
10. Use two orientations to add shadows and highlights to the characters. One curve is used to darken, and this curve is used to add shadows; one curve is used to lighten. highlight.


11. Finally save and export.

The above is the detailed content of What are the basic steps for PS portrait refinement?. For more information, please follow other related articles on the PHP Chinese website!

Hot AI Tools

Undresser.AI Undress
AI-powered app for creating realistic nude photos

AI Clothes Remover
Online AI tool for removing clothes from photos.

Undress AI Tool
Undress images for free

Clothoff.io
AI clothes remover

AI Hentai Generator
Generate AI Hentai for free.

Hot Article

Hot Tools

Notepad++7.3.1
Easy-to-use and free code editor

SublimeText3 Chinese version
Chinese version, very easy to use

Zend Studio 13.0.1
Powerful PHP integrated development environment

Dreamweaver CS6
Visual web development tools

SublimeText3 Mac version
God-level code editing software (SublimeText3)

Hot Topics
 How do I use Photoshop for creating social media graphics?
Mar 18, 2025 pm 01:41 PM
The article details using Photoshop for social media graphics, covering setup, design tools, and optimization techniques. It emphasizes efficiency and quality in graphic creation.
 How do I prepare images for web use in Photoshop (file size, resolution, color space)?
Mar 13, 2025 pm 07:28 PM
Article discusses preparing images for web use in Photoshop, focusing on optimizing file size, resolution, and color space. Main issue is balancing image quality with quick loading times.
 How do I use Photoshop's Content-Aware Fill and Content-Aware Move tools effectively?
Mar 13, 2025 pm 07:35 PM
Article discusses using Photoshop's Content-Aware Fill and Move tools effectively, offering tips on selecting source areas, avoiding mistakes, and adjusting settings for optimal results.
 How do I use Photoshop's video editing capabilities?
Mar 18, 2025 pm 01:37 PM
The article explains how to use Photoshop for video editing, detailing steps to import, edit, and export videos, and highlighting key features like the Timeline panel, video layers, and effects.
 How do I calibrate my monitor for accurate color in Photoshop?
Mar 13, 2025 pm 07:31 PM
Article discusses calibrating monitors for accurate color in Photoshop, tools for calibration, effects of improper calibration, and recalibration frequency. Main issue is ensuring color accuracy.
 How do I prepare images for web using Photoshop (optimize file size, resolution)?
Mar 18, 2025 pm 01:35 PM
Article discusses optimizing images for web using Photoshop, focusing on file size and resolution. Main issue is balancing quality and load times.
 How do I create animated GIFs in Photoshop?
Mar 18, 2025 pm 01:38 PM
Article discusses creating and optimizing animated GIFs in Photoshop, including adding frames to existing GIFs. Main focus is on balancing quality and file size.
 How do I prepare images for print using Photoshop (resolution, color profiles)?
Mar 18, 2025 pm 01:36 PM
The article guides on preparing images for print in Photoshop, focusing on resolution, color profiles, and sharpness. It argues that 300 PPI and CMYK profiles are essential for quality prints.


