 Backend Development
 PHP Tutorial
 Case study of the combination of ThinkPHP5.1 framework and Workerman's GatewayWorker framework
Case study of the combination of ThinkPHP5.1 framework and Workerman's GatewayWorker framework
GatewayWorker is a distributed deployable TCP long connection framework developed based on Workerman. It is specially used to quickly develop TCP long connection applications, such as app push servers, instant IM servers, game servers, Internet of Things, and smart homes. Wait
Document address: http://www.workerman.net/gatewaydoc/

1. Test the official DEMO (Windows version)
1. Download the demo (Get your own in the comments below)
2. Unzip it to any location, here is:
D:\phpStudy\PHPTutorial\WWW\GatewayWorker
3. Enter the GatewayWorker directory
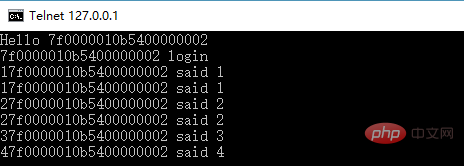
4. Double-click start_for_win.bat to start. (If an error occurs, please refer to here to set the php environment variable), the effect is as follows

5. Run telnet 127.0.0.1 8282 in the command line window, enter any characters to chat (not For local testing, please replace 127.0.0.1 with the actual IP).

PS: The above indicates that the TCP connection test is successful
2. Modify the test websocket
1. Need to modify start_gateway.php specifies the websocket protocol, like this
$gateway = new Gateway(websocket://0.0.0.0:7272);
2. Restart start_for_win.bat
3. Test js

Summary: You only need to change the protocol and port of one file (start_gateway.php), and nothing else needs to be changed.
3. Integration with ThinkPHP5.1 framework
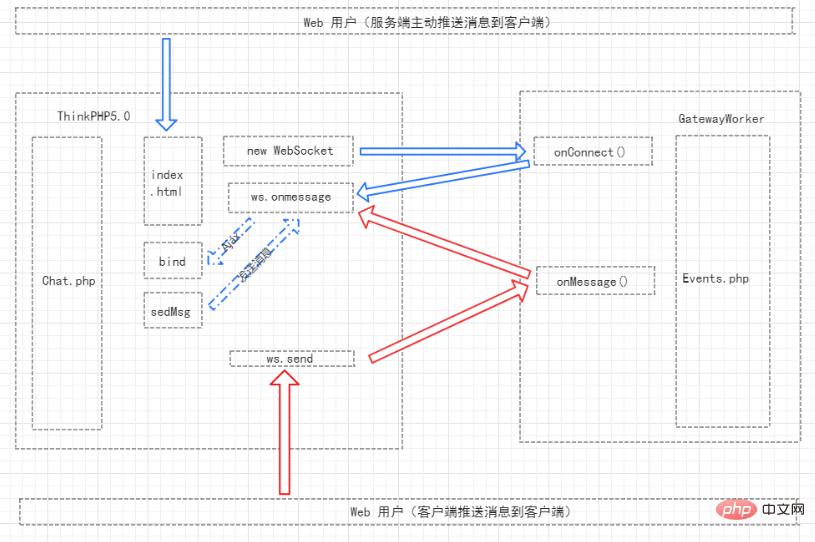
(1) The server actively pushes messages to the client
Principle :
1. The TP5.1 framework project and the independent deployment of GatewayWorker do not interfere with each other
2. All business logic is requested from the website (websocket connected) page to TP5 through post/get. 1 Completed in the controller of the framework
3. GatewayWorker does not accept data sent from the client, that is, GatewayWorker does not process any business logic, and GatewayWorker is only used as a one-way push channel
4. Only when the TP5.1 framework needs to actively push data to the browser, the Gateway's API (GatewayClient) is called in the TP5.1 framework to complete the push
Specific implementation steps
1. The website page establishes a websocket connection with the GatewayWorker
ws = new WebSocket("ws://127.0.0.1:7272");2. When the GatewayWorker finds that a page initiates a connection, it sends the client_id of the corresponding connection to the website page
Event.php content
public static function onConnect($client_id)
{
    $resData = [
        'type' => 'init',
        'client_id' => $client_id,
        'msg' => 'connect is success' // 初始化房间信息
    ];
    Gateway::sendToClient($client_id, json_encode($resData));
}#index.html Content
GatewayWorker的websocket连接
GatewayWorker的websocket连接
3. After the website page receives the client_id, it triggers an ajax request (index/chat_room/bind) to send the client_id to TP5.0 backend, bind method
/*
 * 用户登录后初始化以及绑定client_id
 */
public function bind()
{
    // 设置GatewayWorker服务的Register服务ip和端口,请根据实际情况改成实际值
    Gateway::$registerAddress = '127.0.0.1:1238';
    $uid = $this->userId;
    $group_id = $this->groupId;
    $client_id = request()->param('client_id');
    // client_id与uid绑定
    Gateway::bindUid($client_id, $uid);
    // 加入某个群组(可调用多次加入多个群组)
    Gateway::joinGroup($client_id, $group_id);
}4. After receiving the client_id, the backend uses GatewayClient to call Gateway::bindUid($client_id, $uid) to compare the client_id with the current uid (user id or client unique identifier) ) binding. If there is a group or group sending function, you can also use Gateway::joinGroup($client_id, $group_id) to add the client_id to the corresponding group
Return value after successful connection

PS: The above return value is the json data returned after the GatewayWorker service successfully connects
5. All requests initiated by the page are directly post/get to the mvc framework for unified processing, including sending messages
Send messages through sendMessage (the server actively pushes messages to the client)
// mvc后端发消息 利用GatewayClient发送 Events.php
public function sendMessage()
{
    // stream_socket_client(): unable to connect to tcp://127.0.0.1:1236
    $uid = $this->userId;
    $group = $this->groupId;
    $message = json_encode([
      'type'=>'say',
      'msg'=>'Hello ThinkPHP5'
    ]);
    // 设置GatewayWorker服务的Register服务ip和端口,请根据实际情况改成实际值
    Gateway::$registerAddress = '127.0.0.1:1238';
    // 向任意uid的网站页面发送数据
    Gateway::sendToUid($uid, $message);
    // 向任意群组的网站页面发送数据,如果开启,则会向页面发送两条一样的消息
    //Gateway::sendToGroup($group, $message);
}6. When the mvc framework needs to send data to a certain uid or a group during business processing, call it directly GatewayClient's interface Gateway::sendToUid Gateway::sendToGroup can be sent after waiting.
Access the sendMessage operation through the browser, test results

PS: The above message It is TP5.0 that sends write messages through GatewayClient\Gateway and has no direct relationship with the GatewayWorker service
The above is the server actively pushing messages to the client
Note the distinction:
1 , The server actively pushes messages to the client
2. The client pushes messages to the client
(2) The client pushes messages to the client
Modify the sending and receiving of messages from client to client. Modify Events.php of GatewayWorker below (developers only need to pay attention to this file)
public static function onConnect($client_id)
{
    $resData = [
        'type' => 'init',
        'client_id' => $client_id,
        'msg' => 'connect is success' // 初始化房间信息
    ];
    Gateway::sendToClient($client_id, json_encode($resData));
}

/**
 * 当客户端发来消息时触发
 * @param int $client_id 连接id
 * @param mixed $message 具体消息
 */
public static function onMessage($client_id, $message)
{
    // 服务端console输出
    //echo "msg : $message \r\n";

    // 解析数据
    $resData = json_decode($message, true);
    $type = $resData['type'];
    $roomId = $resData['roomId'];
    $userId = $resData['userId']; // 未登录,则传递一个随机
    $userName = $resData['userName']; // 未登录,则传递一个随机
    $content = isset($resData['content']) ? $resData['content'] : 'default content';

    //将时间全部置为服务器时间
    $serverTime = date('Y-m-d H:i:s', time());

    switch ($type) {
        case 'join':  // 用户进入直播间
            //将客户端加入到某一直播间
            Gateway::joinGroup($client_id, $roomId);
            $resData = [
                'type' => 'join',
                'roomId' => $roomId,
                'userName' => $userName,
                'msg' => "enters the Room", // 发送给客户端的消息,而不是聊天发送的内容
                'joinTime' => $serverTime // 加入时间
            ];

            // 广播给直播间内所有人,谁?什么时候?加入了那个房间?
            Gateway::sendToGroup($roomId, json_encode($resData));
            break;
        case 'say':  // 用户发表评论
            $resData = [
                'type' => 'say',
                'roomId' => $roomId,
                'userName' => $userName,
                'content' => $content,
                'commentTime' => $serverTime // 发表评论时间
            ];
            // 广播给直播间内所有人
            Gateway::sendToGroup($roomId, json_encode($resData));
            break;
        case 'pong':
            break; // 接收心跳
        default:
            //Gateway::sendToAll($client_id,$json_encode($resData));
            break;
    }
}index.html Chat Room Page
<!DOCTYPE html>
<html>
<head>
<meta charset="UTF-8">
<title>GatewayWorker的websocket连接</title>
</head>
<body>
<h1 id="GatewayWorker的websocket连接">GatewayWorker的websocket连接</h1>
<div>
websocket send content:<input type="text" style="height: 50px; width: 100%;" name="data" id="data">
<p></p>
<button id="submit" onclick="sub()">send info</button>
<p></p>
<div id="output"></div>
</div>
<script src="https://cdn.bootcss.com/jquery/3.3.1/jquery.min.js"></script>
<script src="https://cdn.bootcss.com/reconnecting-websocket/1.0.0/reconnecting-websocket.min.js"></script>
<script language="javascript" type="text/javascript">
var wsUri = "ws://notes.env:7272/";
var outputContent;
var roomId = 'L06777';
var userId = 4840043;
var userName = 'Tinywan' + Math.random();
// 把当新链接的客户端加入到当前直播间,消息类型:{"type":"join","roomId":"1002","userId":"88","userName":"userName"}
var joinContent = {
"type": "join",
"roomId": roomId,
"userId": userId,
"userName": userName
};
// 初始化页面操作
function init() {
outputContent = document.getElementById("output");
initWebSocket();
}
function initWebSocket() {
websocket = new ReconnectingWebSocket(wsUri);
websocket.onopen = function (evt) {
onOpen(evt)
};
websocket.onclose = function (evt) {
onClose(evt)
};
websocket.onmessage = function (evt) {
onMessage(evt)
};
websocket.onerror = function (evt) {
onError(evt)
};
}
function onOpen(evt) {
console.log("CONNECTED");
}
// 接收数据
function onMessage(evt) {
var data = eval("(" + evt.data + ")");
var type = data.type || '';
switch (type) {
case 'init':
// 把当新链接的客户端加入到当前直播间
console.log('-------init--------' + data);
websocket.send(JSON.stringify(joinContent));
writeToScreen('<span style="color: blue;">RESPONSE: ' + evt.data + '</span>');
break;
case 'join':
console.log('-------join--------' + data);
writeToScreen(
'<span style="color: blue;"> ' + ' 新用户: ' + '</span>' +
'<span style="color: red;"> ' + data.userName + '</span>' +
'<span style="color: green;"> ' + data.joinTime + '</span>' +
'<span style="color: black;"> ' + data.msg + '</span>'
);
break;
case 'say':
console.log('say======' + data);
writeToScreen(
'<span style="color: blue;"> ' + ' Chat: ' + '</span>' +
'<span style="color: red;"> ' + data.userName + '</span>' +
'<span style="color: #D2691E;"> ' + data.commentTime + '</span>' +
'<span style="color: black;"> ' + data.content + '</span>'
);
break;
default :
console.log(data);
break;
}
}
function onError(evt) {
console.log('<span style="color: red;">ERROR:</span> ' + evt.data);
}
function onClose(evt) {
console.log("DISCONNECTED");
}
function writeToScreen(message) {
var pre = document.createElement("p");
pre.style.wordWrap = "break-word";
pre.innerHTML = message;
outputContent.appendChild(pre);
}
function sub() {
var text = document.getElementById('data').value;
// {"type":"say",,"msg":"Welcome 111111111111Live Room"}
var sayContent = {
"type": "say",
"roomId": roomId,
"userId": userId,
"userName": userName,
"content": text
};
websocket.send(JSON.stringify(sayContent));
}
window.addEventListener("load", init, false);
</script>
</body>
</html> Restart the service
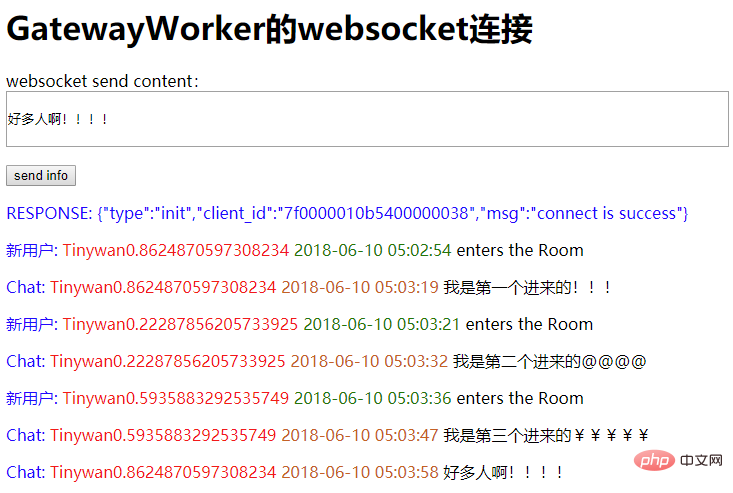
Test results

##Extension:
Can store messages In Redis, count the PVof the live broadcast room through Redis
$redis = new \Redis;
$redis->connect('127.0.0.1',6379);
$key = "PV:ROOM:".$roomId;
$field = "ROOM_TOTAL_PV";
// 进入房间的人数增长,自增 ,增加PV统计
$redis->hIncrBy($key,$field,1);
相关推荐:《PHP教程》
The above is the detailed content of Case study of the combination of ThinkPHP5.1 framework and Workerman's GatewayWorker framework. For more information, please follow other related articles on the PHP Chinese website!

Hot AI Tools

Undresser.AI Undress
AI-powered app for creating realistic nude photos

AI Clothes Remover
Online AI tool for removing clothes from photos.

Undress AI Tool
Undress images for free

Clothoff.io
AI clothes remover

AI Hentai Generator
Generate AI Hentai for free.

Hot Article

Hot Tools

Notepad++7.3.1
Easy-to-use and free code editor

SublimeText3 Chinese version
Chinese version, very easy to use

Zend Studio 13.0.1
Powerful PHP integrated development environment

Dreamweaver CS6
Visual web development tools

SublimeText3 Mac version
God-level code editing software (SublimeText3)

Hot Topics
 Implement file upload and download in Workerman documents
Nov 08, 2023 pm 06:02 PM
To implement file upload and download in Workerman documents, specific code examples are required. Introduction: Workerman is a high-performance PHP asynchronous network communication framework that is simple, efficient, and easy to use. In actual development, file uploading and downloading are common functional requirements. This article will introduce how to use the Workerman framework to implement file uploading and downloading, and give specific code examples. 1. File upload: File upload refers to the operation of transferring files on the local computer to the server. The following is used
 Which one is better, swoole or workerman?
Apr 09, 2024 pm 07:00 PM
Swoole and Workerman are both high-performance PHP server frameworks. Known for its asynchronous processing, excellent performance, and scalability, Swoole is suitable for projects that need to handle a large number of concurrent requests and high throughput. Workerman offers the flexibility of both asynchronous and synchronous modes, with an intuitive API that is better suited for ease of use and projects that handle lower concurrency volumes.
 How to implement the reverse proxy function in the Workerman document
Nov 08, 2023 pm 03:46 PM
How to implement the reverse proxy function in the Workerman document requires specific code examples. Introduction: Workerman is a high-performance PHP multi-process network communication framework that provides rich functions and powerful performance and is widely used in Web real-time communication and long connections. Service scenarios. Among them, Workerman also supports the reverse proxy function, which can realize load balancing and static resource caching when the server provides external services. This article will introduce how to use Workerman to implement the reverse proxy function.
 Workerman development: How to implement real-time video calls based on UDP protocol
Nov 08, 2023 am 08:03 AM
Workerman development: real-time video call based on UDP protocol Summary: This article will introduce how to use the Workerman framework to implement real-time video call function based on UDP protocol. We will have an in-depth understanding of the characteristics of the UDP protocol and show how to build a simple but complete real-time video call application through code examples. Introduction: In network communication, real-time video calling is a very important function. The traditional TCP protocol may have problems such as transmission delays when implementing high-real-time video calls. And UDP
 How to implement the basic usage of Workerman documents
Nov 08, 2023 am 11:46 AM
Introduction to how to implement the basic usage of Workerman documents: Workerman is a high-performance PHP development framework that can help developers easily build high-concurrency network applications. This article will introduce the basic usage of Workerman, including installation and configuration, creating services and listening ports, handling client requests, etc. And give corresponding code examples. 1. Install and configure Workerman. Enter the following command on the command line to install Workerman: c
 How to implement the timer function in the Workerman document
Nov 08, 2023 pm 05:06 PM
How to implement the timer function in the Workerman document Workerman is a powerful PHP asynchronous network communication framework that provides a wealth of functions, including the timer function. Use timers to execute code within specified time intervals, which is very suitable for application scenarios such as scheduled tasks and polling. Next, I will introduce in detail how to implement the timer function in Workerman and provide specific code examples. Step 1: Install Workerman First, we need to install Worker
 How to implement TCP/UDP communication in Workerman documentation
Nov 08, 2023 am 09:17 AM
How to implement TCP/UDP communication in the Workerman document requires specific code examples. Workerman is a high-performance PHP asynchronous event-driven framework that is widely used to implement TCP and UDP communication. This article will introduce how to use Workerman to implement TCP and UDP-based communication and provide corresponding code examples. 1. Create a TCP server for TCP communication. It is very simple to create a TCP server using Workerman. You only need to write the following code: <?ph
 How to use Workerman to build a high-availability load balancing system
Nov 07, 2023 pm 01:16 PM
How to use Workerman to build a high-availability load balancing system requires specific code examples. In the field of modern technology, with the rapid development of the Internet, more and more websites and applications need to handle a large number of concurrent requests. In order to achieve high availability and high performance, the load balancing system has become one of the essential components. This article will introduce how to use the PHP open source framework Workerman to build a high-availability load balancing system and provide specific code examples. 1. Introduction to Workerman Worke


