Quickly deploy LNMP environment under Centos system
This article mainly talks about the rapid deployment of LNMP environment under Centos system. Interested friends can come and learn about it.
When the PHP language is running on the Linux system, it is necessary to deploy the corresponding Nginx, MySQL, PHP and other environments on the Linux system. Only when these environment parameters are set, PHP related applications The program can run normally. There are many ways to deploy the environment. You can install software environments one by one in manual mode, or you can use tools for rapid deployment. This article takes Alibaba Cloud's Centos system as an example to introduce how to quickly deploy the environment on the Centos system. Deploy LNMP environment with one click.
One-click deployment of the LNMP environment on Alibaba Cloud's Centos system requires the use of Alibaba Cloud's Alibaba Cloud Resource Orchestration Service, referred to as the ROS service. This service is free and does not require installation or download. You can use ROS to create a resource stack template file in JSON format, or use the template samples provided by ROS to create a set of Alibaba Cloud resources. In the process of this article, we will introduce the use of the LNMP_basic template in the ROS service console function to automatically create an ECS instance and deploy the LNMP environment on the instance.
One-click operation steps to deploy LNMP environment
(1) First enter the Alibaba Cloud official website and log in to ROS management console. If this is your first time using this service, you will be prompted to activate this service after logging in. This service is free and there is no need to worry about charges.
(2) After entering the ROS service management background, in the menu bar on the far left of the page, find the Key Help menu,select ECS instance related information under this menu can obtain the instance information data (such as server specifications), availability zone ID (ZoneId) and image ID (ImageId) of your Alibaba Cloud ECS server.
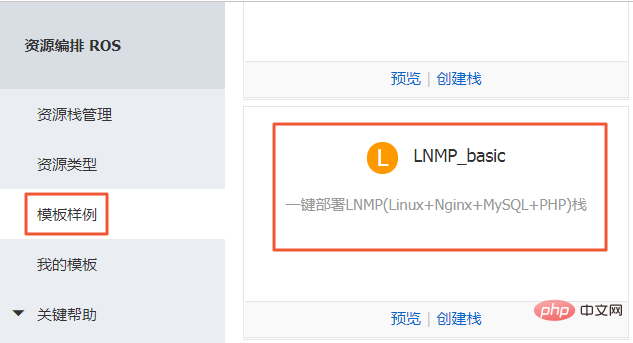
(3) Continue back to the leftmost menu bar, select the Template Sample menu, and in the opened template list data, select the LNMP_basic template.

(4) There is a preview button in the picture above. Enter the preview interface to view the JSON file configuration of the template. Here is a brief introduction Top-level field information in the JSON file:
"ROSTemplateFormatVersion" : "2015-09-01"==>Define the version information of the template.
"Description": "Deploy LNMP(Linux Nginx MySQL PHP) stack on 1 ECS instance. ***
WARNING *** Only support CentOS-7."== >Explain the template.
"Parameters" : { }==>Define some parameters of the template. In this example, the parameters defined by the template include: image ID, instance specifications, etc., and default values are specified.
"Resources" : { }==>Define the Alibaba Cloud resources to be created by this template. In this example, it is declared that an ECS instance and a security group will be created. The resource attributes declared here can refer to the parameters defined in <span style="color: rgb(0, 0, 0);">Parameters</span>.
"Outputs": { }: Define the resource information that the stack needs to output after the resource creation is completed. In this example, after the resource is created, the ECS instance ID, public IP address, and security group ID will be output.
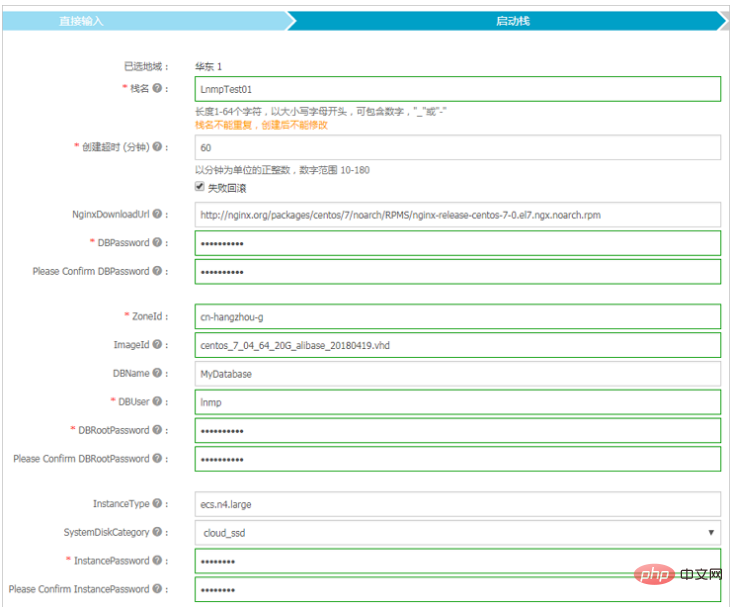
(5) Return to the picture in step 3, click the Create stack button, select the specific region in the drop-down box of region, and Click Next in the lower right corner of the page. In this example, choose China East 2. Then set some related configuration information of the stack. The relevant explanation is as follows:
- Stack name: Set a stack name, which cannot be repeated and cannot be modified after creation.
- Creation timeout: Set a time. If the resource is not successfully created within the set time period, the judgment will time out. You can choose whether to rollback on failure. If you choose rollback on failure, if any failure occurs during the creation process (including creation timeout), ROS will delete the successfully created resources.
- NginxDownloadUrl: Use the default Nginx download address.
- DBPassword and Please Confirm DBPassword: Set and confirm the password to access the MySQL database. According to the template definition, the password can only contain English letters and numbers.
- ZoneId: Fill in the availability zone ID where you need to create the resource. See step 2 for details.
- ImageId: Fill in the image ID used when creating the ECS instance. See step 2 for details.
- DBName: Fill in the MySQL database name.
- DBUser: Fill in the user name of the MySQL database.
- DBRootPassword and Please Confirm DBRootPassword: Set and confirm the password of the MySQL root account. According to the template definition, the password can only contain English letters and numbers.
- InstanceType: Fill in the ECS instance specifications you need. See step 2 for details.
- SystemDiskCategory: Select the cloud disk type as the system disk.
- InstancePassword and Please Confirm InstancePassword: Set and confirm the login password of the instance. According to the template definition, the password can only contain uppercase or lowercase English letters and numbers.
(6) Return to the picture in step 3, click the Create Stack button, and select the specific region in the drop-down box of region , and click Next in the lower right corner of the page. In this example, choose China East 2. Then set some related configuration information of the stack. The relevant explanation is as follows:

(7) Click the Create button on the page, and then the page promptsRequest submitted successfully.
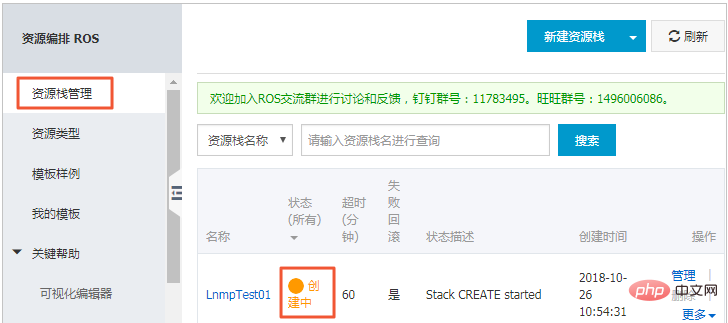
(8) Return to the picture in step 3, select Resource Stack Management on the left menu, Here you can view the creation of the stack progress etc.

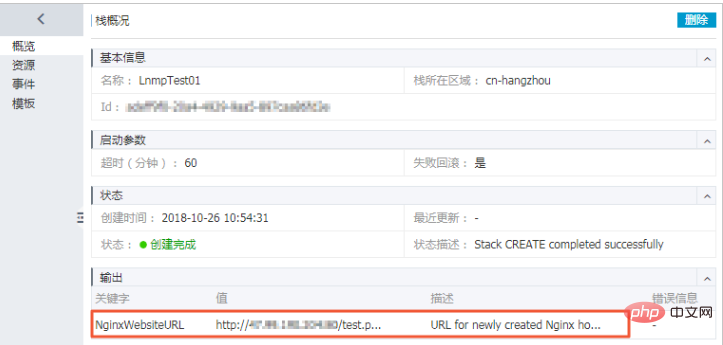
(9) After the stack is created, open the stack you just created and view in the output section of the stack overview page <span style="color: rgb(0, 0, 0);"></span>NginxWebsiteURL defined in <span style="color: rgb(0, 0, 0);">Outputs</span>. You can access the created LNMP environment through this address.

At this point, the relevant operations have been completed.
Related tutorials: PHP video tutorial
The above is the detailed content of Quickly deploy LNMP environment under Centos system. For more information, please follow other related articles on the PHP Chinese website!

Hot AI Tools

Undresser.AI Undress
AI-powered app for creating realistic nude photos

AI Clothes Remover
Online AI tool for removing clothes from photos.

Undress AI Tool
Undress images for free

Clothoff.io
AI clothes remover

Video Face Swap
Swap faces in any video effortlessly with our completely free AI face swap tool!

Hot Article

Hot Tools

Notepad++7.3.1
Easy-to-use and free code editor

SublimeText3 Chinese version
Chinese version, very easy to use

Zend Studio 13.0.1
Powerful PHP integrated development environment

Dreamweaver CS6
Visual web development tools

SublimeText3 Mac version
God-level code editing software (SublimeText3)

Hot Topics
 1387
1387
 52
52
 How to optimize CentOS HDFS configuration
Apr 14, 2025 pm 07:15 PM
Improve HDFS performance on CentOS: A comprehensive optimization guide to optimize HDFS (Hadoop distributed file system) on CentOS requires comprehensive consideration of hardware, system configuration and network settings. This article provides a series of optimization strategies to help you improve HDFS performance. 1. Hardware upgrade and selection resource expansion: Increase the CPU, memory and storage capacity of the server as much as possible. High-performance hardware: adopts high-performance network cards and switches to improve network throughput. 2. System configuration fine-tuning kernel parameter adjustment: Modify /etc/sysctl.conf file to optimize kernel parameters such as TCP connection number, file handle number and memory management. For example, adjust TCP connection status and buffer size
 What are the backup methods for GitLab on CentOS
Apr 14, 2025 pm 05:33 PM
Backup and Recovery Policy of GitLab under CentOS System In order to ensure data security and recoverability, GitLab on CentOS provides a variety of backup methods. This article will introduce several common backup methods, configuration parameters and recovery processes in detail to help you establish a complete GitLab backup and recovery strategy. 1. Manual backup Use the gitlab-rakegitlab:backup:create command to execute manual backup. This command backs up key information such as GitLab repository, database, users, user groups, keys, and permissions. The default backup file is stored in the /var/opt/gitlab/backups directory. You can modify /etc/gitlab
 Centos stops maintenance 2024
Apr 14, 2025 pm 08:39 PM
CentOS will be shut down in 2024 because its upstream distribution, RHEL 8, has been shut down. This shutdown will affect the CentOS 8 system, preventing it from continuing to receive updates. Users should plan for migration, and recommended options include CentOS Stream, AlmaLinux, and Rocky Linux to keep the system safe and stable.
 How to check CentOS HDFS configuration
Apr 14, 2025 pm 07:21 PM
Complete Guide to Checking HDFS Configuration in CentOS Systems This article will guide you how to effectively check the configuration and running status of HDFS on CentOS systems. The following steps will help you fully understand the setup and operation of HDFS. Verify Hadoop environment variable: First, make sure the Hadoop environment variable is set correctly. In the terminal, execute the following command to verify that Hadoop is installed and configured correctly: hadoopversion Check HDFS configuration file: The core configuration file of HDFS is located in the /etc/hadoop/conf/ directory, where core-site.xml and hdfs-site.xml are crucial. use
 What is the CentOS MongoDB backup strategy?
Apr 14, 2025 pm 04:51 PM
Detailed explanation of MongoDB efficient backup strategy under CentOS system This article will introduce in detail the various strategies for implementing MongoDB backup on CentOS system to ensure data security and business continuity. We will cover manual backups, timed backups, automated script backups, and backup methods in Docker container environments, and provide best practices for backup file management. Manual backup: Use the mongodump command to perform manual full backup, for example: mongodump-hlocalhost:27017-u username-p password-d database name-o/backup directory This command will export the data and metadata of the specified database to the specified backup directory.
 What steps are required to configure CentOS in HDFS
Apr 14, 2025 pm 06:42 PM
Building a Hadoop Distributed File System (HDFS) on a CentOS system requires multiple steps. This article provides a brief configuration guide. 1. Prepare to install JDK in the early stage: Install JavaDevelopmentKit (JDK) on all nodes, and the version must be compatible with Hadoop. The installation package can be downloaded from the Oracle official website. Environment variable configuration: Edit /etc/profile file, set Java and Hadoop environment variables, so that the system can find the installation path of JDK and Hadoop. 2. Security configuration: SSH password-free login to generate SSH key: Use the ssh-keygen command on each node
 Centos shutdown command line
Apr 14, 2025 pm 09:12 PM
The CentOS shutdown command is shutdown, and the syntax is shutdown [Options] Time [Information]. Options include: -h Stop the system immediately; -P Turn off the power after shutdown; -r restart; -t Waiting time. Times can be specified as immediate (now), minutes ( minutes), or a specific time (hh:mm). Added information can be displayed in system messages.
 Centos install mysql
Apr 14, 2025 pm 08:09 PM
Installing MySQL on CentOS involves the following steps: Adding the appropriate MySQL yum source. Execute the yum install mysql-server command to install the MySQL server. Use the mysql_secure_installation command to make security settings, such as setting the root user password. Customize the MySQL configuration file as needed. Tune MySQL parameters and optimize databases for performance.


