 Web Front-end
 CSS Tutorial
 How to perform regular polygon transformation of a single div with CSS
How to perform regular polygon transformation of a single div with CSS
This article purely uses CSS to transform a "single" div from a regular triangle to a regular octagon (a single div can only be a regular octagon at most), and finally uses the effect of animation to transform it into a regular polygon. Animation, and because regular polygons require a lot of trigonometric function calculations, for the sake of convenience, the sides of regular polygons are set to 100px.
Ixagonal triangle
The equilateral triangle does not need to use pseudo elements. It only needs to set the border width of p itself to generate it. First, let’s take a look at the side length and center line of the equilateral triangle. , if the side length is 100px, the center line is rounded to 87px (100 x sin (60) = 87).

So we need to set the length and width of p to 0, then set the width of the bottom border to 87px, and the left and right borders Set the width to 50px (and the color to transparent) to make a beautiful triangle.
1 2 3 4 5 |
|

Square
The square should be the simplest, just set the length and width to the same value. But there are actually two other methods. The first one is to set the length and width to 0, and set the top, bottom, left and right borders to 50px. The second one is to set the height to 0 and the width to 100px, and then a certain The side width is also set to 100, which is fine.
1 2 3 4 5 6 7 8 9 10 11 12 13 14 15 16 17 18 19 |
|

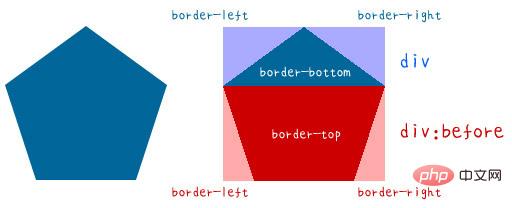
Regular pentagon
Regular pentagon needs to enter the field of basic trigonometric functions. Let us first Decompose the regular pentagon, use the original p as the upper triangle, and then use a pseudo element to create the lower trapezoid. Because the angle between each side of the regular pentagon is 108 degrees, you can calculate the upper triangle through trigonometric functions. The height is 59px (100 x cos(54)), the width is 192px (100x sin(54) x 2), the height of the lower trapezoid is 95px (100 x sin(72)), and the width of the long side is the same as the triangle above It's 192px.

After understanding the principle, you can use pseudo elements to match and create!
1 2 3 4 5 6 7 8 9 10 11 12 13 14 15 16 17 18 19 20 |
|

Regular hexagon
Each angle of a regular hexagon is 120 degrees, if viewed in the direction of pure CSS If so, just change the triangle on the regular pentagon to make a regular hexagon, which is just a combination of the upper and lower trapezoids. The long side of the trapezoid is 200px (100 x cos (60) x 2 100 ), the height of the trapezoid is 87px (100 x sin(60)).

So you can make a regular hexagon by slightly modifying the CSS of the regular pentagon.
1 2 3 4 5 6 7 8 9 10 11 12 13 14 15 16 17 18 19 20 |
|

Regular heptagon
The after pseudo-element must be used at the beginning of the regular heptagon, because the regular heptagon must It needs to be disassembled into three memory blocks, using the original p as the upper triangle, a pseudo element as the middle trapezoid, and then another pseudo element as the bottom trapezoid. The angles of the regular heptagons are not integers. It is 128 and 4/7 degrees, and the second decimal place is approximately 128.57, so the calculated result is as shown in the figure below. The key point is that you must clearly know what the length and width are.

After you have the length and width, start writing with CSS!
1 2 3 4 5 6 7 8 9 10 11 12 13 14 15 16 17 18 19 20 21 22 23 24 25 26 27 28 29 30 31 |
|

Regular octagon
The regular octagon actually turns the triangle on the regular heptagon into a trapezoid. Then the trapezoid in the middle becomes a rectangle. The angle between the regular octagon is 135 degrees. The calculated length and width of each area are as follows.

If you understand the same principle, it will be much easier to do it with CSS!
1 2 3 4 5 6 7 8 9 10 11 12 13 14 15 16 17 18 19 20 21 22 23 24 25 26 27 28 29 30 31 |
|

小结
以上就是纯粹利用CSS做出来的单一div的正多边形变换,如果熟练的话,其实加上动画效果,就可以做出像下面示例这个样子的变换动画啰!

相关教程:css视频教程
The above is the detailed content of How to perform regular polygon transformation of a single div with CSS. For more information, please follow other related articles on the PHP Chinese website!

Hot AI Tools

Undresser.AI Undress
AI-powered app for creating realistic nude photos

AI Clothes Remover
Online AI tool for removing clothes from photos.

Undress AI Tool
Undress images for free

Clothoff.io
AI clothes remover

Video Face Swap
Swap faces in any video effortlessly with our completely free AI face swap tool!

Hot Article

Hot Tools

Notepad++7.3.1
Easy-to-use and free code editor

SublimeText3 Chinese version
Chinese version, very easy to use

Zend Studio 13.0.1
Powerful PHP integrated development environment

Dreamweaver CS6
Visual web development tools

SublimeText3 Mac version
God-level code editing software (SublimeText3)

Hot Topics
 How to use bootstrap in vue
Apr 07, 2025 pm 11:33 PM
Using Bootstrap in Vue.js is divided into five steps: Install Bootstrap. Import Bootstrap in main.js. Use the Bootstrap component directly in the template. Optional: Custom style. Optional: Use plug-ins.
 The Roles of HTML, CSS, and JavaScript: Core Responsibilities
Apr 08, 2025 pm 07:05 PM
HTML defines the web structure, CSS is responsible for style and layout, and JavaScript gives dynamic interaction. The three perform their duties in web development and jointly build a colorful website.
 How to write split lines on bootstrap
Apr 07, 2025 pm 03:12 PM
There are two ways to create a Bootstrap split line: using the tag, which creates a horizontal split line. Use the CSS border property to create custom style split lines.
 Understanding HTML, CSS, and JavaScript: A Beginner's Guide
Apr 12, 2025 am 12:02 AM
WebdevelopmentreliesonHTML,CSS,andJavaScript:1)HTMLstructurescontent,2)CSSstylesit,and3)JavaScriptaddsinteractivity,formingthebasisofmodernwebexperiences.
 React's Role in HTML: Enhancing User Experience
Apr 09, 2025 am 12:11 AM
React combines JSX and HTML to improve user experience. 1) JSX embeds HTML to make development more intuitive. 2) The virtual DOM mechanism optimizes performance and reduces DOM operations. 3) Component-based management UI to improve maintainability. 4) State management and event processing enhance interactivity.
 How to set up the framework for bootstrap
Apr 07, 2025 pm 03:27 PM
To set up the Bootstrap framework, you need to follow these steps: 1. Reference the Bootstrap file via CDN; 2. Download and host the file on your own server; 3. Include the Bootstrap file in HTML; 4. Compile Sass/Less as needed; 5. Import a custom file (optional). Once setup is complete, you can use Bootstrap's grid systems, components, and styles to create responsive websites and applications.
 How to insert pictures on bootstrap
Apr 07, 2025 pm 03:30 PM
There are several ways to insert images in Bootstrap: insert images directly, using the HTML img tag. With the Bootstrap image component, you can provide responsive images and more styles. Set the image size, use the img-fluid class to make the image adaptable. Set the border, using the img-bordered class. Set the rounded corners and use the img-rounded class. Set the shadow, use the shadow class. Resize and position the image, using CSS style. Using the background image, use the background-image CSS property.
 How to use bootstrap button
Apr 07, 2025 pm 03:09 PM
How to use the Bootstrap button? Introduce Bootstrap CSS to create button elements and add Bootstrap button class to add button text


