

Things about WebSocket

As we all know, the traditional http protocol is the way in which the client (browser) sends a request and the browser responds to the request. One request corresponds to one response. If the browser does not actively request, the server cannot actively push data to the client. The traditional way is to use AJAX polling (this method has its problems) to solve this problem, which will be discussed later.
Application Scenarios
List several application scenarios:
Internet chat room
Multiplayer online game
Website to page real-time Push advertisements and messages
Online control of control devices
The first three Many experts have already talked about the application scenarios, so I won’t go into them. Here I will briefly analyze the fourth application scenario.
Scenario 4:
There is a "XX" brand network camera at home. I am working now and want to see if my "Erha" When dismantling the house, I opened the app provided by the company to check the situation at home. Unfortunately, the camera is not turned on now. However, you can control the camera to turn on through the app and click the power on button to turn on the camera. But it takes a while for the camera to turn on. At this time, the traditional approach is to send a request to the server every 1 second or so through AJAX polling to ask whether the device is ready.
Client> The computer is not turned on. Can I play the video?
Server> Not yet, don’t worry, come back later.
Client> The computer is not turned on. Can I play the video?
Server> Not yet, don’t worry, come back later.
Client> The computer is not turned on. Can I play the video?
Server> Not yet, don’t worry, come back later.
……
After N times
…. .
Client> The computer is not turned on. Can I play the video? . .
Server> OK, you can play it
This shows that after the client has to go through many inquiries, Only in this way can we know when the server is ready. If there are a lot of clients sending requests and the frequency of requests is particularly high, this will undoubtedly put a lot of pressure on the server.
If there is a way for the server to push messages to the client, this situation can be perfectly solved, so WebSocket appeared.
Use of WebSocket
WebSocket is a new protocol of HTML5, so browsers that support HTML5 can directly use WebSocket without additional installation. What development package or plug-in?
In order to test WebSocket we need to simply create a server program. The protocols supported by Node.js include TCP protocol and HTTP protocol, but it does not support WebSocket. In order to allow node to also support WebSocket, here I choose the ws module.
Test
Create a folder named testWebSocket and use npm init to initialize the project
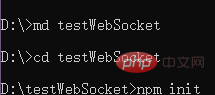
Configuration package.json file addition, here select the latest version of ws
<span style="padding-right: 0.1px"><span class="cm-string" style="color: #aa1111">"dependencies"</span>: {</span><br/><span style="padding-right: 0.1px"><span class="cm-string cm-property"> "ws"</span>: <span class="cm-string" style="color: #aa1111">"^6.2.1"</span></span><br/><span style="padding-right: 0.1px">}</span>Copy after login
Use the npm command npm install --save in the root directory to pull down all ws related dependencies.

Then create a file named myWebSocketServer.js, and a simple WebSocket server program is completed,
node myWebSocketServer.js Let the server run first. Related tutorials: webSocket video tutorial
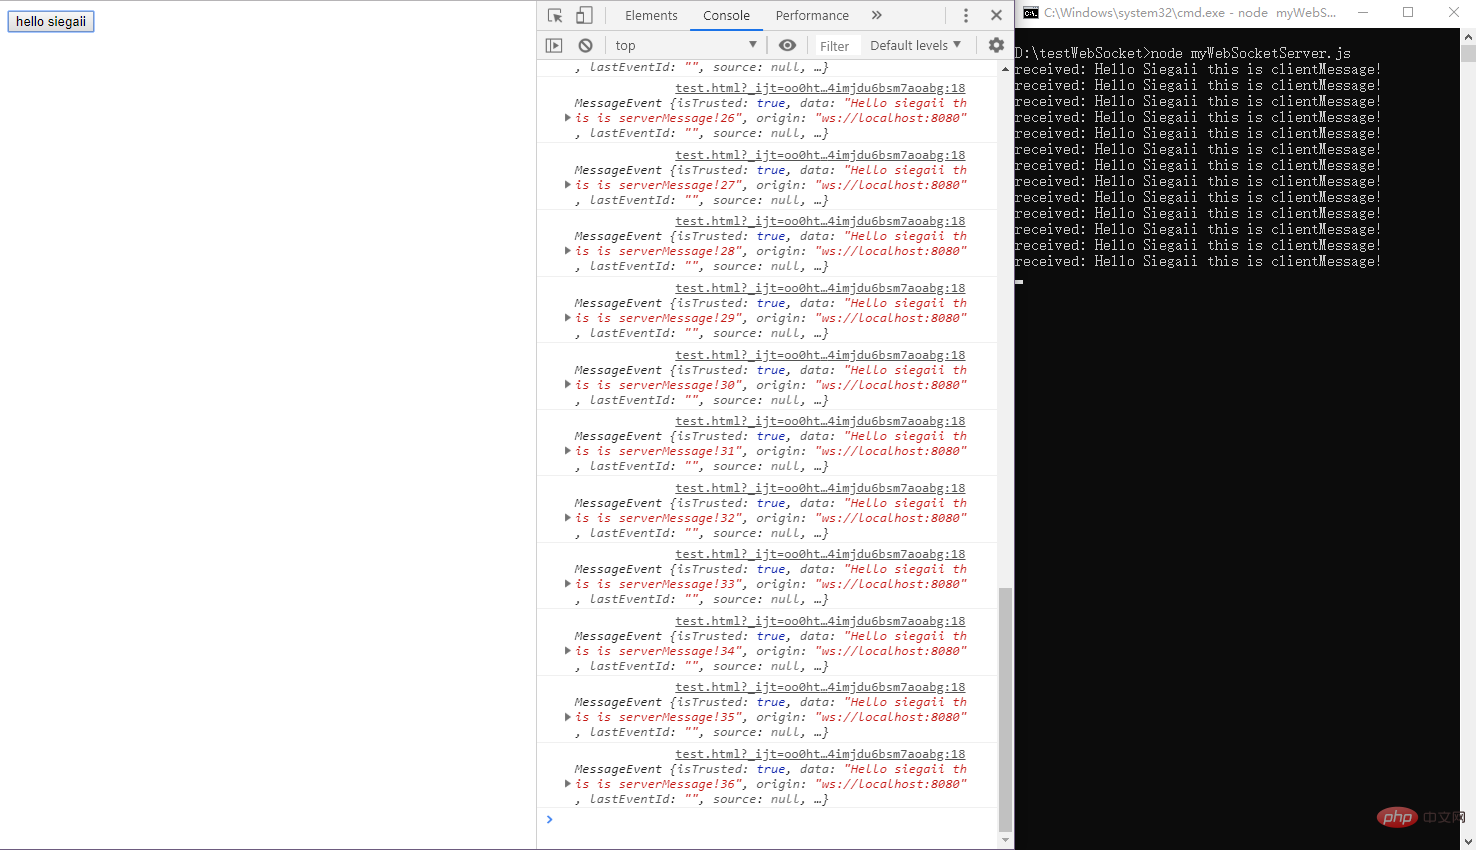
<span style="padding-right: 0.1px"><span class="cm-comment" style="color: #aa5500">// 导入WebSocket模块:</span></span><br/><span style="padding-right: 0.1px"><span class="cm-keyword" style="color: #770088">const</span> <span class="cm-def" style="color: #0000ff">WebSocket</span> <span class="cm-operator" style="color: #981a1a">=</span> <span class="cm-variable" style="color: #000000">require</span>(<span class="cm-string" style="color: #aa1111">'ws'</span>);</span><br/><span style="padding-right: 0.1px"><span class="cm-keyword" style="color: #770088">let</span> <span class="cm-def" style="color: #0000ff">i</span> <span class="cm-operator" style="color: #981a1a">=</span> <span class="cm-number" style="color: #116644">1</span>;</span><br/><span style="padding-right: 0.1px"></span><br/><span style="padding-right: 0.1px"><span class="cm-comment" style="color: #aa5500">// 引用Server类:</span></span><br/><span style="padding-right: 0.1px"><span class="cm-keyword" style="color: #770088">const</span> <span class="cm-def" style="color: #0000ff">WebSocketServer</span> <span class="cm-operator" style="color: #981a1a">=</span> <span class="cm-variable" style="color: #000000">WebSocket</span>.<span class="cm-property" style="color: #000000">Server</span>;</span><br/><span style="padding-right: 0.1px"></span><br/><span style="padding-right: 0.1px"><span class="cm-comment" style="color: #aa5500">// 实例化:</span></span><br/><span style="padding-right: 0.1px"><span class="cm-keyword" style="color: #770088">const</span> <span class="cm-def" style="color: #0000ff">myWs</span> <span class="cm-operator" style="color: #981a1a">=</span> <span class="cm-keyword" style="color: #770088">new</span> <span class="cm-variable" style="color: #000000">WebSocketServer</span>({</span><br/><span style="padding-right: 0.1px"> <span class="cm-property" style="color: #000000">port</span>: <span class="cm-number" style="color: #116644">8080</span></span><br/><span style="padding-right: 0.1px">});</span><br/><span style="padding-right: 0.1px"></span><br/><span style="padding-right: 0.1px"><span class="cm-variable" style="color: #000000">myWs</span>.<span class="cm-property" style="color: #000000">on</span>(<span class="cm-string" style="color: #aa1111">'connection'</span>, <span class="cm-def" style="color: #0000ff">ws</span> <span class="cm-operator" style="color: #981a1a">=></span> {</span><br/><span style="padding-right: 0.1px"> <span class="cm-variable-2" style="color: #0055aa">ws</span>.<span class="cm-property" style="color: #000000">on</span>(<span class="cm-string" style="color: #aa1111">'message'</span>, <span class="cm-def" style="color: #0000ff">message</span> <span class="cm-operator" style="color: #981a1a">=></span> {</span><br/><span style="padding-right: 0.1px"> <span class="cm-variable" style="color: #000000">console</span>.<span class="cm-property" style="color: #000000">log</span>(<span class="cm-string" style="color: #aa1111">'received: %s'</span>, <span class="cm-variable-2" style="color: #0055aa">message</span>);</span><br/><span style="padding-right: 0.1px"> });</span><br/><span style="padding-right: 0.1px"></span><br/><span style="padding-right: 0.1px"> <span class="cm-variable" style="color: #000000">setInterval</span>(() <span class="cm-operator" style="color: #981a1a">=></span> {</span><br/><span style="padding-right: 0.1px"> <span class="cm-variable-2" style="color: #0055aa">ws</span>.<span class="cm-property" style="color: #000000">send</span>(<span class="cm-string" style="color: #aa1111">'Hello siegaii this is serverMessage!'</span> <span class="cm-operator" style="color: #981a1a">+</span> <span class="cm-variable" style="color: #000000">i</span>);</span><br/><span style="padding-right: 0.1px"> <span class="cm-variable" style="color: #000000">i</span><span class="cm-operator" style="color: #981a1a">++</span>;</span><br/><span style="padding-right: 0.1px"> }, <span class="cm-number" style="color: #116644">1000</span>);</span><br/><span style="padding-right: 0.1px"></span><br/><span style="padding-right: 0.1px">});</span>Client
<span style="padding-right: 0.1px"><span class="cm-meta" style="color: #555555"><!DOCTYPE html></span></span><br/><span style="padding-right: 0.1px"><span class="cm-tag cm-bracket" style="color: #117700"><</span><span class="cm-tag" style="color: #117700">html</span> <span class="cm-attribute" style="color: #0000cc">lang</span>=<span class="cm-string" style="color: #aa1111">"en"</span><span class="cm-tag cm-bracket" style="color: #117700">></span></span><br/><span style="padding-right: 0.1px"><span class="cm-tag cm-bracket" style="color: #117700"><</span><span class="cm-tag" style="color: #117700">head</span><span class="cm-tag cm-bracket" style="color: #117700">></span></span><br/><span style="padding-right: 0.1px"> <span class="cm-tag cm-bracket" style="color: #117700"><</span><span class="cm-tag" style="color: #117700">meta</span> <span class="cm-attribute" style="color: #0000cc">charset</span>=<span class="cm-string" style="color: #aa1111">"UTF-8"</span><span class="cm-tag cm-bracket" style="color: #117700">></span></span><br/><span style="padding-right: 0.1px"> <span class="cm-tag cm-bracket" style="color: #117700"><</span><span class="cm-tag" style="color: #117700">title</span><span class="cm-tag cm-bracket" style="color: #117700">></span>test<span class="cm-tag cm-bracket" style="color: #117700"></</span><span class="cm-tag" style="color: #117700">title</span><span class="cm-tag cm-bracket" style="color: #117700">></span></span><br/><span style="padding-right: 0.1px"><span class="cm-tag cm-bracket" style="color: #117700"></</span><span class="cm-tag" style="color: #117700">head</span><span class="cm-tag cm-bracket" style="color: #117700">></span></span><br/><span style="padding-right: 0.1px"><span class="cm-tag cm-bracket" style="color: #117700"><</span><span class="cm-tag" style="color: #117700">body</span><span class="cm-tag cm-bracket" style="color: #117700">></span></span><br/><span style="padding-right: 0.1px"><span class="cm-tag cm-bracket" style="color: #117700"><</span><span class="cm-tag" style="color: #117700">button</span> <span class="cm-attribute" style="color: #0000cc">id</span>=<span class="cm-string" style="color: #aa1111">"test"</span><span class="cm-tag cm-bracket" style="color: #117700">></span>hello siegaii<span class="cm-tag cm-bracket" style="color: #117700"></</span><span class="cm-tag" style="color: #117700">button</span><span class="cm-tag cm-bracket" style="color: #117700">></span></span><br/><span style="padding-right: 0.1px"></span><br/><span style="padding-right: 0.1px"><span class="cm-tag cm-bracket" style="color: #117700"><</span><span class="cm-tag" style="color: #117700">script</span><span class="cm-tag cm-bracket" style="color: #117700">></span></span><br/><span style="padding-right: 0.1px"> <span class="cm-keyword" style="color: #770088">let</span> <span class="cm-def" style="color: #0000ff">ws</span> <span class="cm-operator" style="color: #981a1a">=</span> <span class="cm-keyword" style="color: #770088">new</span> <span class="cm-variable" style="color: #000000">WebSocket</span>(<span class="cm-string" style="color: #aa1111">'ws://localhost:8080/testWebSocket'</span>);</span><br/><span style="padding-right: 0.1px"> <span class="cm-variable" style="color: #000000">document</span>.<span class="cm-property" style="color: #000000">getElementById</span>(<span class="cm-string" style="color: #aa1111">'test'</span>).<span class="cm-property" style="color: #000000">addEventListener</span>(<span class="cm-string" style="color: #aa1111">'click'</span>, () <span class="cm-operator" style="color: #981a1a">=></span> {</span><br/><span style="padding-right: 0.1px"> <span class="cm-variable" style="color: #000000">ws</span>.<span class="cm-property" style="color: #000000">send</span>(<span class="cm-string" style="color: #aa1111">'Hello Siegaii this is clientMessage!'</span>);</span><br/><span style="padding-right: 0.1px"> });</span><br/><span style="padding-right: 0.1px"></span><br/><span style="padding-right: 0.1px"> <span class="cm-comment" style="color: #aa5500">// 响应onmessage事件:</span></span><br/><span style="padding-right: 0.1px"> <span class="cm-variable" style="color: #000000">ws</span>.<span class="cm-property" style="color: #000000">onmessage</span> <span class="cm-operator" style="color: #981a1a">=</span> (<span class="cm-def" style="color: #0000ff">msg</span>) <span class="cm-operator" style="color: #981a1a">=></span> {</span><br/><span style="padding-right: 0.1px"> <span class="cm-variable" style="color: #000000">console</span>.<span class="cm-property" style="color: #000000">log</span>(<span class="cm-variable-2" style="color: #0055aa">msg</span>);</span><br/><span style="padding-right: 0.1px"> };</span><br/><span style="padding-right: 0.1px"></span><br/><span style="padding-right: 0.1px"><span class="cm-tag cm-bracket" style="color: #117700"></</span><span class="cm-tag" style="color: #117700">script</span><span class="cm-tag cm-bracket" style="color: #117700">></span></span><br/><span style="padding-right: 0.1px"><span class="cm-tag cm-bracket" style="color: #117700"></</span><span class="cm-tag" style="color: #117700">body</span><span class="cm-tag cm-bracket" style="color: #117700">></span></span><br/><span style="padding-right: 0.1px"><span class="cm-tag cm-bracket" style="color: #117700"></</span><span class="cm-tag" style="color: #117700">html</span><span class="cm-tag cm-bracket" style="color: #117700">></span></span>The running results are as follows
API
简单介绍下WebSocket的api
<span style="padding-right: 0.1px"><span class="cm-comment" style="color: #aa5500">// WebSocket Api</span></span><br/><span style="padding-right: 0.1px"><span class="cm-keyword" style="color: #770088">let</span> <span class="cm-def" style="color: #0000ff">socket</span> <span class="cm-operator" style="color: #981a1a">=</span> <span class="cm-keyword" style="color: #770088">new</span> <span class="cm-variable" style="color: #000000">WebSocket</span>(<span class="cm-variable" style="color: #000000">url</span>, [<span class="cm-variable" style="color: #000000">protocol</span>] ); <span class="cm-comment" style="color: #aa5500">// 实例化一个WebSocket对象建立连接</span></span><br/><span style="padding-right: 0.1px"><span class="cm-comment" style="color: #aa5500">/**</span></span><br/><span style="padding-right: 0.1px"><span class="cm-comment" style="color: #aa5500">* socket的readyState属性</span></span><br/><span style="padding-right: 0.1px"><span class="cm-comment" style="color: #aa5500">* 0 - 表示连接尚未建立。</span></span><br/><span style="padding-right: 0.1px"><span class="cm-comment" style="color: #aa5500">* 1 - 表示连接已建立,可以进行通信。</span></span><br/><span style="padding-right: 0.1px"><span class="cm-comment" style="color: #aa5500">* 2 - 表示连接正在进行关闭。</span></span><br/><span style="padding-right: 0.1px"><span class="cm-comment" style="color: #aa5500">* 3 - 表示连接已经关闭或者连接不能打开。</span></span><br/><span style="padding-right: 0.1px"><span class="cm-comment" style="color: #aa5500">*/</span></span><br/><span class="cm-tab-wrap-hack" style="padding-right: 0.1px"><span class="cm-variable" style="color: #000000">socket</span>.<span class="cm-property" style="color: #000000">readyState</span></span><br/><span style="padding-right: 0.1px"></span><br/><span style="padding-right: 0.1px"><span class="cm-comment" style="color: #aa5500">/**</span></span><br/><span style="padding-right: 0.1px"><span class="cm-comment" style="color: #aa5500">* 只读属性 bufferedAmount 已被 send() 放入正在队列中等待传输,但是还没有发出的 UTF-8 文本字节数。</span></span><br/><span style="padding-right: 0.1px"><span class="cm-comment" style="color: #aa5500">*/</span></span><br/><span style="padding-right: 0.1px"><span class="cm-variable" style="color: #000000">socket</span>.<span class="cm-property" style="color: #000000">bufferedAmount</span></span><br/><span style="padding-right: 0.1px"></span><br/><span style="padding-right: 0.1px"><span class="cm-comment" style="color: #aa5500">/**</span></span><br/><span style="padding-right: 0.1px"><span class="cm-comment" style="color: #aa5500">* WebSocket 事件</span></span><br/><span style="padding-right: 0.1px"><span class="cm-comment" style="color: #aa5500">*/</span></span><br/><span style="padding-right: 0.1px"><span class="cm-variable" style="color: #000000">socket</span>.<span class="cm-property" style="color: #000000">onopen</span>(); <span class="cm-comment" style="color: #aa5500">//连接建立时触发</span></span><br/><span style="padding-right: 0.1px"><span class="cm-variable" style="color: #000000">socket</span>.<span class="cm-property" style="color: #000000">onmessage</span>(); <span class="cm-comment" style="color: #aa5500">//客户端接收服务端数据时触发</span></span><br/><span style="padding-right: 0.1px"><span class="cm-variable" style="color: #000000">socket</span>.<span class="cm-property" style="color: #000000">onerror</span>(); <span class="cm-comment" style="color: #aa5500">//通信发生错误时触发</span></span><br/><span style="padding-right: 0.1px"><span class="cm-variable" style="color: #000000">socket</span>.<span class="cm-property" style="color: #000000">onclose</span>(); <span class="cm-comment" style="color: #aa5500">//连接关闭时触发</span></span><br/><span style="padding-right: 0.1px"></span><br/><span style="padding-right: 0.1px"><span class="cm-comment" style="color: #aa5500">/**</span></span><br/><span style="padding-right: 0.1px"><span class="cm-comment" style="color: #aa5500">* WebSocket 方法</span></span><br/><span style="padding-right: 0.1px"><span class="cm-comment" style="color: #aa5500">*/</span></span><br/><span style="padding-right: 0.1px"><span class="cm-variable" style="color: #000000">Socket</span>.<span class="cm-property" style="color: #000000">send</span>() <span class="cm-comment" style="color: #aa5500">//使用连接发送数据</span></span><br/><span style="padding-right: 0.1px"><span class="cm-variable" style="color: #000000">Socket</span>.<span class="cm-property" style="color: #000000">close</span>() <span class="cm-comment" style="color: #aa5500">//关闭连接</span></span><br/><span style="padding-right: 0.1px"><br/></span>
The above is the detailed content of Things about WebSocket. For more information, please follow other related articles on the PHP Chinese website!

Hot AI Tools

Undresser.AI Undress
AI-powered app for creating realistic nude photos

AI Clothes Remover
Online AI tool for removing clothes from photos.

Undress AI Tool
Undress images for free

Clothoff.io
AI clothes remover

AI Hentai Generator
Generate AI Hentai for free.

Hot Article
Hot Tools

Notepad++7.3.1
Easy-to-use and free code editor

SublimeText3 Chinese version
Chinese version, very easy to use

Zend Studio 13.0.1
Powerful PHP integrated development environment

Dreamweaver CS6
Visual web development tools

SublimeText3 Mac version
God-level code editing software (SublimeText3)
Hot Topics


 Recommended: Excellent JS open source face detection and recognition project
Apr 03, 2024 am 11:55 AM
Recommended: Excellent JS open source face detection and recognition project
Apr 03, 2024 am 11:55 AM
Face detection and recognition technology is already a relatively mature and widely used technology. Currently, the most widely used Internet application language is JS. Implementing face detection and recognition on the Web front-end has advantages and disadvantages compared to back-end face recognition. Advantages include reducing network interaction and real-time recognition, which greatly shortens user waiting time and improves user experience; disadvantages include: being limited by model size, the accuracy is also limited. How to use js to implement face detection on the web? In order to implement face recognition on the Web, you need to be familiar with related programming languages and technologies, such as JavaScript, HTML, CSS, WebRTC, etc. At the same time, you also need to master relevant computer vision and artificial intelligence technologies. It is worth noting that due to the design of the Web side
 SSE and WebSocket
Apr 17, 2024 pm 02:18 PM
SSE and WebSocket
Apr 17, 2024 pm 02:18 PM
In this article, we will compare Server Sent Events (SSE) and WebSockets, both of which are reliable methods for delivering data. We will analyze them in eight aspects, including communication direction, underlying protocol, security, ease of use, performance, message structure, ease of use, and testing tools. A comparison of these aspects is summarized as follows: Category Server Sent Event (SSE) WebSocket Communication Direction Unidirectional Bidirectional Underlying Protocol HTTP WebSocket Protocol Security Same as HTTP Existing security vulnerabilities Ease of use Setup Simple setup Complex performance Fast message sending speed Affected by message processing and connection management Message structure Plain text or binary Ease of use Widely available Helpful for WebSocket integration
 PHP and WebSocket: Best practices for real-time data transfer
Dec 18, 2023 pm 02:10 PM
PHP and WebSocket: Best practices for real-time data transfer
Dec 18, 2023 pm 02:10 PM
PHP and WebSocket: Best Practice Methods for Real-Time Data Transfer Introduction: In web application development, real-time data transfer is a very important technical requirement. The traditional HTTP protocol is a request-response model protocol and cannot effectively achieve real-time data transmission. In order to meet the needs of real-time data transmission, the WebSocket protocol came into being. WebSocket is a full-duplex communication protocol that provides a way to communicate full-duplex over a single TCP connection. Compared to H
 PHP and Vue: a perfect pairing of front-end development tools
Mar 16, 2024 pm 12:09 PM
PHP and Vue: a perfect pairing of front-end development tools
Mar 16, 2024 pm 12:09 PM
PHP and Vue: a perfect pairing of front-end development tools. In today's era of rapid development of the Internet, front-end development has become increasingly important. As users have higher and higher requirements for the experience of websites and applications, front-end developers need to use more efficient and flexible tools to create responsive and interactive interfaces. As two important technologies in the field of front-end development, PHP and Vue.js can be regarded as perfect tools when paired together. This article will explore the combination of PHP and Vue, as well as detailed code examples to help readers better understand and apply these two
 PHP and JS Development Tips: Master the Method of Drawing Stock Candle Charts
Dec 18, 2023 pm 03:39 PM
PHP and JS Development Tips: Master the Method of Drawing Stock Candle Charts
Dec 18, 2023 pm 03:39 PM
With the rapid development of Internet finance, stock investment has become the choice of more and more people. In stock trading, candle charts are a commonly used technical analysis method. It can show the changing trend of stock prices and help investors make more accurate decisions. This article will introduce the development skills of PHP and JS, lead readers to understand how to draw stock candle charts, and provide specific code examples. 1. Understanding Stock Candle Charts Before introducing how to draw stock candle charts, we first need to understand what a candle chart is. Candlestick charts were developed by the Japanese
 PHP Websocket development guide to implement real-time translation function
Dec 18, 2023 pm 05:52 PM
PHP Websocket development guide to implement real-time translation function
Dec 18, 2023 pm 05:52 PM
PHP Websocket Development Guide: Implementing Real-time Translation Function Introduction: With the development of the Internet, real-time communication is becoming more and more important in various application scenarios. As an emerging communication protocol, Websocket provides good support for real-time communication. This article will take you through a detailed understanding of how to use PHP to develop Websocket applications, and combine the real-time translation function to demonstrate its specific application. 1. What is the Websocket protocol? The Websocket protocol is a
 Questions frequently asked by front-end interviewers
Mar 19, 2024 pm 02:24 PM
Questions frequently asked by front-end interviewers
Mar 19, 2024 pm 02:24 PM
In front-end development interviews, common questions cover a wide range of topics, including HTML/CSS basics, JavaScript basics, frameworks and libraries, project experience, algorithms and data structures, performance optimization, cross-domain requests, front-end engineering, design patterns, and new technologies and trends. . Interviewer questions are designed to assess the candidate's technical skills, project experience, and understanding of industry trends. Therefore, candidates should be fully prepared in these areas to demonstrate their abilities and expertise.
 Java Websocket Development Tips: How to Handle Concurrent Connections
Dec 18, 2023 pm 05:33 PM
Java Websocket Development Tips: How to Handle Concurrent Connections
Dec 18, 2023 pm 05:33 PM
Java Websocket development tips: How to handle concurrent connections In today's Internet era, real-time communication has become an important requirement. As a technology that enables real-time two-way communication, Java Websocket is increasingly favored by developers. However, in practical applications, handling concurrent connections is a problem that must be solved. This article will introduce some JavaWebsocket development techniques to help you better handle concurrent connections, while providing specific code examples. 1. Basic concepts in depth
