

Web Learning: How to Use Texture Maps

In order to make graphics obtain material effects close to real objects, textures are generally used. There are two main types of textures: diffuse reflection maps and specular highlight maps. The diffuse reflection map can achieve the effects of diffuse reflection light and ambient light at the same time.
Please see the demo for the actual effect: Texture mapping
2D texture
You need to use texture to implement the texture , commonly used texture formats are: 2D texture, cube texture, 3D texture. We can use the most basic 2D texture to achieve the effects required in this section. Let's take a look at the APIs required to use textures. Related tutorials: js video tutorial
Because the coordinate origin of the texture is in the lower left corner, which is exactly opposite to our usual coordinate origin in the upper left corner, the following is to invert it according to the Y axis for convenience We set the coordinates.
gl.pixelStorei(gl.UNPACK_FLIP_Y_WEBGL, 1);
Activate and bind textures, gl.TEXTURE0 means texture No. 0, which can increase from 0 all the way up. TEXTURE_2D represents 2D texture.
gl.activeTexture(gl.TEXTURE0);//激活纹理
gl.bindTexture(gl.TEXTURE_2D, texture);//绑定纹理
The next step is to set the texture parameters. This API is very important and is also the most complex part of the texture.
gl.texParameteri(target, pname, param), assign the value of param to the pname parameter of the texture object bound to the target. Parameters:
target: gl.TEXTURE_2D or gl.TEXTURE_CUBE_MAP
pname: Yes Specify 4 texture parameters
- Magnify (gl.TEXTURE_MAP_FILTER): How to get the texture color when the texture's drawing range is larger than the texture itself. For example, when a 16*16 texture image is mapped to a 32*32 pixel space, the texture size becomes twice the original size. The default value is gl.LINEAR.
- Minify (gl.TEXTURE_MIN_FILTER): How to get the texel color when the texture's draw return is smaller than the texture itself. For example, if a 32*32 texture image is mapped to a 16*16 pixel space, the size of the texture will only be the original size. The default value is gl.NEAREST_MIPMAP_LINEAR.
- Horizontal filling (gl.TEXTURE_WRAP_S): Indicates how to fill the left or right area of the texture image. The default value is gl.REPEAT.
- Vertical filling (gl.TEXTURE_WRAP_T): Indicates how to fill the area above and below the texture image. The default value is gl.REPEAT.
param: The value of the texture parameter
can be assigned to gl.TEXTURE_MAP_FILTER and gl .TEXTURE_MIN_FILTER Parameter value
gl.NEAREST: Use the color value of the pixel on the original texture that is closest to the center of the mapped pixel as the value of the new pixel.
gl.LINEAR: Use the weighted average of the color values of the four pixels closest to the center of the new pixel as the value of the new pixel (compared with gl.NEAREST, this method has better image quality Better, but also has greater overhead.)
Constants assignable to gl.TEXTURE_WRAP_S and gl.TEXTURE_WRAP_T:
gl.REPEAT: Tile repeated texture
gl.MIRRORED_REPEAT: Mirrored symmetrical repeated texture
gl.CLAMP_TO_EDGE: Using texture image edge values
The setting example is as follows:
gl.texParameteri(gl.TEXTURE_2D, gl.TEXTURE_WRAP_S, gl.CLAMP_TO_EDGE);
gl.texParameteri(gl.TEXTURE_2D, gl.TEXTURE_WRAP_T, gl.CLAMP_TO_EDGE);
gl.texParameteri(gl.TEXTURE_2D, gl.TEXTURE_MIN_FILTER, gl.LINEAR);
gl.texParameteri(gl.TEXTURE_2D, gl.TEXTURE_MAG_FILTER, gl.NEAREST);
gl .texImage2D, assign pixels to the bound texture object. This API has more than a dozen overloaded functions in WebGL1 and WebGL2, and the format types are very diverse. The pixels parameter can be an image, canvas, or video. We only look at the calling form in WebGL1.
// WebGL1:
void gl.texImage2D(target, level, internalformat, width, height, border, format, type, ArrayBufferView? pixels);
void gl.texImage2D(target, level, internalformat, format, type, ImageData? pixels);
void gl.texImage2D(target, level, internalformat, format, type, HTMLImageElement? pixels);
void gl.texImage2D(target, level, internalformat, format, type, HTMLCanvasElement? pixels);
void gl.texImage2D(target, level, internalformat, format, type, HTMLVideoElement? pixels);
void gl.texImage2D(target, level, internalformat, format, type, ImageBitmap? pixels);

// WebGL2:
//...
I have encapsulated a texture loading function. The calling format of each API can be used to view the information. We should first achieve the effect we want.
function loadTexture(url) {
    const texture = gl.createTexture();
    gl.pixelStorei(gl.UNPACK_FLIP_Y_WEBGL, 1);
    gl.activeTexture(gl.TEXTURE0);
    gl.bindTexture(gl.TEXTURE_2D, texture);

    gl.texParameteri(gl.TEXTURE_2D, gl.TEXTURE_WRAP_S, gl.CLAMP_TO_EDGE);
    gl.texParameteri(gl.TEXTURE_2D, gl.TEXTURE_WRAP_T, gl.CLAMP_TO_EDGE);
    gl.texParameteri(gl.TEXTURE_2D, gl.TEXTURE_MIN_FILTER, gl.LINEAR);

    let textureInfo = {
        width: 1,
        height: 1,
        texture: texture,
    };
    const img = new Image();
    return new Promise((resolve,reject) => {
        img.onload = function() {
            textureInfo.width = img.width;
            textureInfo.height = img.height;
            gl.bindTexture(gl.TEXTURE_2D, textureInfo.texture);
            gl.texImage2D(gl.TEXTURE_2D, 0, gl.RGBA, gl.RGBA, gl.UNSIGNED_BYTE, img);
            resolve(textureInfo);
        };
        img.src = url;
    });
}Diffuse reflection map
First implement the diffuse reflection light map and download a floor map from the Internet, which contains various types of maps.
The buffer needs to add the texture coordinates corresponding to the vertices, so that the corresponding texture pixels, referred to as texels, can be found through the texture coordinates.
const arrays = {
    position: [
        -1, 0, -1,
        -1, 0, 1,
        1, 0, -1,
        1, 0, 1
    ],
    texcoord: [
        0.0, 1.0,
        0.0, 0.0,
        1.0, 1.0,
        1.0, 0.0
    ],
    normal: [ 0, 0, 1, 0, 0, 1, 0, 0, 1, 0, 0, 1 ],
};The only difference between the vertex shaders is the addition of texture coordinates, which require interpolation to be passed into the fragment shader
//...
attribute vec2 a_texcoord;
varying vec2 v_texcoord;

void main() {
        //...
    v_texcoord = a_texcoord;
}The fragment shader needs to be modified more. Mainly use texture2D to obtain the texel at the corresponding coordinates and replace the previous color. The following is the code related to the fragment shader
//...
vec3 normal = normalize(v_normal);
vec4 diffMap = texture2D(u_samplerD, v_texcoord);

//光线方向
vec3 lightDirection = normalize(u_lightPosition - v_position);
// 计算光线方向和法向量夹角
float nDotL = max(dot(lightDirection, normal), 0.0);
// 漫反射光亮度
vec3 diffuse = u_diffuseColor * nDotL * diffMap.rgb;
// 环境光亮度
vec3 ambient = u_ambientColor * diffMap.rgb;
//...
js part loads the image corresponding to the texture, passes the texture unit, and then renders
//...
(async function (){
    const ret = await loadTexture('/model/floor_tiles_06_diff_1k.jpg')
    setUniforms(program, {
        u_samplerD: 0//0号纹理
    });
    //...
    draw();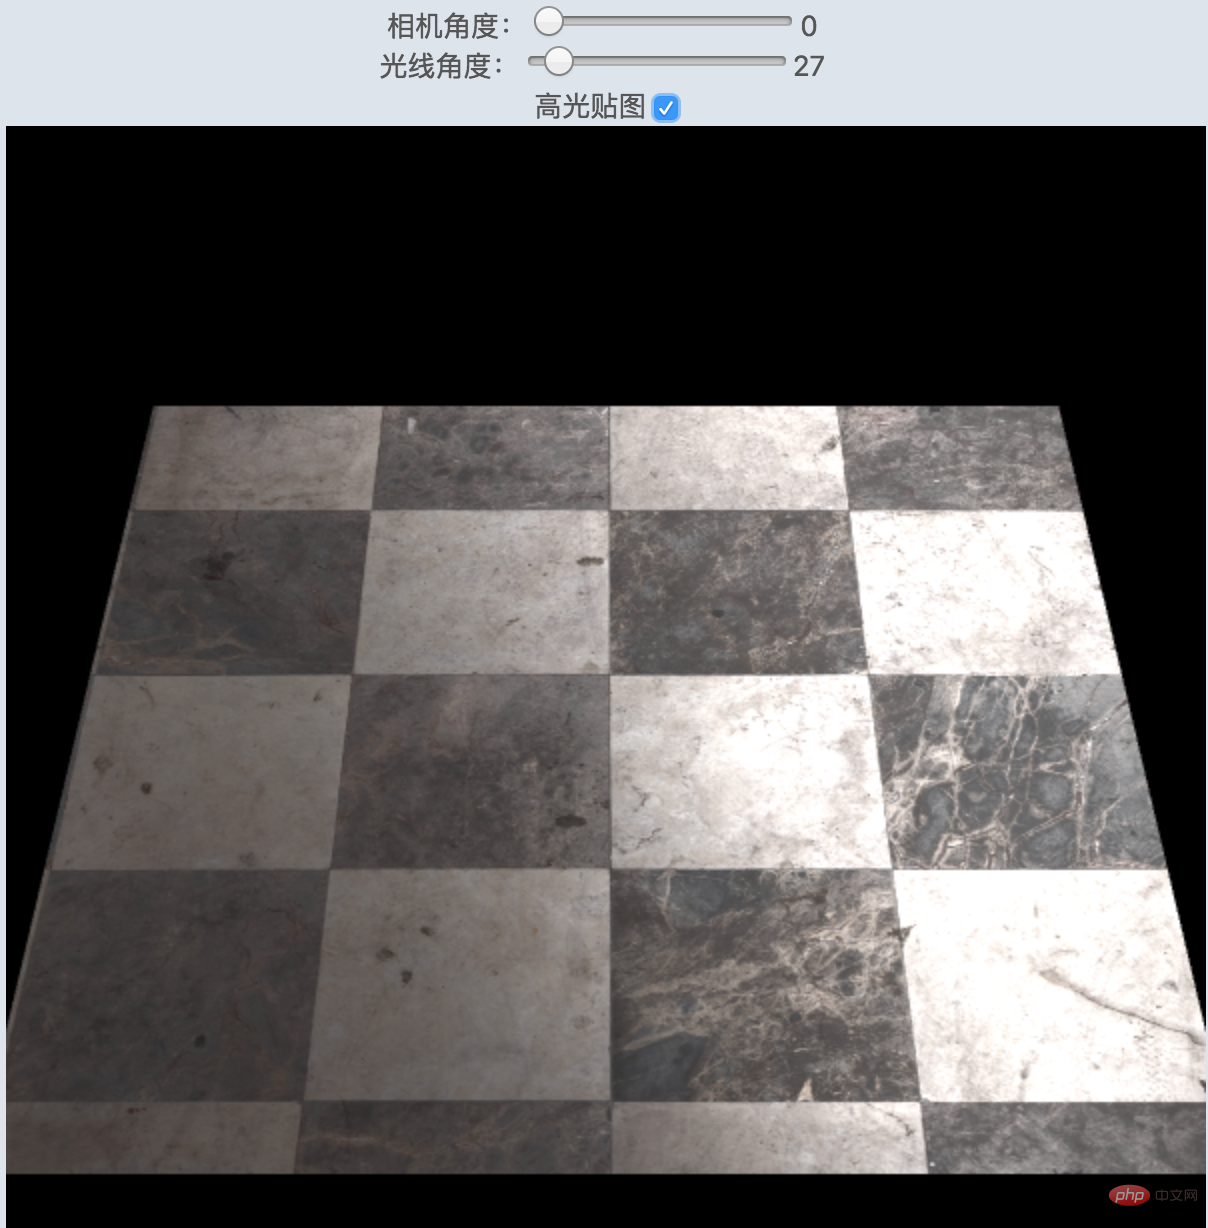
})()The effect is as follows. The specular highlight part seems too dazzling because the floor is There will be no smooth and strong reflection like a mirror.
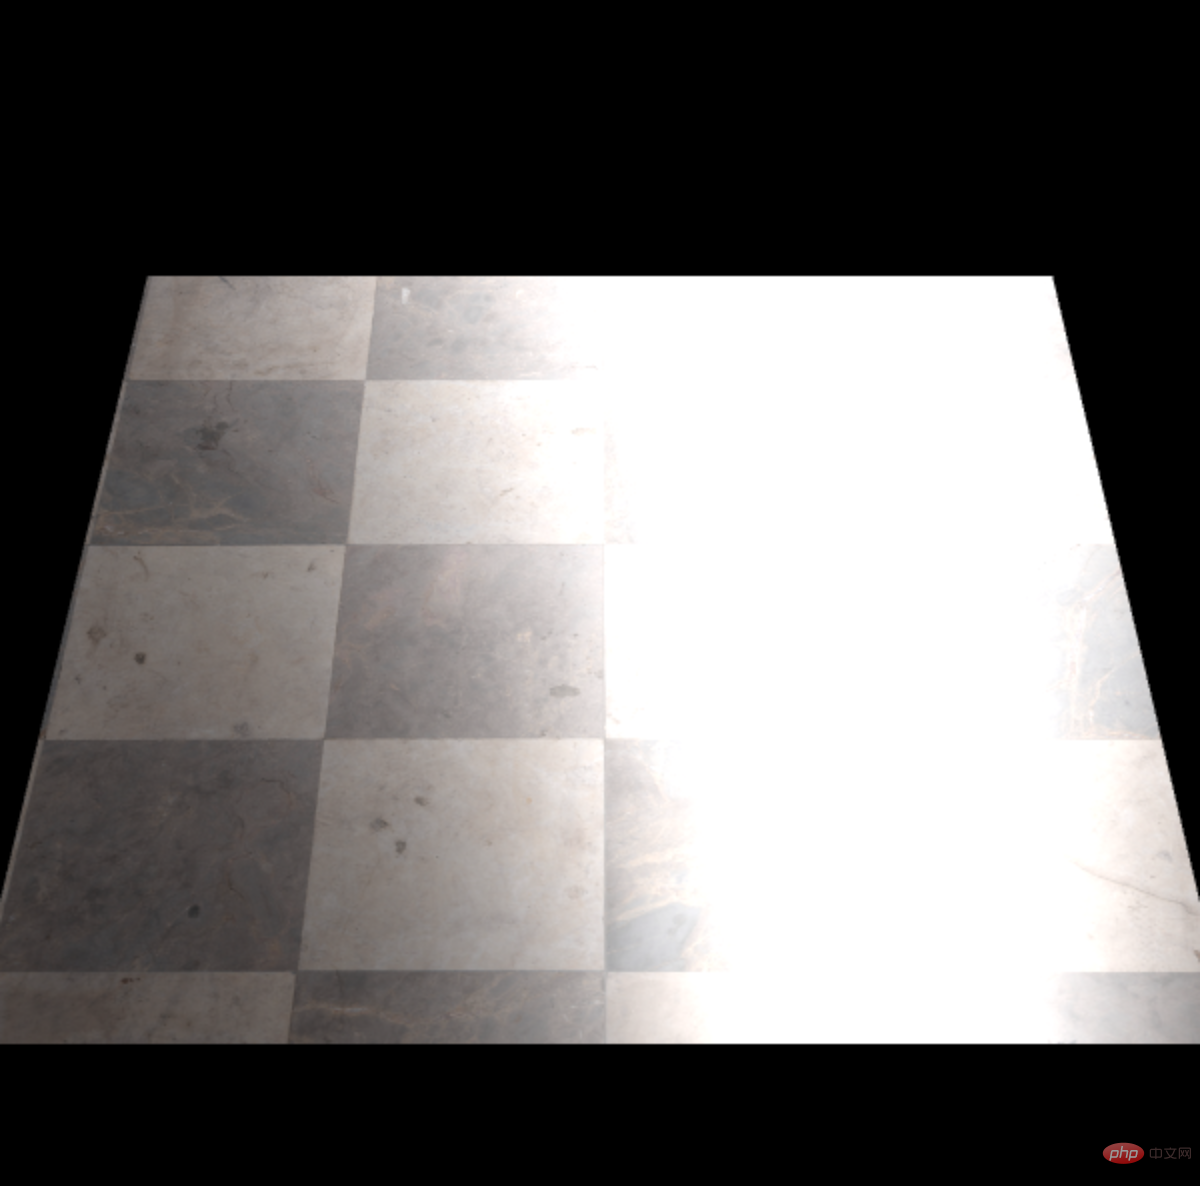
镜面Web Learning: How to Use Texture Maps
为了实现更逼真的高光效果,继续实现Web Learning: How to Use Texture Maps,实现原理和漫反射一样,把对应的高光颜色替换成Web Learning: How to Use Texture Maps纹素就可以了。
下面就是片元着色器增加修改高光部分
//...
vec3 normal = normalize(v_normal);
vec4 diffMap = texture2D(u_samplerD, v_texcoord);
vec4 specMap = texture2D(u_samplerS, v_texcoord);

//光线方向
vec3 lightDirection = normalize(u_lightPosition - v_position);
// 计算光线方向和法向量夹角
float nDotL = max(dot(lightDirection, normal), 0.0);
// 漫反射光亮度
vec3 diffuse = u_diffuseColor * nDotL * diffMap.rgb;
// 环境光亮度
vec3 ambient = u_ambientColor * diffMap.rgb;
// 镜面高光
vec3 eyeDirection = normalize(u_viewPosition - v_position);// 反射方向
vec3 halfwayDir = normalize(lightDirection + eyeDirection);
float specularIntensity = pow(max(dot(normal, halfwayDir), 0.0), u_shininess);
vec3 specular = (vec3(0.2,0.2,0.2) + specMap.rgb) * specularIntensity;
//...
js同时加载漫反射和Web Learning: How to Use Texture Maps
//...
(async function (){
const ret = await Promise.all([
loadTexture('/model/floor_tiles_06_diff_1k.jpg'),
loadTexture('/model/floor_tiles_06_spec_1k.jpg',1)
]);
setUniforms(program, {
u_samplerD: 0,//0号纹理
u_samplerS: 1 //1号纹理
});
//...
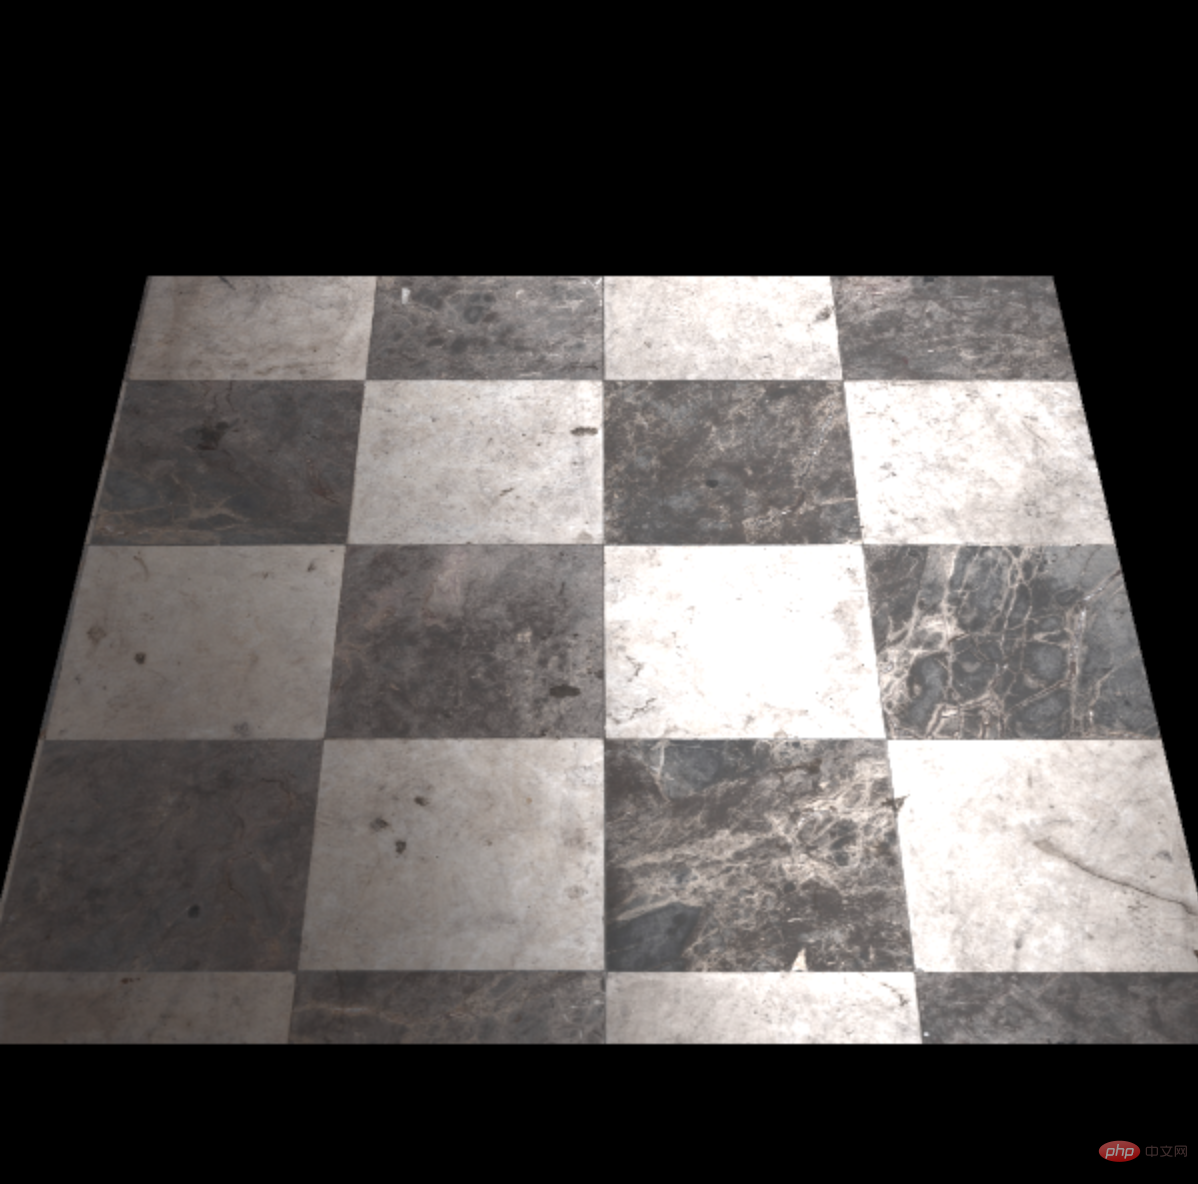
draw();
})()最后实现的效果如下,明显更加接近真实的地板
The above is the detailed content of Web Learning: How to Use Texture Maps. For more information, please follow other related articles on the PHP Chinese website!

Hot AI Tools

Undresser.AI Undress
AI-powered app for creating realistic nude photos

AI Clothes Remover
Online AI tool for removing clothes from photos.

Undress AI Tool
Undress images for free

Clothoff.io
AI clothes remover

AI Hentai Generator
Generate AI Hentai for free.

Hot Article
Hot Tools

Notepad++7.3.1
Easy-to-use and free code editor

SublimeText3 Chinese version
Chinese version, very easy to use

Zend Studio 13.0.1
Powerful PHP integrated development environment

Dreamweaver CS6
Visual web development tools

SublimeText3 Mac version
God-level code editing software (SublimeText3)
Hot Topics
 1378
1378
 52
52

 Recommended: Excellent JS open source face detection and recognition project
Apr 03, 2024 am 11:55 AM
Recommended: Excellent JS open source face detection and recognition project
Apr 03, 2024 am 11:55 AM
Face detection and recognition technology is already a relatively mature and widely used technology. Currently, the most widely used Internet application language is JS. Implementing face detection and recognition on the Web front-end has advantages and disadvantages compared to back-end face recognition. Advantages include reducing network interaction and real-time recognition, which greatly shortens user waiting time and improves user experience; disadvantages include: being limited by model size, the accuracy is also limited. How to use js to implement face detection on the web? In order to implement face recognition on the Web, you need to be familiar with related programming languages and technologies, such as JavaScript, HTML, CSS, WebRTC, etc. At the same time, you also need to master relevant computer vision and artificial intelligence technologies. It is worth noting that due to the design of the Web side
 Essential tools for stock analysis: Learn the steps to draw candle charts with PHP and JS
Dec 17, 2023 pm 06:55 PM
Essential tools for stock analysis: Learn the steps to draw candle charts with PHP and JS
Dec 17, 2023 pm 06:55 PM
Essential tools for stock analysis: Learn the steps to draw candle charts in PHP and JS. Specific code examples are required. With the rapid development of the Internet and technology, stock trading has become one of the important ways for many investors. Stock analysis is an important part of investor decision-making, and candle charts are widely used in technical analysis. Learning how to draw candle charts using PHP and JS will provide investors with more intuitive information to help them make better decisions. A candlestick chart is a technical chart that displays stock prices in the form of candlesticks. It shows the stock price
 How to create a stock candlestick chart using PHP and JS
Dec 17, 2023 am 08:08 AM
How to create a stock candlestick chart using PHP and JS
Dec 17, 2023 am 08:08 AM
How to use PHP and JS to create a stock candle chart. A stock candle chart is a common technical analysis graphic in the stock market. It helps investors understand stocks more intuitively by drawing data such as the opening price, closing price, highest price and lowest price of the stock. price fluctuations. This article will teach you how to create stock candle charts using PHP and JS, with specific code examples. 1. Preparation Before starting, we need to prepare the following environment: 1. A server running PHP 2. A browser that supports HTML5 and Canvas 3
 How to use JS and Baidu Map to implement map click event processing function
Nov 21, 2023 am 11:11 AM
How to use JS and Baidu Map to implement map click event processing function
Nov 21, 2023 am 11:11 AM
Overview of how to use JS and Baidu Maps to implement map click event processing: In web development, it is often necessary to use map functions to display geographical location and geographical information. Click event processing on the map is a commonly used and important part of the map function. This article will introduce how to use JS and Baidu Map API to implement the click event processing function of the map, and give specific code examples. Steps: Import the API file of Baidu Map. First, import the file of Baidu Map API in the HTML file. This can be achieved through the following code:
 PHP and JS Development Tips: Master the Method of Drawing Stock Candle Charts
Dec 18, 2023 pm 03:39 PM
PHP and JS Development Tips: Master the Method of Drawing Stock Candle Charts
Dec 18, 2023 pm 03:39 PM
With the rapid development of Internet finance, stock investment has become the choice of more and more people. In stock trading, candle charts are a commonly used technical analysis method. It can show the changing trend of stock prices and help investors make more accurate decisions. This article will introduce the development skills of PHP and JS, lead readers to understand how to draw stock candle charts, and provide specific code examples. 1. Understanding Stock Candle Charts Before introducing how to draw stock candle charts, we first need to understand what a candle chart is. Candlestick charts were developed by the Japanese
 How to enable administrative access from the cockpit web UI
Mar 20, 2024 pm 06:56 PM
How to enable administrative access from the cockpit web UI
Mar 20, 2024 pm 06:56 PM
Cockpit is a web-based graphical interface for Linux servers. It is mainly intended to make managing Linux servers easier for new/expert users. In this article, we will discuss Cockpit access modes and how to switch administrative access to Cockpit from CockpitWebUI. Content Topics: Cockpit Entry Modes Finding the Current Cockpit Access Mode Enable Administrative Access for Cockpit from CockpitWebUI Disabling Administrative Access for Cockpit from CockpitWebUI Conclusion Cockpit Entry Modes The cockpit has two access modes: Restricted Access: This is the default for the cockpit access mode. In this access mode you cannot access the web user from the cockpit
 How to use JS and Baidu Maps to implement map polygon drawing function
Nov 21, 2023 am 10:53 AM
How to use JS and Baidu Maps to implement map polygon drawing function
Nov 21, 2023 am 10:53 AM
How to use JS and Baidu Maps to implement map polygon drawing function. In modern web development, map applications have become one of the common functions. Drawing polygons on the map can help us mark specific areas for users to view and analyze. This article will introduce how to use JS and Baidu Map API to implement map polygon drawing function, and provide specific code examples. First, we need to introduce Baidu Map API. You can use the following code to import the JavaScript of Baidu Map API in an HTML file
 The relationship between js and vue
Mar 11, 2024 pm 05:21 PM
The relationship between js and vue
Mar 11, 2024 pm 05:21 PM
The relationship between js and vue: 1. JS as the cornerstone of Web development; 2. The rise of Vue.js as a front-end framework; 3. The complementary relationship between JS and Vue; 4. The practical application of JS and Vue.
