It is recommended to use a reverse proxy server to forward requests to the Kestrel Http server in a production environment. This article will practice the process of containerizing the Nginx --->ASP.NET Core deployment architecture.
There are two options for deploying Nginx in Docker--->ASP.NETCore. The first is in a single container Deployment of Nginx ASP.NET Core is the focus of this article. The other method is to deploy Nginx and ASP.NET Core separately in independent containers. Communication between containers is completed through Docker's built-in network bridge (please pay attention to subsequent blog posts).
 This practice will use .NET Core CLI to create a default web application
 mkdir app cd app dotnet new web dotnet restore dotnet build
After that, the project will be published to the specified directory (dotnet publish), and the files generated by the publication will be used In image packaging.
Related tutorials: Linux video tutorial
 Building the image
This time we will use ASP.NETCore Runtime Image [mcr. microsoft.com/dotnet/core/aspnet:2.2] As a basic image, this image contains .NET Core Runtime, ASP.NET Core framework components, and dependencies. This image has been optimized for production deployment.
Pit 1: This deployment is a web app. Do not use [mcr.microsoft.com/dotnet/core/runtime:2.2] as the base image. An error will be reported when starting the container:
It was not possible to find any compatible framework version
The specified framework 'Microsoft.AspNetCore.App', version '2.2.0' was not found.
- Check application dependencies and target a framework version installed at:
/usr/share/dotnet/
- Installing .NET Core prerequisites might help resolve this problem:
https://go. microsoft.com/fwlink/?LinkID=798306&clcid=0x409
- The .NET Core framework and SDK can be installed from:
https://aka.ms/dotnet-download
Because the base image does not contain ASP.NET Core framework components.
The definition of this Dokefile will include nginx. Enable Nginx standard configuration proxy request to Kestrel in the container:
FROM mcr.microsoft.com/dotnet/core/aspnet:2.2
RUN apt-get update
RUN apt-get install -y nginx
WORKDIR /app
COPY bin/Debug/netcoreapp2.2/publish .
COPY ./startup.sh .
RUN chmod 755 /app/startup.sh
RUN rm /etc/nginx/nginx.conf
COPY nginx.conf /etc/nginx
 ENV ASPNETCORE_URLS http://+:5000
EXPOSE 5000 80
 CMD ["sh", "/app/startup.sh"]
Line 1 Specify the base image
Line 3-4 Install Nginx from Debian package management store
Line 6-7 Set the working directory and place the ASP.NET Core WebApp deployment package
Line 9-10 Set the startup script
Line 12-13 Set up nginx configuration file
Line 15-16 Set up ASP.NETCore Kestrel to listen on port 5000 and expose 5000 and 80 ports to the outside of the container
Line 18 slightly The startup script is given later
tip: You need to understand that the container is an independent Linux environment. EXPOSE in the Dockfile is used to indicate the port that the container intends to expose.
Here you can only expose port 80 to the outside, but you must define a non-80 port for ASPNETCORE_URLS as the kestrel listening port in the container.
The final (tree -L 1) output app directory structure is as follows
.
├── app.csproj
├── appsettings.Development.json
├── appsettings.json
├── bin
├── Dockerfile
├── nginx.conf
├── obj
├── Program.cs
├── Properties
├── Startup.cs
└── startup.sh
 Nginx configuration
Create the nginx configuration file required in the above Dockerfile. In the same directory, create vim nginx.conf file:
worker_processes 4;
events { worker_connections 1024; }
 http {
    sendfile on;
    upstream app_servers {
        server 127.0.0.1:5000;
    }
    server {
        listen 80;
        location / {
            proxy_pass         http://app_servers;
            proxy_redirect     off;
            proxy_set_header   Host $host;
            proxy_set_header   X-Real-IP $remote_addr;
            proxy_set_header   X-Forwarded-For $proxy_add_x_forwarded_for;
            proxy_set_header   X-Forwarded-Host $server_name;
        }
    }
}Line 8-10 Define a group of servers (only webapp here), the resource name (app_servers) can be used anywhere in this file.
Line 13 Notifies Nginx to listen on port 80
Line 15-22 Instructs all requests to be proxied to app_servers
In short, this file defines Nginx to listen on port 80 Listens for external requests and forwards the requests to port 5000 of the same container.
 Startup script
For Docker containers, only one CMD (or ENTRYPOINT definition) can be used, but this reverse proxy configuration requires starting Nginx and Kestrel, so we define a script To complete these two tasks
#!/bin/bash
service nginx start
dotnet /app/app.dll
Related tutorials: docker video tutorial
 Build image
docker build -t example/hello- nginx .
The image name is example/hello-nginx Observe the output and you will see the output of each step defined in the Dockerfile.
Comparing the Dockerfile generated by this image with the dockerfile generated by vs docker tool, the image generated by this file is smaller, making full use of the concept of image layering.
 Running image
docker run --name test -it -d -p 8080:80 example/test
该容器名称为test, 现在可从 http://localhost:8080 端口访问webapp, 通过curl -s -D - localhost:8080 -o /dev/null 验证
通过shell终端进入容器内部, 可进一步分别探究Nginx和Kestrel服务:
docker exec -it test bash
# curl -s -D - localhost:80 -o /dev/null
HTTP/1.1 200 OK
Server: nginx/1.6.2
Date: Fri, 24 Feb 2017 14:45:03 GMT
Content-Type: text/html; charset=utf-8
Transfer-Encoding: chunked

# curl -s -D - localhost:5000 -o /dev/null
HTTP/1.1 200 OK
Date: Fri, 24 Feb 2017 14:45:53 GMT
Transfer-Encoding: chunked
Content-Type: text/html; charset=utf-8
Server: Kestrel
tip:对于正在运行的容器,可使用docker exec -it [container_id] [command] 进入容器内部探究容器
对于启动失败的容器,可使用docker logs [container_id] 查看容器输出日志
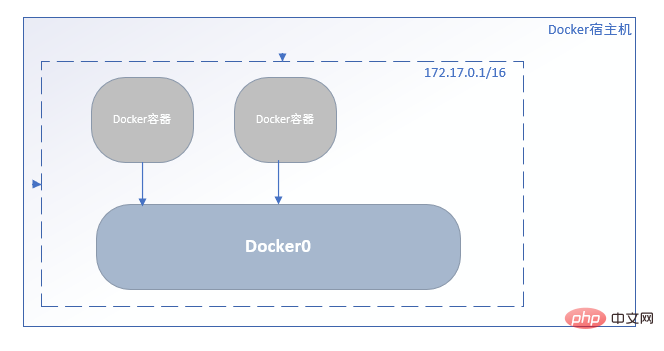
了解一下docker的网络基础知识:

当Docker守护进程以其默认的配置参数在宿主机启动时,会创建一个名为docker0的Linux网桥设备, 该网桥会自动分配满足标准的私有IP段的随机IP直至和子网, 该子网决定了所有新创建容器将被分配的容器IP地址所属网段。
可使用 docker inspect [container_id] 查看network部分配置:
---- 截取自 docker inspect [container_id]的输出---

"Networks": {
                "bridge": {
                    "IPAMConfig": null,
                    "Links": null,
                    "Aliases": null,
                    "NetworkID": "a74331df40dc8c94483115256538304f1cbefe9f65034f20780a27271e6db606",
                    "EndpointID": "4f35ea62c1715bd9f6855bc82ada06e1bf5e58291dabb42e92ebc9552c6f017b",
                    "Gateway": "172.17.0.1",
                    "IPAddress": "172.17.0.3",
                    "IPPrefixLen": 16,
                    "IPv6Gateway": "",
                    "GlobalIPv6Address": "",
                    "GlobalIPv6PrefixLen": 0,
                    "MacAddress": "02:42:ac:11:00:03",
                    "DriverOpts": null
                }
}其中列出的NetworkID 正是 docker network ls 名为bridge的网桥, 这便是默认建立的docker0 网桥(docker inspect networkid 可继续探究)。
 正如上面所说,ASP.NET Core有两种容器化反向代理部署架构,后续将会实践以独立容器分别部署Nginx、ASP.NET Core。
The above is the detailed content of How to install Nginx+ASP.NET Core in a single container in Linux system. For more information, please follow other related articles on the PHP Chinese website!