

MySQL multiple instance installation

Step 1. Preparation
Close the firewall; install MySQL dependencies Use the libaio library; download, decompress, and rename the MySQL executable file; create new user groups and users and other preparations will not be repeated here.
The executable file directory is /data/mysql57

Instructions for adding users and groups
groupadd mysql
useradd mysql -g mysql
Step 2. Add environment variables
In the /etc/profile file, append PATH=${PATH}:/data/mysql57/bin/
After saving, such as To take effect immediately, execute source /etc/profile.
step 3. Create the directory and authorize
Execute in the data root directory
mkdir -p mysql3306/data mysql3306/mysql_log mysql3306/tmp mysql3307/data mysql3307/mysql_log mysql3307/tmp mysqld_multi/log

This step is essential to create a log file.
touch /data/mysql3306/mysql_log/mysql3306.errtouch /data/mysql3307/mysql_log/mysql3307.err
Give directory and file permissions
chown -R mysql.mysql mysql3* mysqld_multi
In this test case, mysql57 is copied from other services, not downloaded and decompressed directly, so the following two are added Step authorization operation.
chmod -R 755 /data/mysql57/bin
chmod -R 755 /data/mysql57/support-files
step 4. Edit my.cnf
[client]
host=localhost
socket = /tmp/mysql.sock
default-character-set=utf8mb4
#loose-local-infile=0

[mysqld]
user=mysql
log_bin_trust_function_creators=1
secure_file_priv='/tmp'

########server setting#######
sql_mode = "ONLY_FULL_GROUP_BY,STRICT_TRANS_TABLES,NO_ZERO_IN_DATE,NO_ZERO_DATE,ERROR_FOR_DIVISION_BY_ZERO,NO_AUTO_CREATE_USER,NO_ENGINE_SUBSTITUTION"
character-set-server=utf8mb4
collation_server=utf8mb4_unicode_ci
lower_case_table_names = 0
skip_name_resolve = 1
#max_connect_errors = 1000
max_connections = 2000
thread_cache_size=256
#thread_stack= 262144
#back_log=80
max_allowed_packet = 134217728
event_scheduler = 1
local-infile=0
#lower_case_table_names = 1
explicit_defaults_for_timestamp = 1
expire_logs_days = 7
log_bin_trust_function_creators =1

####.frm/.ibd files qty related
open_files_limit=65535
innodb_open_files=65535
table_open_cache=65535
table_definition_cache=65535

#### seesion buffer related
read_buffer_size = 262144
read_rnd_buffer_size = 524288
sort_buffer_size = 8388608
join_buffer_size = 8388608

####memory table size
tmp_table_size =67108864
max_heap_table_size=67108864

####timeout
interactive_timeout = 1800
wait_timeout = 1800
# connect_timeout=10

########slow query ########
slow_query_log = 1
log_slow_slave_statements = 1
#log_queries_not_using_indexes = 1
log_throttle_queries_not_using_indexes = 10
long_query_time = 1
#min_examined_row_limit = 10000

########innodb settings########
innodb_buffer_pool_size = 10737418240
innodb_buffer_pool_instances = 16
innodb_buffer_pool_dump_pct = 40
innodb_lru_scan_depth = 2048
innodb_page_cleaners = 16
#innodb_purge_threads = 4
innodb_sort_buffer_size = 67108864
#innodb_file_per_table = 1
#innodb_flush_log_at_trx_commit = 1

innodb_undo_log_truncate = 1
innodb_undo_tablespaces = 3
innodb_max_undo_log_size = 2147483648
innodb_purge_rseg_truncate_frequency = 128

innodb_log_file_size = 1073741824
innodb_log_files_in_group = 3
innodb_log_buffer_size = 16777216
innodb_flush_method = O_DIRECT
innodb_flush_neighbors = 0
innodb_print_all_deadlocks = 1

innodb_strict_mode = 1
#innodb_lock_wait_timeout = 50

innodb_io_capacity = 32768
innodb_io_capacity_max = 65536
innodb_thread_concurrency = 32
innodb_write_io_threads = 8
innodb_read_io_threads = 8

########replication settings########
master_info_repository = TABLE
relay_log_info_repository = TABLE

gtid_mode = on
enforce_gtid_consistency = 1
binlog_gtid_simple_recovery=1
relay_log_recovery = 1

slave-parallel-type = LOGICAL_CLOCK
slave-parallel-workers = 16
slave_transaction_retries=128
slave_preserve_commit_order=1

log_slave_updates=1
binlog_format = ROW
log_timestamps=system

binlog_rows_query_log_events = 1
binlog_row_image='full'
slave_skip_errors = ddl_exist_errors

########semi sync replication settings########
##plugin_dir=/data/mysql/plugin/
#plugin_load = "rpl_semi_sync_master=semisync_master.so;rpl_semi_sync_slave=semisync_slave.so"
#rpl_semi_sync_master_enabled = 1
#rpl_semi_sync_master_timeout = 5000
#rpl_semi_sync_slave_enabled = 1

[mysqld_multi]
mysqld = /data/mysql57/bin/mysqld_safe
mysqladmin = /data/mysql57/bin/mysqladmin
log = /data/mysqld_multi/log/mysqld_multi.log

[mysqld3306]
basedir = /data/mysql57
mysqladmin=mysqladmin
datadir=/data/mysql3306/data
port=3306
server_id=102473306
socket= /tmp/mysql_3306.sock
tmpdir = /data/mysql3306/tmp
pid-file = /data/mysql3306/mysql_log/mysql3306.pid
slow_query_log_file = /data/mysql3306/mysql_log/mysql3306_slow_new.log
log-error = /data/mysql3306/mysql_log/mysql3306.err
general_log_file= /data/mysql3306/mysql_log/mysql3306.genlog
log-bin = /data/mysql3306/mysql_log/mysql3306_bin
relay_log = /data/mysql3306/mysql_log/relay3306.log

innodb_buffer_pool_size = 90G
innodb_buffer_pool_instances = 8

[mysqld3307]
basedir = /data/mysql57
mysqladmin=mysqladmin
datadir=/data/mysql3307/data
port=3307
server_id=102473307
socket= /tmp/mysql_3307.sock
tmpdir = /data/mysql3307/tmp
pid-file = /data/mysql3307/mysql_log/mysql3307.pid
slow_query_log_file = /data/mysql3307/mysql_log/mysql3307_slow_new.log
log-error = /data/mysql3307/mysql_log/mysql3307.err
general_log_file= /data/mysql3307/mysql_log/mysql3307.genlog
log-bin = /data/mysql3307/mysql_log/mysql3307_bin
relay_log = /data/mysql3307/mysql_log/relay3307.log

innodb_buffer_pool_size = 90G
innodb_buffer_pool_instances = 8

[mysqldump]
quick
#step 5. Initialize the instance
Initialize the instance of port 3306, pay attention to the temporary password generated.
/data/mysql57/bin/mysqld --defaults-file=/etc/my.cnf --initialize --user=mysql --basedir=/data/mysql57 --datadir=/data/mysql3306/data
Initialize the instance of port 3307, pay attention to the temporary password generated.
/data/mysql57/bin/mysqld --defaults-file=/etc/my.cnf --initialize --user=mysql --basedir=/data/mysql57 --datadir=/data/mysql3307/data
#step 6. Copy the generated mysqld_multi and add it to the startup
cp /data/mysql57/support-files/mysqld_multi.server /etc/init.d/mysqld_multi
chkconfig --add mysqld_multi
#step 7. Multiple instances of Mysqld Open
Open all instances
mysqld_multi start
View the opening status (view the status of all instances)
mysqld_multi report
Open the specified instance
Open [mysqld3306] in /etc/my.cnf where the number after mysqld is the label, such as the 3306 label
mysqld_multi start 3306
Also open the 3307 label instance
mysqld_multi start 3307
(note: here There is no mention of shutting down the instance through the mysqld_multi stop command. Why not? Because the command is invalid. The operation in Step 9 will make it valid)
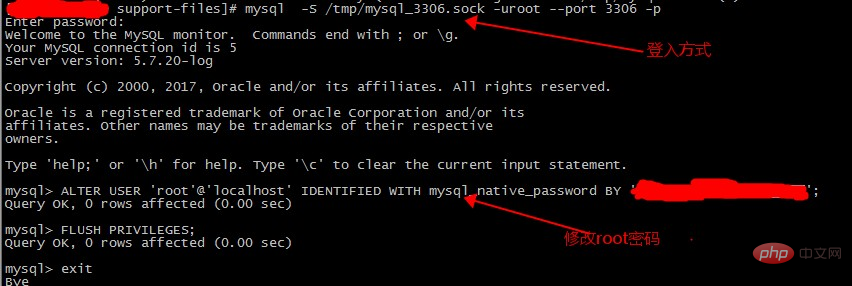
step 8. Log in to the instance for the first time and modify the root account. Password
Multi-instance login requires specifying the socket parameter
The login method for the 3306 instance in this test is:
mysql -S /tmp/mysql_3306.sock -uroot --port 3306 -p
step 9. Grant permission to shut down the instance through mysqld_multi stop.
To close the instance, you need to configure the root user and password, and modify the /etc/my.cnf file.
Add
user=root
password=密码

in the [client] position because the account password needs to be retained in the file, which is a security risk. Whether to set it up like this in the actual environment depends on the specific situation and security requirements.
After the above steps, 2 MySQL instances were successfully installed on this server, one with Port 3306 and the other with Port 3307
##
The above is the detailed content of MySQL multiple instance installation. For more information, please follow other related articles on the PHP Chinese website!

Hot AI Tools

Undresser.AI Undress
AI-powered app for creating realistic nude photos

AI Clothes Remover
Online AI tool for removing clothes from photos.

Undress AI Tool
Undress images for free

Clothoff.io
AI clothes remover

Video Face Swap
Swap faces in any video effortlessly with our completely free AI face swap tool!

Hot Article
Hot Tools

Notepad++7.3.1
Easy-to-use and free code editor

SublimeText3 Chinese version
Chinese version, very easy to use

Zend Studio 13.0.1
Powerful PHP integrated development environment

Dreamweaver CS6
Visual web development tools

SublimeText3 Mac version
God-level code editing software (SublimeText3)
Hot Topics
 1386
1386
 52
52

 MySQL: Simple Concepts for Easy Learning
Apr 10, 2025 am 09:29 AM
MySQL: Simple Concepts for Easy Learning
Apr 10, 2025 am 09:29 AM
MySQL is an open source relational database management system. 1) Create database and tables: Use the CREATEDATABASE and CREATETABLE commands. 2) Basic operations: INSERT, UPDATE, DELETE and SELECT. 3) Advanced operations: JOIN, subquery and transaction processing. 4) Debugging skills: Check syntax, data type and permissions. 5) Optimization suggestions: Use indexes, avoid SELECT* and use transactions.
 How to open phpmyadmin
Apr 10, 2025 pm 10:51 PM
How to open phpmyadmin
Apr 10, 2025 pm 10:51 PM
You can open phpMyAdmin through the following steps: 1. Log in to the website control panel; 2. Find and click the phpMyAdmin icon; 3. Enter MySQL credentials; 4. Click "Login".
 MySQL: An Introduction to the World's Most Popular Database
Apr 12, 2025 am 12:18 AM
MySQL: An Introduction to the World's Most Popular Database
Apr 12, 2025 am 12:18 AM
MySQL is an open source relational database management system, mainly used to store and retrieve data quickly and reliably. Its working principle includes client requests, query resolution, execution of queries and return results. Examples of usage include creating tables, inserting and querying data, and advanced features such as JOIN operations. Common errors involve SQL syntax, data types, and permissions, and optimization suggestions include the use of indexes, optimized queries, and partitioning of tables.
 How to use single threaded redis
Apr 10, 2025 pm 07:12 PM
How to use single threaded redis
Apr 10, 2025 pm 07:12 PM
Redis uses a single threaded architecture to provide high performance, simplicity, and consistency. It utilizes I/O multiplexing, event loops, non-blocking I/O, and shared memory to improve concurrency, but with limitations of concurrency limitations, single point of failure, and unsuitable for write-intensive workloads.
 Why Use MySQL? Benefits and Advantages
Apr 12, 2025 am 12:17 AM
Why Use MySQL? Benefits and Advantages
Apr 12, 2025 am 12:17 AM
MySQL is chosen for its performance, reliability, ease of use, and community support. 1.MySQL provides efficient data storage and retrieval functions, supporting multiple data types and advanced query operations. 2. Adopt client-server architecture and multiple storage engines to support transaction and query optimization. 3. Easy to use, supports a variety of operating systems and programming languages. 4. Have strong community support and provide rich resources and solutions.
 MySQL's Place: Databases and Programming
Apr 13, 2025 am 12:18 AM
MySQL's Place: Databases and Programming
Apr 13, 2025 am 12:18 AM
MySQL's position in databases and programming is very important. It is an open source relational database management system that is widely used in various application scenarios. 1) MySQL provides efficient data storage, organization and retrieval functions, supporting Web, mobile and enterprise-level systems. 2) It uses a client-server architecture, supports multiple storage engines and index optimization. 3) Basic usages include creating tables and inserting data, and advanced usages involve multi-table JOINs and complex queries. 4) Frequently asked questions such as SQL syntax errors and performance issues can be debugged through the EXPLAIN command and slow query log. 5) Performance optimization methods include rational use of indexes, optimized query and use of caches. Best practices include using transactions and PreparedStatemen
 MySQL and SQL: Essential Skills for Developers
Apr 10, 2025 am 09:30 AM
MySQL and SQL: Essential Skills for Developers
Apr 10, 2025 am 09:30 AM
MySQL and SQL are essential skills for developers. 1.MySQL is an open source relational database management system, and SQL is the standard language used to manage and operate databases. 2.MySQL supports multiple storage engines through efficient data storage and retrieval functions, and SQL completes complex data operations through simple statements. 3. Examples of usage include basic queries and advanced queries, such as filtering and sorting by condition. 4. Common errors include syntax errors and performance issues, which can be optimized by checking SQL statements and using EXPLAIN commands. 5. Performance optimization techniques include using indexes, avoiding full table scanning, optimizing JOIN operations and improving code readability.
 Monitor Redis Droplet with Redis Exporter Service
Apr 10, 2025 pm 01:36 PM
Monitor Redis Droplet with Redis Exporter Service
Apr 10, 2025 pm 01:36 PM
Effective monitoring of Redis databases is critical to maintaining optimal performance, identifying potential bottlenecks, and ensuring overall system reliability. Redis Exporter Service is a powerful utility designed to monitor Redis databases using Prometheus. This tutorial will guide you through the complete setup and configuration of Redis Exporter Service, ensuring you seamlessly build monitoring solutions. By studying this tutorial, you will achieve fully operational monitoring settings
