

What are the commonly used shortcut keys for cutout in PS?

Commonly used cutout shortcut keys in ps are: 1. [ctrl]; 2. [ctrl -]; 3. [ctrl z]; 4. [ctrl alt z]; 5. [ctrl shift i ]; 6. [ctrl t]; 7. [ctrl d].

ps What are the commonly used shortcut keys for cutout? What are they?
Commonly used shortcut keys for cutout:
● Zoom in ctrl
● Zoom out ctrl -
● Undo a step ctrl z
● Undo multi-step ctrl alt z
● Use "pen" to form a closure selection method ctrl enter
● Invert the selected content shift ctrl i
● Free transformation ctrl t
● In the free transformation state, click the right button of the mouse - Bevel ------ You can straighten the side of the icon
● Imitation stamp ----- Copy the pre-selected content (alt mouse = selection magic board)
● Marquee tool ----- The operation can only be in this area (the selected area is affected)
● Uncheck ----- ctrl D
● Use the selection box, then use Free Transform (ctrl t), select the drag tool, hold down alt and move, which is responsible for the function
● Use the marquee tool, then use the selected tool to achieve free transformation (ctrl t), and then drag up, down, left, and right to expand the selected part, similar to copying.
The above is the detailed content of What are the commonly used shortcut keys for cutout in PS?. For more information, please follow other related articles on the PHP Chinese website!

Hot AI Tools

Undresser.AI Undress
AI-powered app for creating realistic nude photos

AI Clothes Remover
Online AI tool for removing clothes from photos.

Undress AI Tool
Undress images for free

Clothoff.io
AI clothes remover

AI Hentai Generator
Generate AI Hentai for free.

Hot Article
Hot Tools

Notepad++7.3.1
Easy-to-use and free code editor

SublimeText3 Chinese version
Chinese version, very easy to use

Zend Studio 13.0.1
Powerful PHP integrated development environment

Dreamweaver CS6
Visual web development tools

SublimeText3 Mac version
God-level code editing software (SublimeText3)
Hot Topics
 1359
1359
 52
52

 How to solve the problem that the NVIDIA graphics card screen recording shortcut key cannot be used?
Mar 13, 2024 pm 03:52 PM
How to solve the problem that the NVIDIA graphics card screen recording shortcut key cannot be used?
Mar 13, 2024 pm 03:52 PM
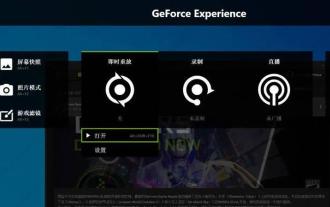
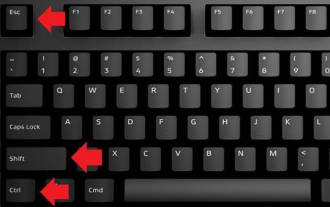
NVIDIA graphics cards have their own screen recording function. Users can directly use shortcut keys to record the desktop or game screen. However, some users reported that the shortcut keys cannot be used. So what is going on? Now, let this site give users a detailed introduction to the problem of the N-card screen recording shortcut key not responding. Analysis of the problem of NVIDIA screen recording shortcut key not responding Method 1, automatic recording 1. Automatic recording and instant replay mode. Players can regard it as automatic recording mode. First, open NVIDIA GeForce Experience. 2. After calling out the software menu with the Alt+Z key, click the Open button under Instant Replay to start recording, or use the Alt+Shift+F10 shortcut key to start recording.
 How do you cut out a picture and put it in another picture in Meitu Xiuxiu? Meitu Xiu Xiu's tutorial on placing the cut picture on another picture!
Mar 15, 2024 pm 11:00 PM
How do you cut out a picture and put it in another picture in Meitu Xiuxiu? Meitu Xiu Xiu's tutorial on placing the cut picture on another picture!
Mar 15, 2024 pm 11:00 PM
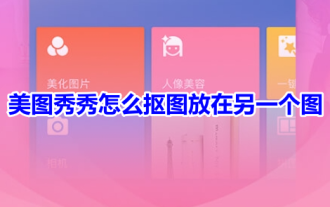
1. How to cut out the beautiful picture Xiu Xiu and put it in another picture? Meitu Xiu Xiu’s tutorial on placing the cut picture on another picture! 1. Open the MeituXiuXiu app and click on the picture beautification function. 2. Open the photo album and select the picture you want to cut out. 3. Click the cutout button in the bottom navigation bar. 4. Select the area to cut out. 5. After cutting out the image, click the replace background icon. 6. Finally, click to import another picture, and the cut out picture can be placed on another picture.
 How to use shortcut keys to take screenshots in Win8?
Mar 28, 2024 am 08:33 AM
How to use shortcut keys to take screenshots in Win8?
Mar 28, 2024 am 08:33 AM
How to use shortcut keys to take screenshots in Win8? In our daily use of computers, we often need to take screenshots of the content on the screen. For users of Windows 8 system, taking screenshots through shortcut keys is a convenient and efficient operation method. In this article, we will introduce several commonly used shortcut keys to take screenshots in Windows 8 system to help you take screenshots more quickly. The first method is to use the "Win key + PrintScreen key" key combination to perform full
 How to put the cut out picture onto another picture in Xingtu? How to put the cut out picture on another picture!
Mar 15, 2024 pm 06:52 PM
How to put the cut out picture onto another picture in Xingtu? How to put the cut out picture on another picture!
Mar 15, 2024 pm 06:52 PM
1. How to put the cut out picture on another picture? How to put the cut out picture on another picture! 1. Open the Xingtu app, click Import, and import the picture you want to change. 2. Then click Import Picture under the picture and select the picture you want to cut out. 3. Then you can select an area to cut out, and you can also choose smart cutout for characters. 4. Adjust the size and position of the cut out picture. 5. Finally, click Merge Layers in the upper right corner to put the cut out picture on another picture.
 Introduction to the process of extracting line drawings in PS
Apr 01, 2024 pm 12:51 PM
Introduction to the process of extracting line drawings in PS
Apr 01, 2024 pm 12:51 PM
1. Open the software and import a piece of material, as shown in the picture below. 2. Then ctrl+shift+u to remove color. 3. Then press ctrl+J to copy the layer. 4. Then reverse ctrl+I, and then set the layer blending mode to Color Dodge. 5. Click Filter--Others--Minimum. 6. In the pop-up dialog box, set the radius to 2 and click OK. 7. Finally, you can see the line draft extracted.
 What are the shortcut keys for the win11 taskbar manager_What are the shortcut keys for the win11 taskbar manager
Mar 20, 2024 pm 09:11 PM
What are the shortcut keys for the win11 taskbar manager_What are the shortcut keys for the win11 taskbar manager
Mar 20, 2024 pm 09:11 PM
Recently, netizens find it very troublesome to find the taskbar manager. They asked the editor if there is a way to open the taskbar manager immediately. Of course, there is. So today, the editor will teach you the shortcut key tutorial to quickly open the win11 taskbar manager. I hope it can help. To all netizens. Method 1: Find the Ctrl+Shift+ESC shortcut key in Win11 system. 1. Press [Ctrl+Shift+ESC] to open the Task Manager. Method 2: Right-click the Start menu to open and find Task Manager. 1. Right-click the start menu to open: After right-clicking the start icon with the mouse, you can see a simplified version of the function list. Most of the commands here are related to the system, and "Task Manager" is also among them.
 How to merge cells using shortcut keys
Feb 26, 2024 am 10:27 AM
How to merge cells using shortcut keys
Feb 26, 2024 am 10:27 AM
How to use the shortcut keys for merging cells In daily work, we often need to edit and format tables. Merging cells is a common operation that can merge multiple adjacent cells into one cell to improve the beauty of the table and the information display effect. In mainstream spreadsheet software such as Microsoft Excel and Google Sheets, the operation of merging cells is very simple and can be achieved through shortcut keys. The following will introduce the shortcut key usage for merging cells in these two software. exist
 How to solve the problem of pressing W key to trigger the stylus function in Win10 system?
Mar 23, 2024 pm 01:01 PM
How to solve the problem of pressing W key to trigger the stylus function in Win10 system?
Mar 23, 2024 pm 01:01 PM
Recently, some friends who are using Win10 system have encountered that whenever the "W" key on the keyboard is pressed, the stylus function is activated, causing normal work to be disrupted. In order to solve this problem, we will bring you several different detailed solutions below, let’s take a look. Solution Method 1: Click "Start" in the taskbar in the lower left corner and select "Settings" in the option list. 2. After entering the new interface, click the "Device" option. 3. Then click "Pen and WindowsInk" in the left column. 4. Then find "Write with fingers on the handwriting panel" on the right, and finally uncheck the small box. Method 2: 1. Use the "win+R" shortcut key to start running, enter "regedit", and press Enter to start.
