由于要使用了laravel5.1,php要升级到5.5以上。具体环境是Aliyun Cent OS 7.0。由于阿里的yum源lastest只有5.4,laravel5.1必须php5.5,加了几个网上的yum源,各种各样的问题,所以只能麻烦的编译安装了。
首先网上这类的文章非常多,每个人的升级目的,要升级的组件都不完全一样。最好的说明文档还是官方安装文档,如果php官网的安装失败,再去搜索相关问题。我最终靠的是官网上Apache 2.x on Unix systems这篇文档。
1.下载
http://php.net/downloads.php
<span style="color: #008080;">1</span> <span style="color: #0000ff;">wget</span> http:<span style="color: #008000;">//</span><span style="color: #008000;">cn2.php.net/get/php-5.5.33.tar.gz/from/this/mirror</span>
<span style="color: #008080;">2</span> <span style="color: #000000;">#下载完改一下名字
</span><span style="color: #008080;">3</span> <span style="color: #0000ff;">mv</span> mirror php-<span style="color: #800080;">5.5</span>.<span style="color: #800080;">33</span>.<span style="color: #0000ff;">tar</span><span style="color: #000000;">.gz
</span><span style="color: #008080;">4</span> <span style="color: #0000ff;">tar</span> -zxf php-<span style="color: #800080;">5.5</span>.<span style="color: #800080;">33</span>.<span style="color: #0000ff;">tar</span>.gz php-<span style="color: #800080;">5.5</span>.<span style="color: #800080;">33</span>
<span style="color: #008080;">5</span> cd php-<span style="color: #800080;">5.5</span>.<span style="color: #800080;">33</span>
2.编译安装
#这一步出错了#############################<br>./configure --with-apxs2=/usr/local/apache2/bin/apxs --with-mysql<br>#这一步出错率#############################
我在--with-apxs2=/usr/local/apache2/bin/apxs这一步出了问题,去掉这个参数即使安装也是不行,这个参数编译出libphp5.so并用在httpd.conf中,find / -name apxs2搜不到结果。我找了很久,发现是我的apache有问题,不知道为什么5.3的时候没有这个问题(不管了)。
<span style="color: #0000ff;">yum</span> <span style="color: #0000ff;">install</span> httpd-devel
虽然apxs2还是没有,但能找到apxs了:
<span style="color: #008080;">1</span> <span style="color: #0000ff;">find</span> / -<span style="color: #000000;">name apxs2
</span><span style="color: #008080;">2</span> <span style="color: #0000ff;">find</span> / -<span style="color: #000000;">name apxs
</span><span style="color: #008080;">3</span> /usr/bin/apxs
接下来几步一点点来,比较耗时:
<span style="color: #008080;">1</span> ./configure --with-apxs2=/usr/bin/apxs --with-<span style="color: #000000;">mysql
</span><span style="color: #008080;">2</span> <span style="color: #0000ff;">make</span>
<span style="color: #008080;">3</span> <span style="color: #0000ff;">make</span> <span style="color: #0000ff;">install<br><br><span style="color: #000000;">#之后发现单独编译pdo_mysql扩展有问题,换了这句重新编译</span><br><span style="color: #000000;">#./configure --with-mysql=mysqlnd --with-mysqli=mysqlnd --with-pdo-mysql=mysqlnd --with-apxs2=/usr/bin/apxs<br></span><span style="color: #000000;">#用下面这句,后面最方便,把Laravel依赖的PDO,openssl,tokenizer都自动装上了,只有mbsting需要手动编译。<br></span><span style="color: #000000;">#./configure --prefix=/usr/local/php --with-mysql=mysqlnd --with-mysqli=mysqlnd --with-pdo-mysql=mysqlnd \<br>#--with-apxs2=/usr/sbin/apxs --with-openssl --with-curl</span><br></span>
得到类似结果为安装成功:
Installing shared extensions:     /usr/local/lib/php/extensions/no-debug-non-zts-<span style="color: #800080;">20121212</span>/<span style="color: #000000;">
...
...
...
Wrote PEAR system config </span><span style="color: #0000ff;">file</span> at: /usr/local/etc/<span style="color: #000000;">pear.conf
You may want to add: </span>/usr/local/lib/<span style="color: #000000;">php to your php.ini include_path
</span>/usr/local/src/php-<span style="color: #800080;">5.5</span>.<span style="color: #800080;">33</span>/build/shtool <span style="color: #0000ff;">install</span> -c ext/phar/phar.phar /usr/local/<span style="color: #000000;">bin
</span><span style="color: #0000ff;">ln</span> -s -f phar.phar /usr/local/bin/<span style="color: #000000;">phar
Installing PDO headers:          </span>/usr/local/include/php/ext/pdo/
3.配置
复制php.ini
#这个位置一定不能错,编译.configure的时候我没有制定php.ini的位置,默认就是这里,
#如果跳过这一步,后面不会出问题,但是你将来该php.ini,比如安装扩展什么的,去修改/etc/php.ini(你原来的)的话都是无效的。
cp php.ini-development /usr/local/lib/php.ini
#这里我建议把原来的php.ini改掉,这样不会影响以后的find
#你的原来不一定是这里,建议find一下
mv /etc/php.ini /etc/php.ini.back
修改httpd.conf
<span style="color: #0000ff;">find</span> / -<span style="color: #000000;">name httpd.conf
</span><span style="color: #0000ff;">vi</span> /etc/httpd/conf/<span style="color: #000000;">httpd.conf
#加入这两句(310行左右)
AddType application</span>/x-httpd-<span style="color: #000000;">php .php .php3 .phtml .inc
AddType application</span>/x-httpd-php-<span style="color: #000000;">source .phps
#可能是升级的原因,这一句我本来就有,没有要加(50行左右)
LoadModule php5_module </span>/usr/lib64/httpd/modules/libphp5.so
重启apache:
service httpd restart
测试一下:
php -v
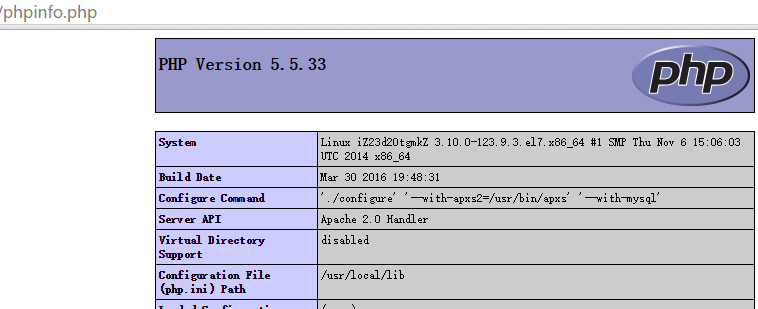
新建一个phpinfo.php访问一下:
<span style="color: #000000;">php
</span><span style="color: #0000ff;">echo</span> <span style="color: #008080;">phpinfo</span>();
结果完美:

可以需要安装一些依赖,如gd php-gd gd-devel php-xml php-common php-mbstring php-ldap php-pear php-xmlrpc php-imap,这些就交给yum吧。
dreamingodd原创文章,如转载请注明出处。


