 Backend Development
 Python Tutorial
 Installation method and function introduction of python's 2D drawing library Matplotlib
Installation method and function introduction of python's 2D drawing library Matplotlib
Matplotlib is a Python 2D plotting library that can produce publication-quality graphics in a variety of hardcopy formats and interactive environments on a variety of platforms.

#First, in order to actually use Matplotlib, we need to install it.
This article talks about how to install Matplotlib. The next article will bring you an introduction to Matplotlib legends, titles and labels.
Installation
If you have a later version of Python installed, you should be able to open cmd.exe or terminal and execute:
pip install matplotlib
NOTE : If the shorter command above doesn't work, you may need to execute C:/Python34/Scripts/pip install matplotlib.
If you receive errors like "No named module" and module name when importing matplotlib, this means you need to install the module as well. A common problem is a missing module named six. This means you need to use pip to install six.
Alternatively, you can go to Matplotlib.org and download the appropriate version to install by visiting the download page. Keep in mind that because your operating system is 64-bit, you don’t necessarily need a 64-bit version of Python. If you're not going to try 64-bit, you can use 32-bit. Open IDLE and read the top. If it says you're 64-bit, you're 64-bit, if it says 32-bit, you're 32-bit. Once you have Python installed, you are ready to write any logic you want. I like using IDLE for programming, but feel free to use whatever you like.
import matplotlib.pyplot as plt
This line imports the integrated pyplot, which we will use throughout the series. We import pyplot as plt, which is the traditional convention for python programs using pylot.
plt.plot([1,2,3],[5,7,4])
Next, we call plot’s .plot method to draw some coordinates. This .plot takes a number of arguments, but the first two are the 'x' and 'y' coordinates, which we put into lists. This means that according to these lists we have 3 coordinates: 1,5 2,7 and 3,4.
plt.plot "draws" the plot in the background, but after drawing everything we want, we need to bring it to the screen when we're ready.
plt.show()
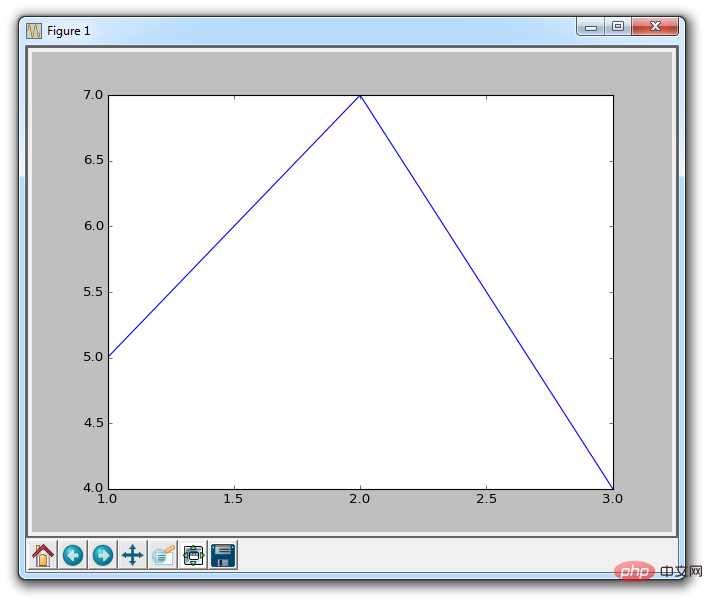
In this way, a graphic should pop up. If not, sometimes it can pop up or you might get an error. Your graph should look like this:

This window is a matplotlib window that allows us to view our graph, as well as interact with and access it. You can hover your mouse over the chart and see the coordinates, usually in the lower right corner. You can also use buttons. They may be in different locations, but in the image above, the buttons are in the lower left corner.
Introduction
Home

Once you start browsing your Charts, home button will help you. You can click on it if you want to return to the original view. Clicking this button before browsing the chart will have no effect.
Forward/Back

These buttons work like the forward and back buttons in your browser. You can click on these to move back to your previous position, or advance again.
Pan

You can click the pan button, then click and drag your chart.
Zoom

The Zoom button lets you click it and then click and drag out the area you want to zoom in square area. Zooming in requires left-clicking and dragging. You can also right-click and drag to zoom out.
Configure Subplots

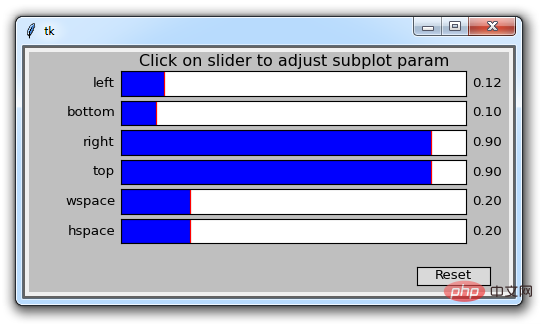
This button allows you to configure various spacing options for graphics and plots. Clicking on it will bring up:

#Each blue bar is a slider that allows you to adjust the padding. Some of them have no effect now because there aren't any other sprites. The first four values adjust the margins of the graphic to the edge of the window. Then wspace and hspace correspond to their horizontal or vertical spacing when you draw multiple subgraphs.
Save

This button allows you to save the graphic in various forms.
The above is the detailed content of Installation method and function introduction of python's 2D drawing library Matplotlib. For more information, please follow other related articles on the PHP Chinese website!

Hot AI Tools

Undresser.AI Undress
AI-powered app for creating realistic nude photos

AI Clothes Remover
Online AI tool for removing clothes from photos.

Undress AI Tool
Undress images for free

Clothoff.io
AI clothes remover

Video Face Swap
Swap faces in any video effortlessly with our completely free AI face swap tool!

Hot Article

Hot Tools

Notepad++7.3.1
Easy-to-use and free code editor

SublimeText3 Chinese version
Chinese version, very easy to use

Zend Studio 13.0.1
Powerful PHP integrated development environment

Dreamweaver CS6
Visual web development tools

SublimeText3 Mac version
God-level code editing software (SublimeText3)

Hot Topics
 1390
1390
 52
52
 Choosing Between PHP and Python: A Guide
Apr 18, 2025 am 12:24 AM
PHP is suitable for web development and rapid prototyping, and Python is suitable for data science and machine learning. 1.PHP is used for dynamic web development, with simple syntax and suitable for rapid development. 2. Python has concise syntax, is suitable for multiple fields, and has a strong library ecosystem.
 PHP and Python: Different Paradigms Explained
Apr 18, 2025 am 12:26 AM
PHP is mainly procedural programming, but also supports object-oriented programming (OOP); Python supports a variety of paradigms, including OOP, functional and procedural programming. PHP is suitable for web development, and Python is suitable for a variety of applications such as data analysis and machine learning.
 Can vs code run in Windows 8
Apr 15, 2025 pm 07:24 PM
VS Code can run on Windows 8, but the experience may not be great. First make sure the system has been updated to the latest patch, then download the VS Code installation package that matches the system architecture and install it as prompted. After installation, be aware that some extensions may be incompatible with Windows 8 and need to look for alternative extensions or use newer Windows systems in a virtual machine. Install the necessary extensions to check whether they work properly. Although VS Code is feasible on Windows 8, it is recommended to upgrade to a newer Windows system for a better development experience and security.
 Is the vscode extension malicious?
Apr 15, 2025 pm 07:57 PM
VS Code extensions pose malicious risks, such as hiding malicious code, exploiting vulnerabilities, and masturbating as legitimate extensions. Methods to identify malicious extensions include: checking publishers, reading comments, checking code, and installing with caution. Security measures also include: security awareness, good habits, regular updates and antivirus software.
 How to run programs in terminal vscode
Apr 15, 2025 pm 06:42 PM
In VS Code, you can run the program in the terminal through the following steps: Prepare the code and open the integrated terminal to ensure that the code directory is consistent with the terminal working directory. Select the run command according to the programming language (such as Python's python your_file_name.py) to check whether it runs successfully and resolve errors. Use the debugger to improve debugging efficiency.
 Can visual studio code be used in python
Apr 15, 2025 pm 08:18 PM
VS Code can be used to write Python and provides many features that make it an ideal tool for developing Python applications. It allows users to: install Python extensions to get functions such as code completion, syntax highlighting, and debugging. Use the debugger to track code step by step, find and fix errors. Integrate Git for version control. Use code formatting tools to maintain code consistency. Use the Linting tool to spot potential problems ahead of time.
 Can vscode be used for mac
Apr 15, 2025 pm 07:36 PM
VS Code is available on Mac. It has powerful extensions, Git integration, terminal and debugger, and also offers a wealth of setup options. However, for particularly large projects or highly professional development, VS Code may have performance or functional limitations.
 Can vscode run ipynb
Apr 15, 2025 pm 07:30 PM
The key to running Jupyter Notebook in VS Code is to ensure that the Python environment is properly configured, understand that the code execution order is consistent with the cell order, and be aware of large files or external libraries that may affect performance. The code completion and debugging functions provided by VS Code can greatly improve coding efficiency and reduce errors.


