Explain the principles of PS color grading

This is the first graphic tutorial of Du Jiang. I originally planned to start the color adjustment chapter directly, but after thinking about it, I still have to start with theoretical knowledge first! Because Dujiang has encountered such a situation in the early PS learning process (I believe most people have this situation), that is, during the PS case learning process, whether it is a graphic tutorial or a video tutorial, after learning a After reading the cases shared by experts in the previous period, the effect is still good when practicing the case pictures in the original video. I feel that the PS color correction is just that, so easy. But as soon as I changed to another picture of my own, it was returned to the prototype, and the color was not what I wanted at all. Even if the steps
are followed according to the expert's instructions, the results are still unsatisfactory. Du Jiang is also well aware of the pain involved. If you want to be able to solo various pictures freely, you must first master the basic principles of color grading. There is a lot of nonsense, let’s get to the point.
1. Understand the three elements of color
First of all, let’s understand the three elements that affect color, namely hue, saturation, and lightness
HSB: HSB mode The corresponding medium is the human eye. In HSB mode, H (hues) represents hue, S (saturation) represents saturation, and B (brightness) represents brightness. This can also be seen in the picture below.
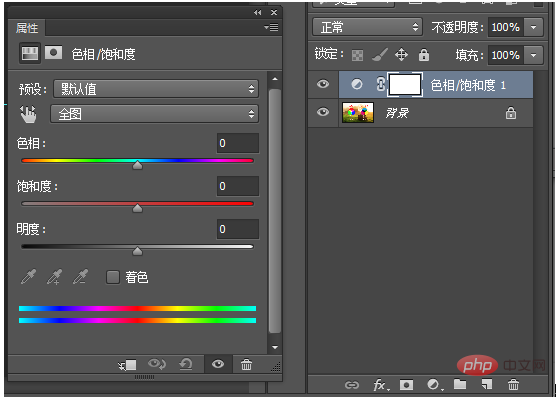
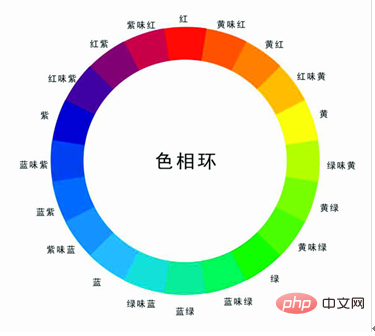
Hue: Hue is measured by position on the standard color wheel from 0-360°. In common usage, hue is identified by a color name, such as red, green, or orange. Black and white are colorless. Complementary colors are 120 degrees apart on the color wheel, such as red and green, yellow and purple, blue and orange. The intervals of 180 degrees on the color wheel are contrasting colors, such as red and cyan, yellow and blue, green and magenta, and the intervals of smaller intervals are adjacent colors.
Saturation: Indicates the purity of the color. When it is 0, it is gray. White, black and other gray colors have no saturation. At maximum saturation, each hue has its purest light.
Brightness: It is the brightness of the color. When it is 0, it is black. Maximum brightness is the most vivid state of color.
The picture indicates the increase in brightness from bottom to top, and the increase in saturation from left to right
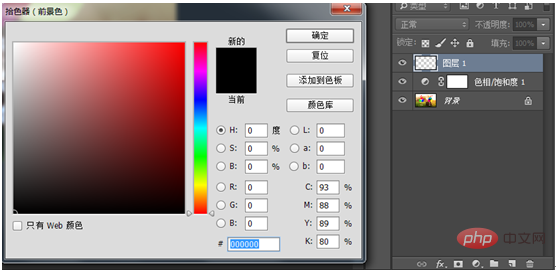
For Color mix! Understanding and being familiar with the three elements of color is the most basic foundation. You must understand it thoroughly. If you can't overcome these, then I dare say that the film you created will not even be as good as the mobile app (critical attack)
2. Understand color modes and overlays
(1) RGB: RGB mode is the three primary colors of light, R stands for Red (red), G stands for Green (green), and B stands for Blue (blue). (The three primary colors of pigments are red, yellow and blue) It is called the three primary colors (the mixed mode is because any color that can be seen by the naked eye in nature can be formed by mixing and superimposing these three colors into a filter color), so it is also Called additive color mode.
We can see that the middle one is white, which is in the additive color mode (the layer blending mode is filter)
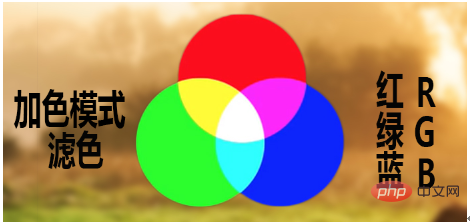
From above In the additive color mode, we can see that when the three colors of red, green and blue are added together, the color is pure white.
But when only two colors are added, they are mixed into one color. For example, if we see blue and green added together, it becomes cyan, blue and red added together, it becomes magenta, and red and green added together, it becomes yellow. This is what we need to do in color mixing. How to control the color you want to get? For example, if you want to turn a blue sky into cyan, then we can add a little green to the blue.

For another example, if you want the green grass to turn into a golden color in autumn, then you can add red to the green
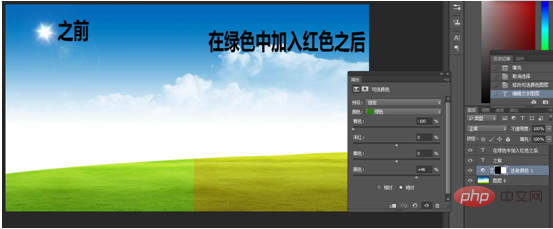
Then someone has to ask, what color should I add to make a yellow grass field green? This is the principle of our next CMYK color model
(2) CMYK represents the four colors used in printing, C represents Cyan, M represents Magenta, and Y represents Yellow ), K stands for Black. Because in actual reference, it is difficult for cyan, magenta and yellow to be superimposed to form a true black, and at most it is just brown. Therefore K - black was introduced. The function of black is to strengthen the dark tones and deepen the dark colors. K is the last letter of black. The reason why it is not the first letter is to avoid confusion with blue. We can see that the middle one is black, which is in subtractive color mode (the layer blending mode is Multiply)

From the picture above, we can solve the problem of what color should be added to turn a yellow grassland into green?
From the picture we can see that yellow plus cyan becomes green, so we only need to add cyan to the yellow grass to achieve it. The effect picture is as shown below

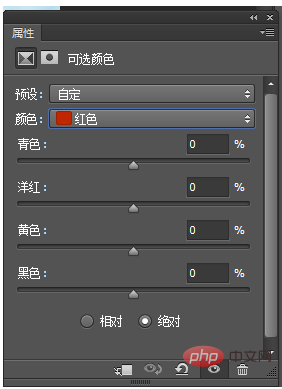
In the optional color panel, moving the logo to the left means adding red, green, blue, and white respectively, and moving the logo to the right means adding cyan, ocean, yellow, and black respectively.
Personal Warm Suggestions
1. Learn to look back and start from scratch. It is important to have an empty cup mentality. Whether you are a newbie who has just started working with PS or a master who has been working in it for a long time, you must repeatedly learn and review the basics (Jiang Du’s personal opinion)
2. PS is a two-dimensional image synthesis software, which is used for image synthesis. It is a medium for art processing. If you want to use PS to draw, you can learn other drawing software, because drawing is not the original intention of PS design. To use software to draw, you can use drawing software such as Illustrator. The practicality is definitely better than PS. use.
For more PS-related technical articles, please visit the PS Tutorial column to learn!
The above is the detailed content of Explain the principles of PS color grading. For more information, please follow other related articles on the PHP Chinese website!

Hot AI Tools

Undresser.AI Undress
AI-powered app for creating realistic nude photos

AI Clothes Remover
Online AI tool for removing clothes from photos.

Undress AI Tool
Undress images for free

Clothoff.io
AI clothes remover

AI Hentai Generator
Generate AI Hentai for free.

Hot Article

Hot Tools

Notepad++7.3.1
Easy-to-use and free code editor

SublimeText3 Chinese version
Chinese version, very easy to use

Zend Studio 13.0.1
Powerful PHP integrated development environment

Dreamweaver CS6
Visual web development tools

SublimeText3 Mac version
God-level code editing software (SublimeText3)

Hot Topics
 1359
1359
 52
52
 ps serial number cs5 permanently free 2020
Jul 13, 2023 am 10:06 AM
PS serial numbers cs5 permanent free 2020 include: 1. 1330-1384-7388-4265-2355-8589 (Chinese); 2. 1330-1409-7892-5799-0412-7680 (Chinese); 3. 1330-1616-1993 -8375-9492-6951 (Chinese); 4. 1330-1971-2669-5043-0398-7801 (Chinese), etc.
 How to delete selected area in ps
Aug 07, 2023 pm 01:46 PM
Steps to delete the selected area in PS: 1. Open the picture you want to edit; 2. Use the appropriate tool to create a selection; 3. You can use a variety of methods to delete the content in the selection, use the "Delete" key, use the "Healing Brush Tool" , use "Content-Aware Fill", use the "Stamp Tool", etc.; 4. Use tools to repair any obvious traces or defects to make the picture look more natural; 5. After completing editing, click "File" > in the menu bar "Save" to save the editing results.
 What to do if ps installation cannot write registry value error 160
Mar 22, 2023 pm 02:33 PM
Solution to error 160 when ps installation cannot write registry value: 1. Check whether there is 2345 software on the computer, and if so, uninstall the software; 2. Press "Win+R" and enter "Regedit" to open the system registry, and then Find "Photoshop.exe" and delete the Photoshop item.
 What should I do if the PS interface font is too small?
Dec 01, 2022 am 11:31 AM
How to fix the PS interface font that is too small: 1. Open PS, click the "Edit" button on the top menu bar of PS to expand the editing menu; 2. Click the "Preferences" button in the expanded editing menu, and then click "Interface. .." button; 3. In the interface settings, set the user interface font size to "Large", set the UI scaling to "200%" and save the settings, then restart PS to take effect.
 Introduction to the process of extracting line drawings in PS
Apr 01, 2024 pm 12:51 PM
1. Open the software and import a piece of material, as shown in the picture below. 2. Then ctrl+shift+u to remove color. 3. Then press ctrl+J to copy the layer. 4. Then reverse ctrl+I, and then set the layer blending mode to Color Dodge. 5. Click Filter--Others--Minimum. 6. In the pop-up dialog box, set the radius to 2 and click OK. 7. Finally, you can see the line draft extracted.
 How to automate tasks using PowerShell
Feb 20, 2024 pm 01:51 PM
If you are an IT administrator or technology expert, you must be aware of the importance of automation. Especially for Windows users, Microsoft PowerShell is one of the best automation tools. Microsoft offers a variety of tools for your automation needs, without the need to install third-party applications. This guide will detail how to leverage PowerShell to automate tasks. What is a PowerShell script? If you have experience using PowerShell, you may have used commands to configure your operating system. A script is a collection of these commands in a .ps1 file. .ps1 files contain scripts executed by PowerShell, such as basic Get-Help
 Complete list of ps shortcut keys
Mar 11, 2024 pm 04:31 PM
1. Ctrl + N: Create a new document. 2. Ctrl + O: Open a file. 3. Ctrl + S: Save the current file. 4. Ctrl + Shift + S: Save as. 5. Ctrl + W: Close the current document. 6. Ctrl + Q: Exit Photoshop. 7. Ctrl + Z: Undo. 8. Ctrl + Y: Redo. 9. Ctrl + X: Cut the selected content. 10. Ctrl + C: Copy the selected content.
 Cannot use PS shortcut keys to fill
Feb 19, 2024 am 09:18 AM
With the development of the digital age, image processing software has become an indispensable part of our life and work. Among them, Photoshop (PS for short) developed by Adobe is one of the most famous image processing software. It has powerful functions and flexible operation, and is deeply loved by users. However, when using PS, some users reported that the shortcut key "Fill" cannot be used normally, which brings troubles to the user experience. Shortcut keys are a quick operation method provided in the software to avoid tedious mouse click operations.


