html5中 canvas标签中 2d上下文 globalCompositeOperation属性 - MythMan
定义和用法
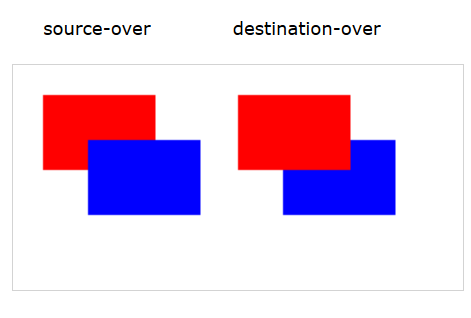
globalCompositeOperation 属性设置或返回如何将一个源(新的)图像绘制到目标(已有)的图像上。
例:

<span style="color: #008080;"> 1</span> <span style="color: #0000ff;">var</span> c=document.getElementById("myCanvas"<span style="color: #000000;">);
</span><span style="color: #008080;"> 2</span> <span style="color: #0000ff;">var</span> ctx=c.getContext("2d"<span style="color: #000000;">);
</span><span style="color: #008080;"> 3</span>
<span style="color: #008080;"> 4</span> ctx.fillStyle="red"<span style="color: #000000;">;
</span><span style="color: #008080;"> 5</span> ctx.fillRect(20,20,75,50<span style="color: #000000;">);
</span><span style="color: #008080;"> 6</span><span style="color: #ff0000;"> ctx.globalCompositeOperation="source-over";
</span><span style="color: #008080;"> 7</span> ctx.fillStyle="blue"<span style="color: #000000;">;
</span><span style="color: #008080;"> 8</span> ctx.fillRect(50,50,75,50<span style="color: #000000;">);
</span><span style="color: #008080;"> 9</span>
<span style="color: #008080;">10</span> ctx.fillStyle="red"<span style="color: #000000;">;
</span><span style="color: #008080;">11</span> ctx.fillRect(150,20,75,50<span style="color: #000000;">);
</span><span style="color: #008080;">12</span> <span style="color: #ff0000;">ctx.globalCompositeOperation="destination-over";
</span><span style="color: #008080;">13</span> ctx.fillStyle="blue"<span style="color: #000000;">;
</span><span style="color: #008080;">14</span> ctx.fillRect(180,50,75,50);
浏览器支持
Internet Explorer 9、Firefox、Opera、Chrome 以及 Safari 支持 globalCompositeOperation 属性。
注释:Internet Explorer 8 以及更早的版本不支持
属性值
蓝色:源图像 = 您打算放置到画布上的绘图。
红色:目标图像 = 您已经放置在画布上的绘图。
1.source-over 默认。在目标图像上显示源图像。

3.source-out 在目标图像之外显示源图像。只会显示目标图像之外源图像部分,目标图像是透明的。

4.source-atop 在目标图像顶部显示源图像。源图像位于目标图像之外的部分是不可见的。

5.destination-over 在源图像上方显示目标图像。

6.destination-atop 在源图像顶部显示目标图像。源图像之外的目标图像部分不会被显示。

7.destination-in 在源图像中显示目标图像。只有源图像内的目标图像部分会被显示,源图像是透明的。

8.destination-out 在源图像外显示目标图像。只有源图像外的目标图像部分会被显示,源图像是透明的。

9.lighter 显示源图像 + 目标图像。

10.copy 显示源图像。忽略目标图像。


Hot AI Tools

Undresser.AI Undress
AI-powered app for creating realistic nude photos

AI Clothes Remover
Online AI tool for removing clothes from photos.

Undress AI Tool
Undress images for free

Clothoff.io
AI clothes remover

Video Face Swap
Swap faces in any video effortlessly with our completely free AI face swap tool!

Hot Article

Hot Tools

Notepad++7.3.1
Easy-to-use and free code editor

SublimeText3 Chinese version
Chinese version, very easy to use

Zend Studio 13.0.1
Powerful PHP integrated development environment

Dreamweaver CS6
Visual web development tools

SublimeText3 Mac version
God-level code editing software (SublimeText3)

Hot Topics
 1392
1392
 52
52
 Is HTML easy to learn for beginners?
Apr 07, 2025 am 12:11 AM
HTML is suitable for beginners because it is simple and easy to learn and can quickly see results. 1) The learning curve of HTML is smooth and easy to get started. 2) Just master the basic tags to start creating web pages. 3) High flexibility and can be used in combination with CSS and JavaScript. 4) Rich learning resources and modern tools support the learning process.
 The Roles of HTML, CSS, and JavaScript: Core Responsibilities
Apr 08, 2025 pm 07:05 PM
HTML defines the web structure, CSS is responsible for style and layout, and JavaScript gives dynamic interaction. The three perform their duties in web development and jointly build a colorful website.
 What is an example of a starting tag in HTML?
Apr 06, 2025 am 12:04 AM
AnexampleofastartingtaginHTMLis,whichbeginsaparagraph.StartingtagsareessentialinHTMLastheyinitiateelements,definetheirtypes,andarecrucialforstructuringwebpagesandconstructingtheDOM.
 Understanding HTML, CSS, and JavaScript: A Beginner's Guide
Apr 12, 2025 am 12:02 AM
WebdevelopmentreliesonHTML,CSS,andJavaScript:1)HTMLstructurescontent,2)CSSstylesit,and3)JavaScriptaddsinteractivity,formingthebasisofmodernwebexperiences.
 Gitee Pages static website deployment failed: How to troubleshoot and resolve single file 404 errors?
Apr 04, 2025 pm 11:54 PM
GiteePages static website deployment failed: 404 error troubleshooting and resolution when using Gitee...
 How to implement adaptive layout of Y-axis position in web annotation?
Apr 04, 2025 pm 11:30 PM
The Y-axis position adaptive algorithm for web annotation function This article will explore how to implement annotation functions similar to Word documents, especially how to deal with the interval between annotations...
 How to use CSS3 and JavaScript to achieve the effect of scattering and enlarging the surrounding pictures after clicking?
Apr 05, 2025 am 06:15 AM
To achieve the effect of scattering and enlarging the surrounding images after clicking on the image, many web designs need to achieve an interactive effect: click on a certain image to make the surrounding...
 Why do you need to call Vue.use(VueRouter) in the index.js file under the router folder?
Apr 05, 2025 pm 01:03 PM
The necessity of registering VueRouter in the index.js file under the router folder When developing Vue applications, you often encounter problems with routing configuration. Special...


