How to create django in python

How to create django with python? Here are the specific steps for you:
1. Create a Django project in the command line (Windows platform, python3.6)
1. Establish a virtual environment (create an independent Python running environment)
Create a new directory learning_log for the project, switch to this directory in the terminal, and create a virtual environment.
The module venv is run here and used to create a virtual environment named ll_env.
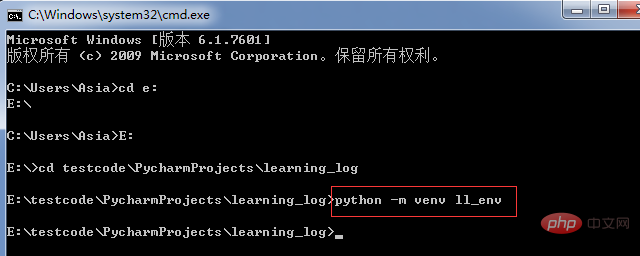
Note: If python is an earlier version, install virtualenv first (pip3 install virtualenv) and then create a virtual environment (virtualenv ll_env)
2. Activate the virtual environment
Command to activate: ll_env\Scripts\activate
Command to stop using the virtual environment: deactivate

3. Install Django in the virtual environment
Execute the command in the virtual environment: pip3 install Django

Related recommendations: "Python Video Tutorial"
4. Create a project in Django
Command: django-admin.py startproject learning_log. (Let Django create a new one Project named learning_log)
Commands: dir and dir learning_log (display directory files in the file)
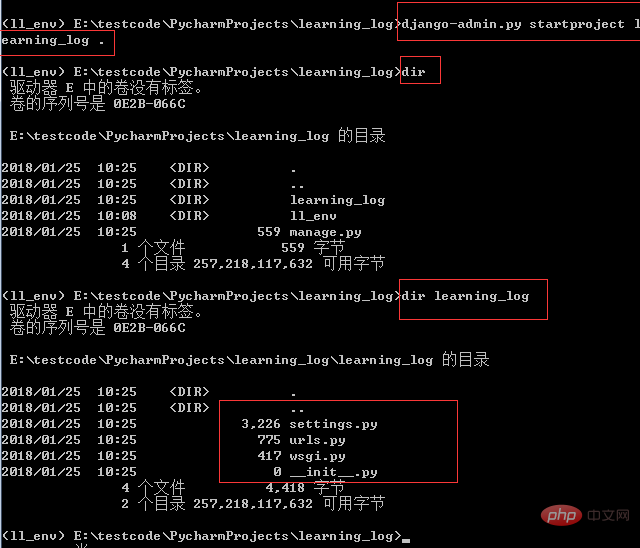
5. Create Database
Command: python manage.py migrate
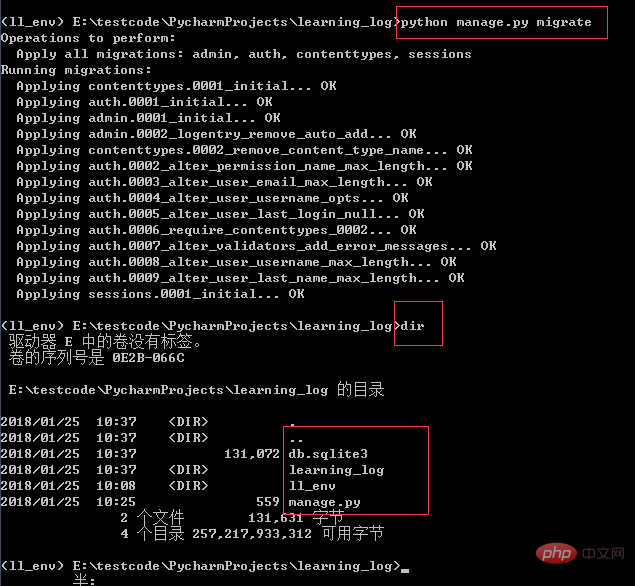
6. View project
Command: python manage.py runserver

Enter http://127.0.0.1:8000/ or http://localhost:8000/
in the browser
2. Use Pycharm to create a Django project under windows
Environment: win7 python3.6 pycharm django pip3
1. Install django

#2. Configure the system environment
After successfully installing Django, go to the Python root directory A django-admin.exe file can be found in the Scripts directory under. This is the core management program of Django. It is best to add it to the environment variables of the operating system, so that it will be more convenient to call in the future.
Add the Scripts directory to the Path environment variable
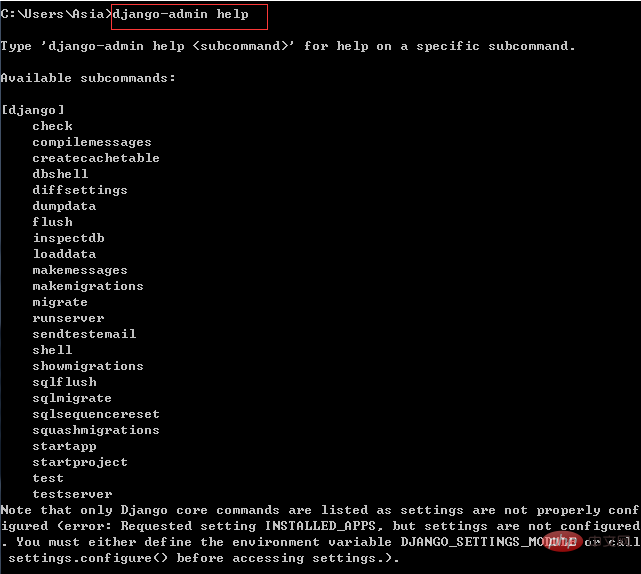
Go back to the cmd interface and run django-admin help. If you see the following content, it means the environment variable is set successfully
3. Create django project with pycharm
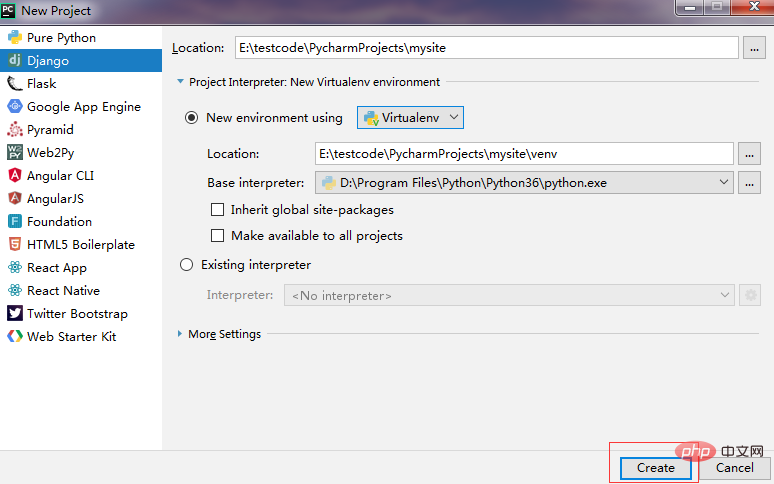
Start the development server
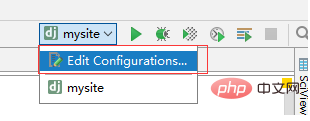
Click edit configurations, fill in 127.0.0.1 in host, and fill in 8000 in port. OK confirm that the web service is running.

After clicking Run

3. Build a virtual environment and create a project in pycharm
1. Install virtualenv

In Windows CMD, enter the specified directory, here is Django_course. Use the following method to create a mysite_env virtual environment
Command: virtualenv mysite_env

Enter the Scripts subdirectory under the mysite_env directory and run the activate command to activate the virtual environment. The command line prompt at this time will start with (mysite_env). Run the pip3 install django command to automatically install the latest version of Django and the only dependent library pytz
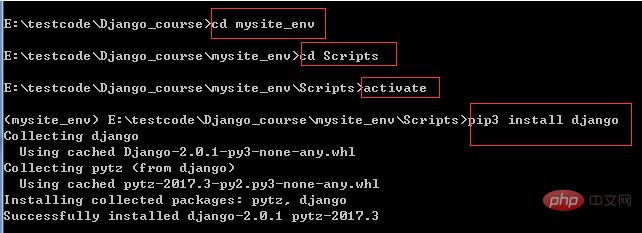
If you need to exit the virtual environment, you can use the deactive command
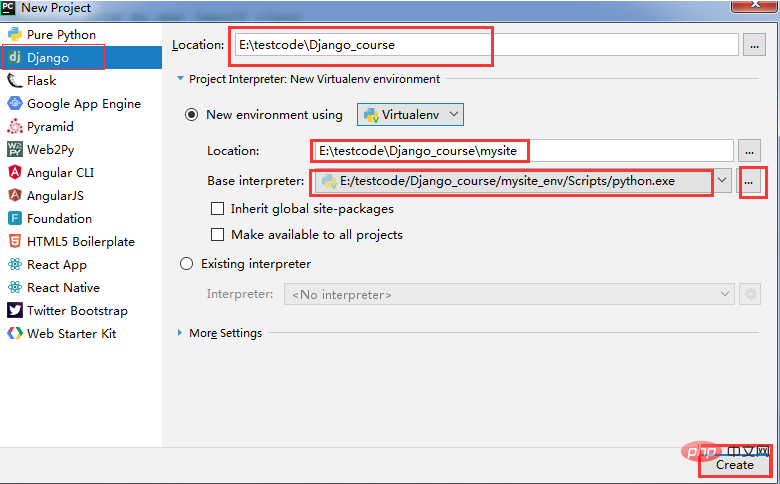
3. Create a project
Select Django on the left as shown, and then set the project location in the directory at the same level as the virtual environment, that is, E:\testcode\Django_course, and use the project name International practice mysite. Click the interpreter selection mark on the right, then in the pop-up interface, find the location of the virtual environment we just created, and finalize it.
The above is the detailed content of How to create django in python. For more information, please follow other related articles on the PHP Chinese website!

Hot AI Tools

Undresser.AI Undress
AI-powered app for creating realistic nude photos

AI Clothes Remover
Online AI tool for removing clothes from photos.

Undress AI Tool
Undress images for free

Clothoff.io
AI clothes remover

AI Hentai Generator
Generate AI Hentai for free.

Hot Article

Hot Tools

Notepad++7.3.1
Easy-to-use and free code editor

SublimeText3 Chinese version
Chinese version, very easy to use

Zend Studio 13.0.1
Powerful PHP integrated development environment

Dreamweaver CS6
Visual web development tools

SublimeText3 Mac version
God-level code editing software (SublimeText3)

Hot Topics
 1378
1378
 52
52
 Python: Games, GUIs, and More
Apr 13, 2025 am 12:14 AM
Python excels in gaming and GUI development. 1) Game development uses Pygame, providing drawing, audio and other functions, which are suitable for creating 2D games. 2) GUI development can choose Tkinter or PyQt. Tkinter is simple and easy to use, PyQt has rich functions and is suitable for professional development.
 PHP and Python: Comparing Two Popular Programming Languages
Apr 14, 2025 am 12:13 AM
PHP and Python each have their own advantages, and choose according to project requirements. 1.PHP is suitable for web development, especially for rapid development and maintenance of websites. 2. Python is suitable for data science, machine learning and artificial intelligence, with concise syntax and suitable for beginners.
 How debian readdir integrates with other tools
Apr 13, 2025 am 09:42 AM
The readdir function in the Debian system is a system call used to read directory contents and is often used in C programming. This article will explain how to integrate readdir with other tools to enhance its functionality. Method 1: Combining C language program and pipeline First, write a C program to call the readdir function and output the result: #include#include#include#includeintmain(intargc,char*argv[]){DIR*dir;structdirent*entry;if(argc!=2){
 Python and Time: Making the Most of Your Study Time
Apr 14, 2025 am 12:02 AM
To maximize the efficiency of learning Python in a limited time, you can use Python's datetime, time, and schedule modules. 1. The datetime module is used to record and plan learning time. 2. The time module helps to set study and rest time. 3. The schedule module automatically arranges weekly learning tasks.
 Nginx SSL Certificate Update Debian Tutorial
Apr 13, 2025 am 07:21 AM
This article will guide you on how to update your NginxSSL certificate on your Debian system. Step 1: Install Certbot First, make sure your system has certbot and python3-certbot-nginx packages installed. If not installed, please execute the following command: sudoapt-getupdatesudoapt-getinstallcertbotpython3-certbot-nginx Step 2: Obtain and configure the certificate Use the certbot command to obtain the Let'sEncrypt certificate and configure Nginx: sudocertbot--nginx Follow the prompts to select
 GitLab's plug-in development guide on Debian
Apr 13, 2025 am 08:24 AM
Developing a GitLab plugin on Debian requires some specific steps and knowledge. Here is a basic guide to help you get started with this process. Installing GitLab First, you need to install GitLab on your Debian system. You can refer to the official installation manual of GitLab. Get API access token Before performing API integration, you need to get GitLab's API access token first. Open the GitLab dashboard, find the "AccessTokens" option in the user settings, and generate a new access token. Will be generated
 How to configure HTTPS server in Debian OpenSSL
Apr 13, 2025 am 11:03 AM
Configuring an HTTPS server on a Debian system involves several steps, including installing the necessary software, generating an SSL certificate, and configuring a web server (such as Apache or Nginx) to use an SSL certificate. Here is a basic guide, assuming you are using an ApacheWeb server. 1. Install the necessary software First, make sure your system is up to date and install Apache and OpenSSL: sudoaptupdatesudoaptupgradesudoaptinsta
 What service is apache
Apr 13, 2025 pm 12:06 PM
Apache is the hero behind the Internet. It is not only a web server, but also a powerful platform that supports huge traffic and provides dynamic content. It provides extremely high flexibility through a modular design, allowing for the expansion of various functions as needed. However, modularity also presents configuration and performance challenges that require careful management. Apache is suitable for server scenarios that require highly customizable and meet complex needs.


