 Web Front-end
 Layui Tutorial
 How to preview the successful image after successfully uploading the image in layui
How to preview the successful image after successfully uploading the image in layui
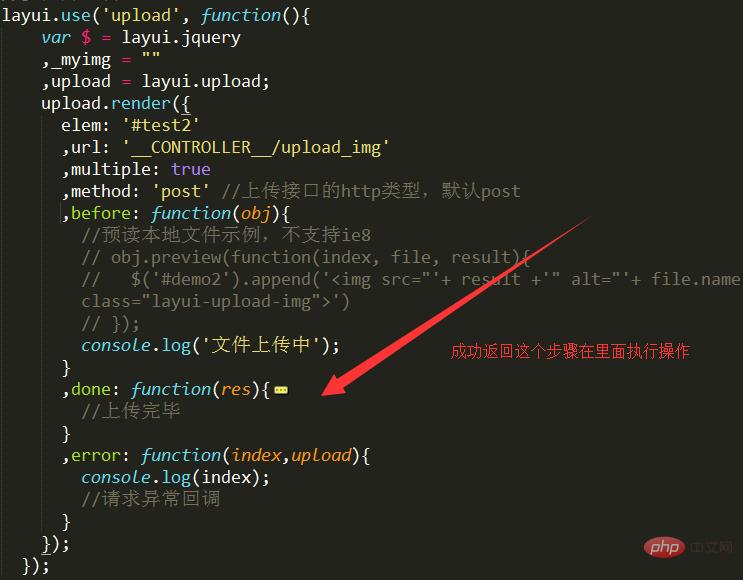
First of all, you must be able to use layui writing, as shown in the picture. There are three states after submission. One is uploading. Generally, the file will be displayed in this step if it is large. The third step is to report an error. , the second step is the most important series of operations after the upload is successful.
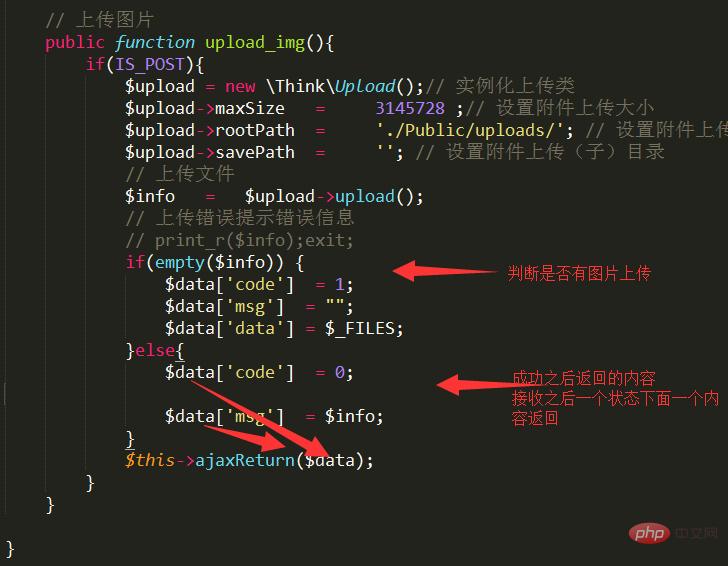
Write a method in the controller to transfer the obtained image to the server, then determine whether the upload is successful and define some values to determine the return. If successful, define a state.
Related recommendations: "layui Framework Tutorial"
After receiving the successfully returned information, determine whether there is this status. If so, Just output your operation, such as getting the name of the heart picture after success.

Because such uploads are not processed, multiple pictures are also called once for each picture, so that an empty variable can be defined to save the name each time.
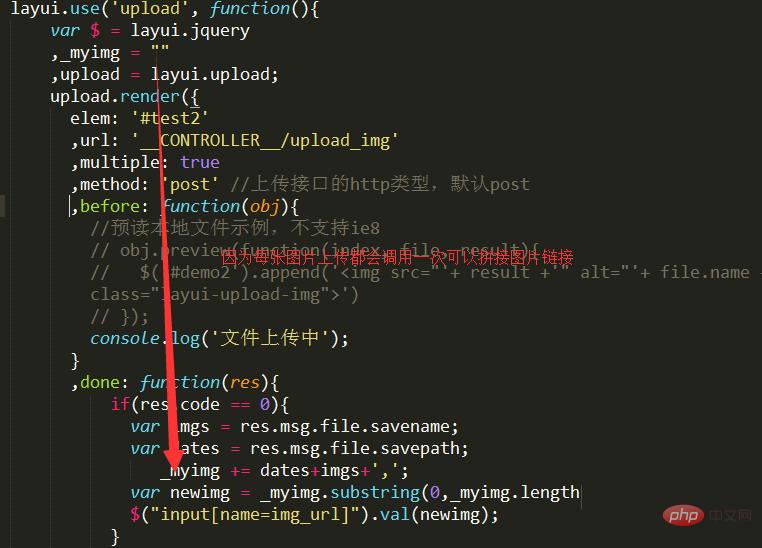
Define to get some returned information, names and saved folders, etc. Depending on your needs, you can splice together what you need and stuff it directly back into the input for easy access. submit.

After success, get the value in the input, split the value, split according to specific symbols, and then get the value for, traverse it, and append it to the element.
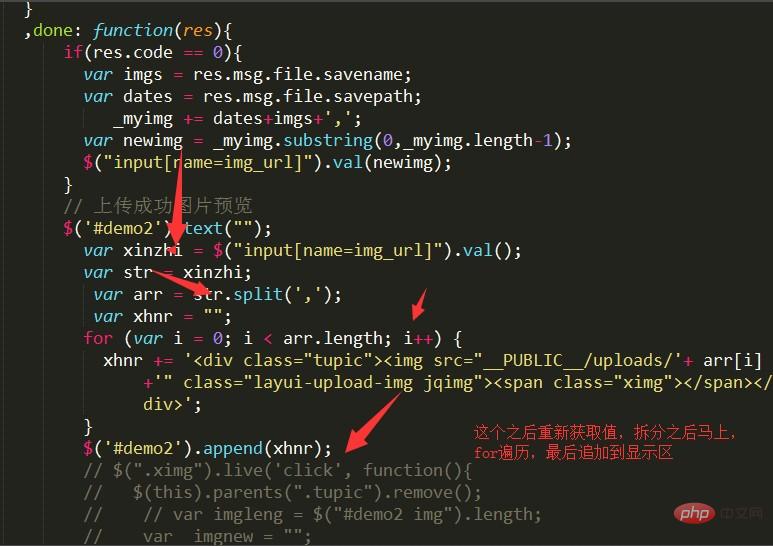
Notes
Note that when writing click events, use live to control the elements added by jq.
Be careful to intercept it after splicing.
The above is the detailed content of How to preview the successful image after successfully uploading the image in layui. For more information, please follow other related articles on the PHP Chinese website!

Hot AI Tools

Undresser.AI Undress
AI-powered app for creating realistic nude photos

AI Clothes Remover
Online AI tool for removing clothes from photos.

Undress AI Tool
Undress images for free

Clothoff.io
AI clothes remover

AI Hentai Generator
Generate AI Hentai for free.

Hot Article

Hot Tools

Notepad++7.3.1
Easy-to-use and free code editor

SublimeText3 Chinese version
Chinese version, very easy to use

Zend Studio 13.0.1
Powerful PHP integrated development environment

Dreamweaver CS6
Visual web development tools

SublimeText3 Mac version
God-level code editing software (SublimeText3)

Hot Topics
 How to solve the problem of automatically saving pictures when publishing on Xiaohongshu? Where is the automatically saved image when posting?
Mar 22, 2024 am 08:06 AM
With the continuous development of social media, Xiaohongshu has become a platform for more and more young people to share their lives and discover beautiful things. Many users are troubled by auto-save issues when posting images. So, how to solve this problem? 1. How to solve the problem of automatically saving pictures when publishing on Xiaohongshu? 1. Clear the cache First, we can try to clear the cache data of Xiaohongshu. The steps are as follows: (1) Open Xiaohongshu and click the "My" button in the lower right corner; (2) On the personal center page, find "Settings" and click it; (3) Scroll down and find the "Clear Cache" option. Click OK. After clearing the cache, re-enter Xiaohongshu and try to post pictures to see if the automatic saving problem is solved. 2. Update the Xiaohongshu version to ensure that your Xiaohongshu
 How to post pictures in TikTok comments? Where is the entrance to the pictures in the comment area?
Mar 21, 2024 pm 09:12 PM
With the popularity of Douyin short videos, user interactions in the comment area have become more colorful. Some users wish to share images in comments to better express their opinions or emotions. So, how to post pictures in TikTok comments? This article will answer this question in detail and provide you with some related tips and precautions. 1. How to post pictures in Douyin comments? 1. Open Douyin: First, you need to open Douyin APP and log in to your account. 2. Find the comment area: When browsing or posting a short video, find the place where you want to comment and click the "Comment" button. 3. Enter your comment content: Enter your comment content in the comment area. 4. Choose to send a picture: In the interface for entering comment content, you will see a "picture" button or a "+" button, click
 How to make ppt pictures appear one by one
Mar 25, 2024 pm 04:00 PM
In PowerPoint, it is a common technique to display pictures one by one, which can be achieved by setting animation effects. This guide details the steps to implement this technique, including basic setup, image insertion, adding animation, and adjusting animation order and timing. Additionally, advanced settings and adjustments are provided, such as using triggers, adjusting animation speed and order, and previewing animation effects. By following these steps and tips, users can easily set up pictures to appear one after another in PowerPoint, thereby enhancing the visual impact of the presentation and grabbing the attention of the audience.
 How to get form data in layui
Apr 04, 2024 am 03:39 AM
layui provides a variety of methods for obtaining form data, including directly obtaining all field data of the form, obtaining the value of a single form element, using the formAPI.getVal() method to obtain the specified field value, serializing the form data and using it as an AJAX request parameter, and listening Form submission event gets data.
 Simple steps to upload your own music on Kugou
Mar 25, 2024 pm 10:56 PM
1. Open Kugou Music and click on your profile picture. 2. Click the settings icon in the upper right corner. 3. Click [Upload Music Works]. 4. Click [Upload Works]. 5. Select the song and click [Next]. 6. Finally, click [Upload].
 How to set up jump on layui login page
Apr 04, 2024 am 03:12 AM
Layui login page jump setting steps: Add jump code: Add judgment in the login form submit button click event, and jump to the specified page through window.location.href after successful login. Modify the form configuration: add a hidden input field to the form element of lay-filter="login", with the name "redirect" and the value being the target page address.
 How layui implements self-adaptation
Apr 26, 2024 am 03:00 AM
Adaptive layout can be achieved by using the responsive layout function of the layui framework. The steps include: referencing the layui framework. Define an adaptive layout container and set the layui-container class. Use responsive breakpoints (xs/sm/md/lg) to hide elements under specific breakpoints. Specify element width using the grid system (layui-col-). Create spacing via offset (layui-offset-). Use responsive utilities (layui-invisible/show/block/inline) to control the visibility of elements and how they appear.
 How to set pencil grayscale artistic effect on PPT pictures
Mar 21, 2024 pm 02:51 PM
On many occasions, we may want to add some artistic processing to the pictures in PPT to enhance the visual effect or better fit the overall theme. Among them, the pencil grayscale artistic effect has become the first choice of many people with its unique charm and excellent performance. This effect can not only give the picture a hand-drawn texture like a pencil, but also convert it into grayscale color, that is, black and white, thereby removing the interference of color on the vision. However, many users do not understand it when using ppt. How to achieve this effect, then the editor of this website will bring you a detailed production tutorial below, I hope it can help you! Method for setting pencil grayscale artistic effects on PPT pictures 1. Open the PPT2021 software and insert a picture. 2. Choose


