How to do multi-level classification in wordpress
WordPress is a personal information publishing platform that focuses on aesthetics, ease of use, and web standards. Although WordPress is free and open source software, its value cannot be measured in terms of money. The graphic design of WordPress is easy to operate and browse in terms of performance; it is elegant in appearance, fresh in style, and attractive in color. WordPress can be used to build a powerful network information publishing platform, but it is more commonly used for personalized blogs. For blog applications, WordPress allows you to save yourself from worrying about backend technology and focus on the content of your website.
It is precisely because of WordPress’s powerful functions and ease of use that many companies and individuals use it to build websites. Although WordPress is so easy to use, there are some details that we need to fine-tune. For example, after using WordPress to build a website, you will find that the website navigation menu bar only has two menus: "Homepage" and "Sample Page". This is of course not the navigation menu bar we want, so we need to create our own multi-level navigation menu bar.

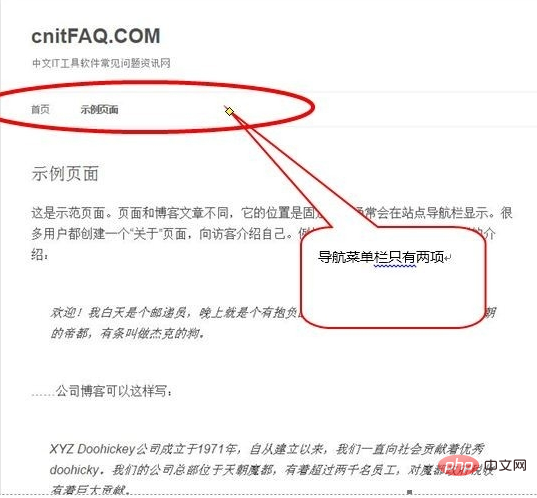
In the first step, after installing WordPress and building the website, we will find that the website is empty, and the more important navigation menu only has "Home" and "Sample Page".
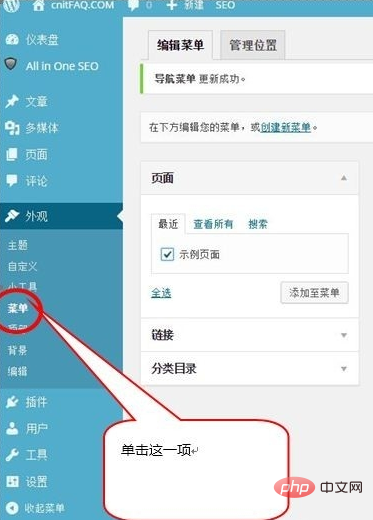
Second step, first, we enter the WordPress backend management page, select [Appearance]-->[Menu] on the left toolbar, where we can first create A menu.
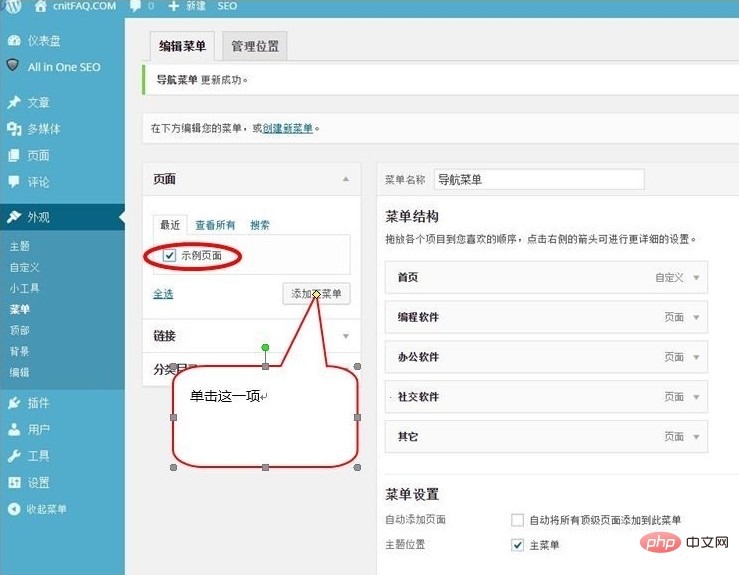
The third step is to check [Sample Page], and then click [Add to Menu]. This is to add a new first-level menu item, and then select the menu Item modification name. By analogy, multiple first-level menu items can be created.
Related recommendations: "WordPress Tutorial"
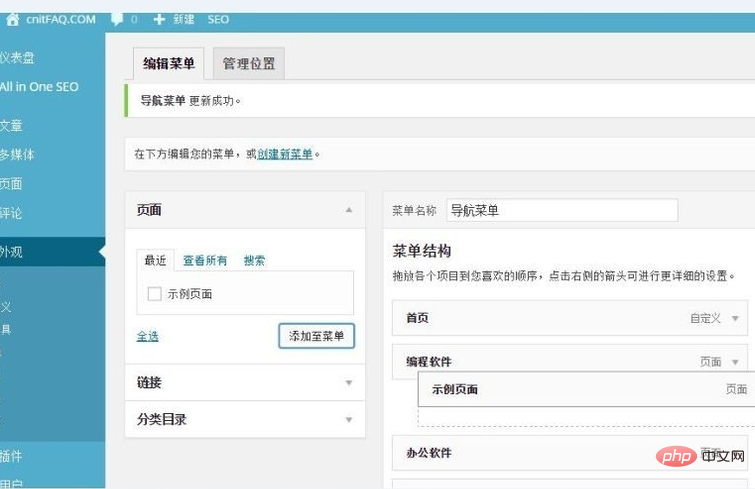
The fourth step, on the right, drag one of the [Sample Page] menus Go to [Programming Software] to create a secondary menu item. By analogy, multiple secondary menu items can be created.
The fifth step is to modify the name and attributes of the corresponding secondary menu. Press the fourth step to add secondary menu items in multiple cycles.
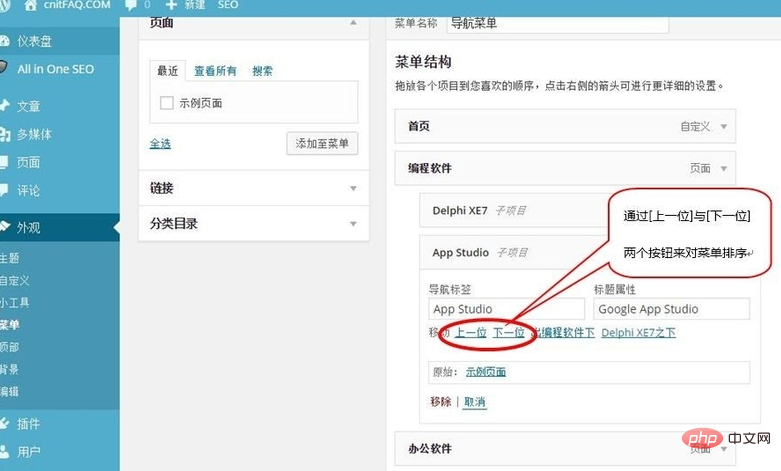

The sixth step is to sort the secondary menu items through the [Previous] and [Next] buttons. , so that we can get the order we want.

The seventh step is to complete the personalized second-level menu navigation bar through the fourth to sixth steps. If necessary, you can also build a third-level menu. Navigation bar, this is done as needed.

#It’s done, let’s take a look at the display effect of the final website and we’ll find that it’s exactly what we wanted.
 ##
##
The above is the detailed content of How to do multi-level classification in wordpress. For more information, please follow other related articles on the PHP Chinese website!

Hot AI Tools

Undresser.AI Undress
AI-powered app for creating realistic nude photos

AI Clothes Remover
Online AI tool for removing clothes from photos.

Undress AI Tool
Undress images for free

Clothoff.io
AI clothes remover

AI Hentai Generator
Generate AI Hentai for free.

Hot Article

Hot Tools

Notepad++7.3.1
Easy-to-use and free code editor

SublimeText3 Chinese version
Chinese version, very easy to use

Zend Studio 13.0.1
Powerful PHP integrated development environment

Dreamweaver CS6
Visual web development tools

SublimeText3 Mac version
God-level code editing software (SublimeText3)

Hot Topics
 1359
1359
 52
52
 PHP vs. Flutter: The best choice for mobile development
May 06, 2024 pm 10:45 PM
PHP and Flutter are popular technologies for mobile development. Flutter excels in cross-platform capabilities, performance and user interface, and is suitable for applications that require high performance, cross-platform and customized UI. PHP is suitable for server-side applications with lower performance and not cross-platform.
 How to change page width in wordpress
Apr 16, 2024 am 01:03 AM
You can easily modify your WordPress page width by editing your style.css file: Edit your style.css file and add .site-content { max-width: [your preferred width]; }. Edit [your preferred width] to set the page width. Save changes and clear cache (optional).
 In which folder are wordpress articles located?
Apr 16, 2024 am 10:29 AM
WordPress posts are stored in the /wp-content/uploads folder. This folder uses subfolders to categorize different types of uploads, including articles organized by year, month, and article ID. Article files are stored in plain text format (.txt), and the filename usually includes its ID and title.
 How to create a product page in wordpress
Apr 16, 2024 am 12:39 AM
Create a product page in WordPress: 1. Create the product (name, description, pictures); 2. Customize the page template (add title, description, pictures, buttons); 3. Enter product information (stock, size, weight); 4 . Create variations (different colors, sizes); 5. Set visibility (public or hidden); 6. Enable/disable comments; 7. Preview and publish the page.
 Where is the wordpress template file?
Apr 16, 2024 am 11:00 AM
WordPress template files are located in the /wp-content/themes/[theme name]/ directory. They are used to determine the appearance and functionality of the website, including header (header.php), footer (footer.php), main template (index.php), single article (single.php), page (page.php), Archive (archive.php), category (category.php), tag (tag.php), search (search.php) and 404 error page (404.php). By editing and modifying these files, you can customize the appearance of your WordPress website
 How to search for authors in WordPress
Apr 16, 2024 am 01:18 AM
Search for authors in WordPress: 1. Once logged in to your admin panel, navigate to Posts or Pages, enter the author name using the search bar, and select Author in Filters. 2. Other tips: Use wildcards to broaden your search, use operators to combine criteria, or enter author IDs to search for articles.
 Which version of wordpress is stable?
Apr 16, 2024 am 10:54 AM
The most stable WordPress version is the latest version because it contains the latest security patches, performance enhancements, and introduces new features and improvements. In order to update to the latest version, log into your WordPress dashboard, go to the Updates page and click Update Now.
 What language is used to develop WordPress?
Apr 16, 2024 am 12:03 AM
WordPress is developed using PHP language as its core programming language for handling database interactions, form processing, dynamic content generation, and user requests. PHP was chosen for reasons including cross-platform compatibility, ease of learning, active community, and rich library and frameworks. Apart from PHP, WordPress also uses languages like HTML, CSS, JavaScript, SQL, etc. to enhance its functionality.


