How to change the logo on dedecms website

The logo area has always been a module that search engines attach great importance to. The author has been doing SEO for many years. According to relevant heat map statistics, the number of clicks in the logo area is relatively high, which reflects the The optimization of a good logo module is very important. Let’s take the DreamWeaver website template as an example to explain how to replace the logo icon and do related optimization.
The optimization of the Logo module not only involves replacing pictures but also involves minor modifications to the code. Therefore, you need to log in to the backend of the website to modify the relevant code, enter your username and password, and log in to the main interface.
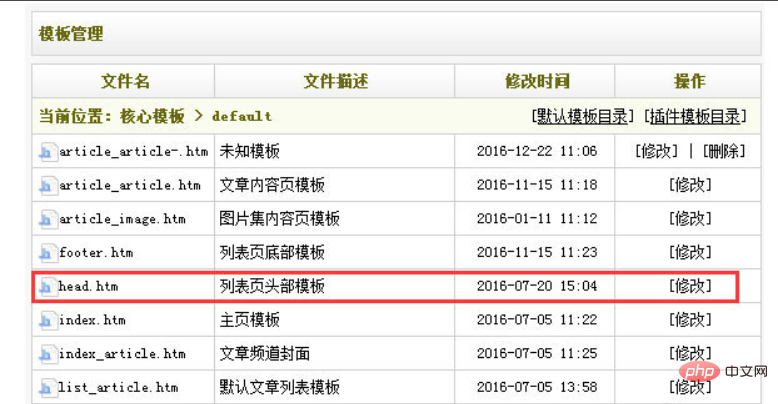
Logo icons generally exist in the "head.htm" template file, so find this template first: click [Module]->[Default Template Management], find the corresponding file on the right, and click [Modify] , as shown in the picture:

# Then find the code we want to modify. Generally, the codes of the logo module are similar, so we encircle the part to be modified with a red box, such as As shown in the picture:

As shown in the previous step, the code we want to modify is: "  ", mainly modify the image hyperlink and alt tag, the alt tag is used for images The tag name will only be displayed when it cannot be loaded, so the alt tag is generally set to the brand word, and the width and height must be set for the image, consistent with the size of the image itself. Some website logos do not have width and height. It is recommended to add width and height. This can reduce the image loading time. If there is other information in the header, it is recommended to modify it together to avoid forgetting it. You can copy the code to the Dreamweaver editing software for editing. You can refer to the settings below:

After modifying the code, copy it to the template and replace the original code, click [Save], but this is not over yet, the logo image has not been replaced. We log in to the website space backend, follow the above path to find the images file directory, and use FTP tools or server space The merchant has its own upload function. Just upload the new logo to replace the original one. The size of the image must be the same as the original image, as shown in the picture:

Then update the website and click [ Generate]->[Update system cache], click [One-click update website] and select [Update all]->[Start update], as shown in the picture:

DedeCMS Tutorial column to learn!
The above is the detailed content of How to change the logo on dedecms website. For more information, please follow other related articles on the PHP Chinese website!

Hot AI Tools

Undresser.AI Undress
AI-powered app for creating realistic nude photos

AI Clothes Remover
Online AI tool for removing clothes from photos.

Undress AI Tool
Undress images for free

Clothoff.io
AI clothes remover

Video Face Swap
Swap faces in any video effortlessly with our completely free AI face swap tool!

Hot Article

Hot Tools

Notepad++7.3.1
Easy-to-use and free code editor

SublimeText3 Chinese version
Chinese version, very easy to use

Zend Studio 13.0.1
Powerful PHP integrated development environment

Dreamweaver CS6
Visual web development tools

SublimeText3 Mac version
God-level code editing software (SublimeText3)


