How to button hair in PS
[Step 1] Open the file in Photoshop
First, open the file you just downloaded in Photoshop. After opening, you can choose to go to the layer panel and double-click the image. The layer name can be used to unlock it, or copy a new layer to use like we did;
The advantage of the latter is that because all post-production is applied to the copied layer, you don’t have to worry about it. The original image file is destroyed, and sometimes it is necessary to compare the before and after with the original image file. At that time, if this layer of insurance is performed, it will be very convenient for inspection.

[Step 2] Use the "Pen Tool"
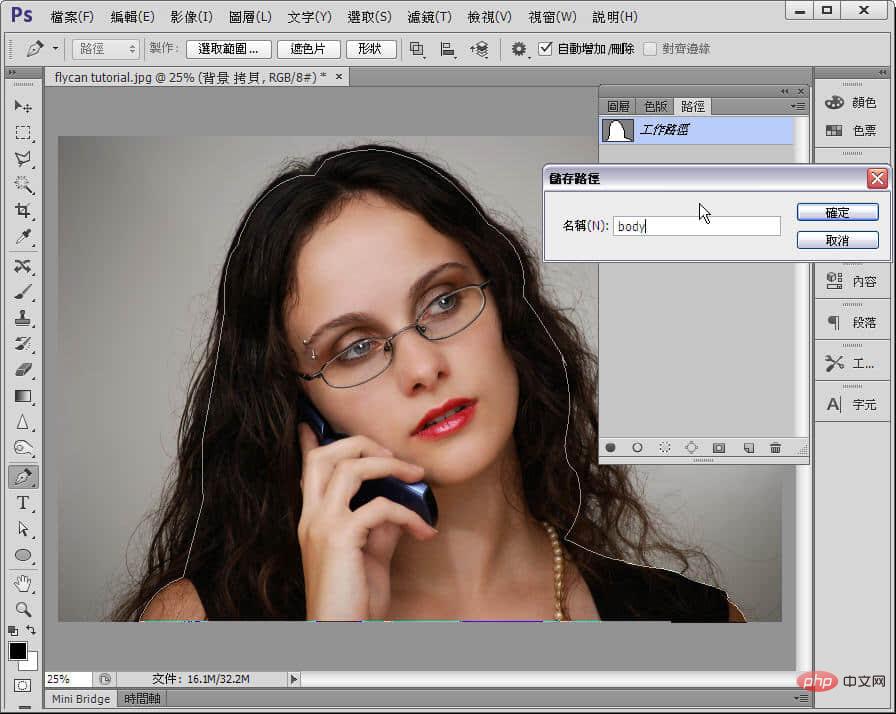
First, select the "Pen Tool" and note that the options panel above should be displayed as " "Path" instead of "Shape", then start to slowly trace the main outline of the character using the "click~pull~point~pull~" method;
(Note: If you are not familiar with pen tools Friends, you can refer to Feiken’s previously shared teaching articles: "Pen Tool" and "Path" to memorize - introductory chapter!)
The hair part needs to be left for special processing later, so Don't select it yet; after selecting it, a complete white solid line range will appear. (As shown in the picture below)

At this time, open the path panel, and the "working path" we just made will appear. Remember to double-click it and name it to save, otherwise it will be hard to use. If you drag the mouse for a long time and finally forget to save it, you will have to do it all over again.

[Step 3] Use Alpha Channel "Color Version" to memorize
At this time, click on the "Color Version" panel, please observe carefully where it is Under one color palette, will the contrast between the dark and bright parts of the character and the background be greater? !
After selecting, we will make a copy of the color version that appears to have greater contrast (that is, clear black and white). This newly copied color version is generally called the alpha channel color version. In this example, we will find that in the blue color version, the black of the model's hair is more clearly distinguished from the gray of the background, so we finally chose blue. color swatches.
Then go back to the "Path" panel and click the "Load path as selection range" button at the bottom of the panel (marked in red as shown in the picture), you can The saved path becomes selected;
At this time, fill the selection range with black (if the foreground color has been set to black, you can use the shortcut key "Alt Delete").

Next, we can use the Levels panel to move the white eyedropper to the background and click it. The background can be initially grayed out and whitened. (As shown in the picture);
At this time, the black and white contrast of the entire picture is more obvious. If some areas are still not white enough, it doesn’t matter. We will use other tools to process it in the next step.

[Step 4] Photoshop’s “Burn Tool”
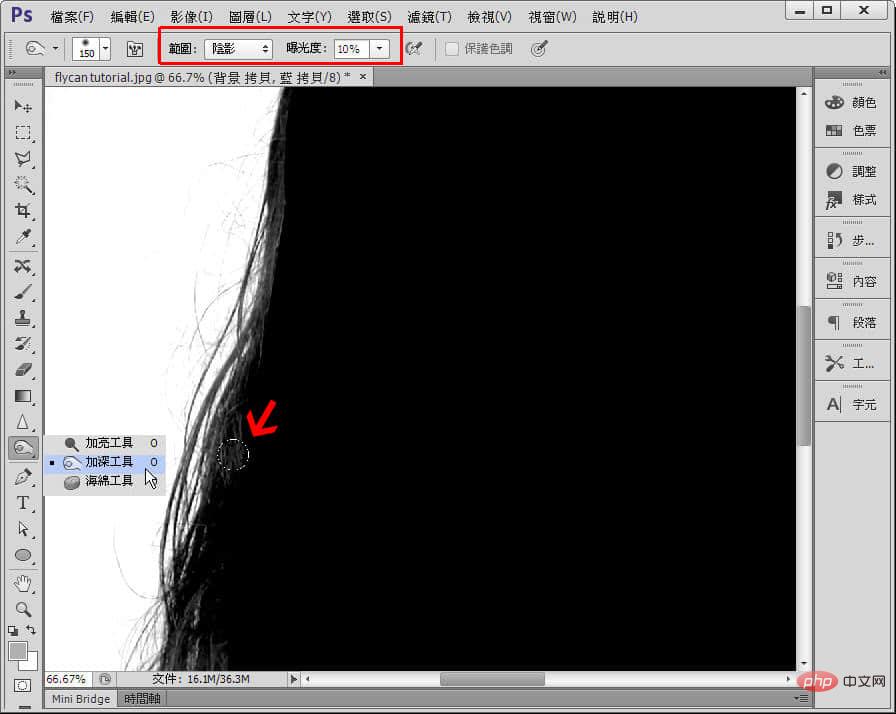
In order to make the hair part darker, here we use Photoshop’s “Burn Tool” "Tool", remember to set the range of the upper option panel to "Shadow", and the exposure can be set to 10% or slightly less than 10%;
As for the size of the brush, adjust it to the appropriate one To determine the size, we only need to lightly brush the edges of the hair a few times, and there is no need to apply too heavy a treatment to avoid adverse effects.

Of course, after using the "Burn Tool", on the contrary, we can use the "Highlight Tool" to enhance the areas where the background is not white enough, or where the hair and the background meet. at.
Also need to pay attention to the options panel above. Please set the range to "Highlights" and the exposure to about 10% or slightly less than 10%.
After the above operation, you should be able to get a silhouette-like effect as shown below:
【Step 5】Load the color plate as the selection range
Since the valid range in the "color plate" is the white part, we first use the shortcut key " Ctrl I" to invert the silhouette in black and white, and then click the "Load Color Version as Selection Range" function at the bottom of the panel to make a direct selection.
Then, return to the "Layer Panel" and use the selection range of the color version just now to make a copy directly on the layer (the shortcut key is "Ctrl J") .
What is copied is the layer file that has been memorized.
[Step 6] Trim the edges after removing the backing
If it is an object with simple lines, remove it roughly It's almost finished here, but because the hair is thin and messy, we can find that under the red background, the edge is close to translucent and it doesn't feel natural enough.
At this time, we still have a little tip to teach you. Please use the "Layer/Trim/Remove White Edge Blending" function to make final touches. White edge action; as long as you learn this function, if you find that the edge is still not clean enough after removing the white background (or light-colored background), you can usually achieve a certain modification effect.
(Note: If the original background is black, use "Remove Black Edge Blending".)
Change the background for viewing After removing the red color, you can save this back-removal picture for later use!
For more technical articles related to PS issues, please visit the PS Tutorial column to learn!
The above is the detailed content of How to button hair in PS. For more information, please follow other related articles on the PHP Chinese website!

Hot AI Tools

Undresser.AI Undress
AI-powered app for creating realistic nude photos

AI Clothes Remover
Online AI tool for removing clothes from photos.

Undress AI Tool
Undress images for free

Clothoff.io
AI clothes remover

AI Hentai Generator
Generate AI Hentai for free.

Hot Article

Hot Tools

Notepad++7.3.1
Easy-to-use and free code editor

SublimeText3 Chinese version
Chinese version, very easy to use

Zend Studio 13.0.1
Powerful PHP integrated development environment

Dreamweaver CS6
Visual web development tools

SublimeText3 Mac version
God-level code editing software (SublimeText3)

Hot Topics
 How do I use Photoshop for creating social media graphics?
Mar 18, 2025 pm 01:41 PM
The article details using Photoshop for social media graphics, covering setup, design tools, and optimization techniques. It emphasizes efficiency and quality in graphic creation.
 How do I prepare images for web use in Photoshop (file size, resolution, color space)?
Mar 13, 2025 pm 07:28 PM
Article discusses preparing images for web use in Photoshop, focusing on optimizing file size, resolution, and color space. Main issue is balancing image quality with quick loading times.
 How do I use Photoshop's Content-Aware Fill and Content-Aware Move tools effectively?
Mar 13, 2025 pm 07:35 PM
Article discusses using Photoshop's Content-Aware Fill and Move tools effectively, offering tips on selecting source areas, avoiding mistakes, and adjusting settings for optimal results.
 How do I prepare images for web using Photoshop (optimize file size, resolution)?
Mar 18, 2025 pm 01:35 PM
Article discusses optimizing images for web using Photoshop, focusing on file size and resolution. Main issue is balancing quality and load times.
 How do I use Photoshop's video editing capabilities?
Mar 18, 2025 pm 01:37 PM
The article explains how to use Photoshop for video editing, detailing steps to import, edit, and export videos, and highlighting key features like the Timeline panel, video layers, and effects.
 How do I calibrate my monitor for accurate color in Photoshop?
Mar 13, 2025 pm 07:31 PM
Article discusses calibrating monitors for accurate color in Photoshop, tools for calibration, effects of improper calibration, and recalibration frequency. Main issue is ensuring color accuracy.
 How do I create animated GIFs in Photoshop?
Mar 18, 2025 pm 01:38 PM
Article discusses creating and optimizing animated GIFs in Photoshop, including adding frames to existing GIFs. Main focus is on balancing quality and file size.
 How do I prepare images for print using Photoshop (resolution, color profiles)?
Mar 18, 2025 pm 01:36 PM
The article guides on preparing images for print in Photoshop, focusing on resolution, color profiles, and sharpness. It argues that 300 PPI and CMYK profiles are essential for quality prints.


