How to build wordpress
First of all, we need to set up a local environment and download the program files. In the previous article "How to install a local website debugging environment", we have already introduced the installation of the local debugging environment. I will not go into details here. The editor uses phpstudy as Example to install. The WordPress program is installed. In the previous article "Which CMS program is better for optimization?" I also introduced that the WordPress program is mainly used to build blog sites. Without further ado, let's follow.

1. Go to the WordPress Chinese official website to download the program file. After clicking the download button, the program file will be automatically downloaded to your local area;
2. Download it Cut the file to the WWW directory in the phpstudy environment (it is the WWW directory if no changes are made), then compress the compressed file, and cut all the files in the decompressed wordpress folder to the WWW directory Down.
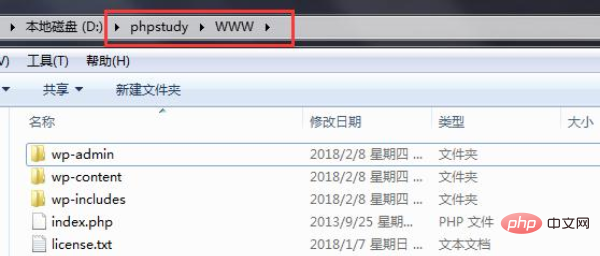
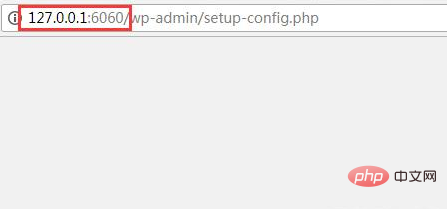
3. Then start phpstudy and visit http://127.0.0.1/ or http://localhost/ in the browser (this is the default access address, if modified Pass the port, just add the port at the end. For example, the editor has changed port 80 to port 6060 here).
Related recommendations: "WordPress Tutorial"
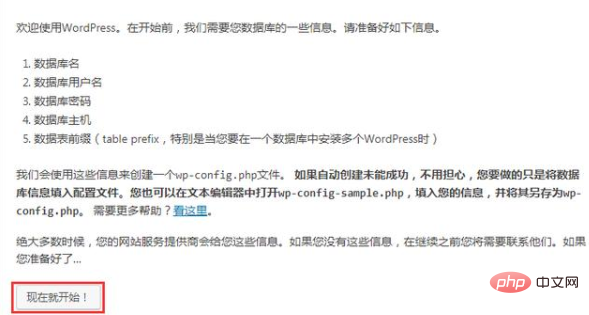
4. The browser will automatically jump to the program installation interface, and then click Now start.
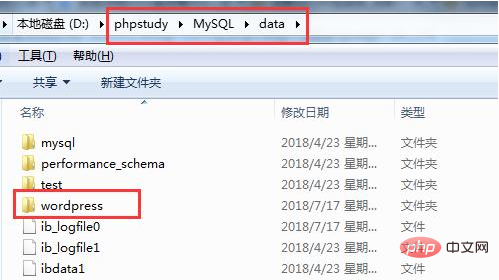
5. Fill in the corresponding information. It should be noted here that the database needs to be created manually. Create a new database in the phpstudy>MySQL>data folder. Folder (can only have an English name). What I created here is a folder named WordPress.
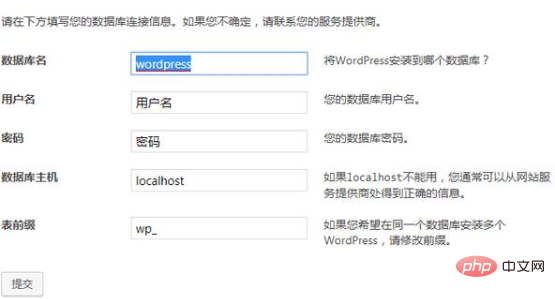
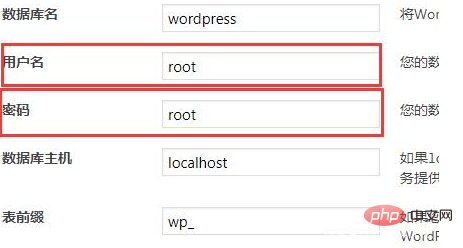
6. In the box where you filled in the information previously, the database name is the name of the database folder created in the previous step, the user name and The password defaults to root (the default is different in different environments, phpstudy defaults to root), the table prefix does not need to be changed unless there are special requirements, and the database host does not need to be changed. Then click Submit.
#7. If there is no error, this interface will appear, then click Install Now.

8. The next step is to set the site title, users, login password and other information. It should be noted that the login password cannot contain Chinese characters, and it is best to fill in your own email The email address can be used to retrieve the login password. The last one is visibility to search engines. If you do not want search engines to index the site, check it; otherwise, do not check it. For SEO sites, do not check it. Then click Install WordPress.
The above is the detailed content of How to build wordpress. For more information, please follow other related articles on the PHP Chinese website!

Hot AI Tools

Undresser.AI Undress
AI-powered app for creating realistic nude photos

AI Clothes Remover
Online AI tool for removing clothes from photos.

Undress AI Tool
Undress images for free

Clothoff.io
AI clothes remover

AI Hentai Generator
Generate AI Hentai for free.

Hot Article

Hot Tools

Notepad++7.3.1
Easy-to-use and free code editor

SublimeText3 Chinese version
Chinese version, very easy to use

Zend Studio 13.0.1
Powerful PHP integrated development environment

Dreamweaver CS6
Visual web development tools

SublimeText3 Mac version
God-level code editing software (SublimeText3)

Hot Topics
 1378
1378
 52
52
 PHP vs. Flutter: The best choice for mobile development
May 06, 2024 pm 10:45 PM
PHP and Flutter are popular technologies for mobile development. Flutter excels in cross-platform capabilities, performance and user interface, and is suitable for applications that require high performance, cross-platform and customized UI. PHP is suitable for server-side applications with lower performance and not cross-platform.
 How to change page width in wordpress
Apr 16, 2024 am 01:03 AM
You can easily modify your WordPress page width by editing your style.css file: Edit your style.css file and add .site-content { max-width: [your preferred width]; }. Edit [your preferred width] to set the page width. Save changes and clear cache (optional).
 How to create a product page in wordpress
Apr 16, 2024 am 12:39 AM
Create a product page in WordPress: 1. Create the product (name, description, pictures); 2. Customize the page template (add title, description, pictures, buttons); 3. Enter product information (stock, size, weight); 4 . Create variations (different colors, sizes); 5. Set visibility (public or hidden); 6. Enable/disable comments; 7. Preview and publish the page.
 In which folder are wordpress articles located?
Apr 16, 2024 am 10:29 AM
WordPress posts are stored in the /wp-content/uploads folder. This folder uses subfolders to categorize different types of uploads, including articles organized by year, month, and article ID. Article files are stored in plain text format (.txt), and the filename usually includes its ID and title.
 Where is the wordpress template file?
Apr 16, 2024 am 11:00 AM
WordPress template files are located in the /wp-content/themes/[theme name]/ directory. They are used to determine the appearance and functionality of the website, including header (header.php), footer (footer.php), main template (index.php), single article (single.php), page (page.php), Archive (archive.php), category (category.php), tag (tag.php), search (search.php) and 404 error page (404.php). By editing and modifying these files, you can customize the appearance of your WordPress website
 How to search for authors in WordPress
Apr 16, 2024 am 01:18 AM
Search for authors in WordPress: 1. Once logged in to your admin panel, navigate to Posts or Pages, enter the author name using the search bar, and select Author in Filters. 2. Other tips: Use wildcards to broaden your search, use operators to combine criteria, or enter author IDs to search for articles.
 What language is used to develop WordPress?
Apr 16, 2024 am 12:03 AM
WordPress is developed using PHP language as its core programming language for handling database interactions, form processing, dynamic content generation, and user requests. PHP was chosen for reasons including cross-platform compatibility, ease of learning, active community, and rich library and frameworks. Apart from PHP, WordPress also uses languages like HTML, CSS, JavaScript, SQL, etc. to enhance its functionality.
 Which version of wordpress is stable?
Apr 16, 2024 am 10:54 AM
The most stable WordPress version is the latest version because it contains the latest security patches, performance enhancements, and introduces new features and improvements. In order to update to the latest version, log into your WordPress dashboard, go to the Updates page and click Update Now.


