How to install dedecms

Environmental support required by DreamWeaver: PHP MYSQL
Step 1: Download the DreamWeaver source code from the official website of DreamWeaver 58. Note: Both DreamWeavervip and commercial source codes are available. It is a source code package with data for the entire site.
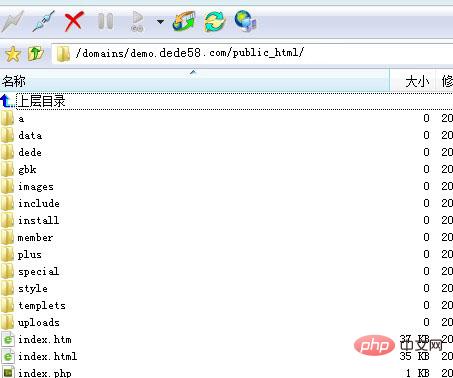
Step 2: Unzip the downloaded Dreamweaver compressed package and upload all the files in the root directory to your server (WEB directory). The final FTP directory is as shown in the figure:

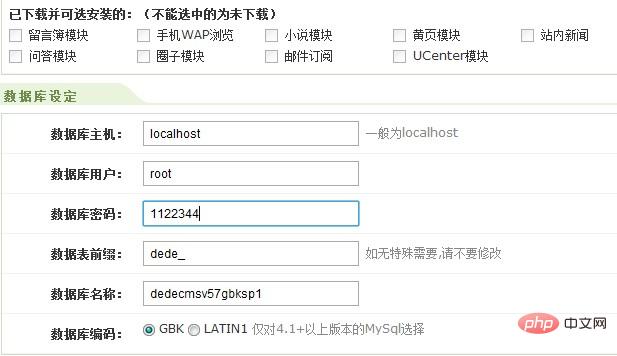
Step 3: Execute the installation, open the browser and enter: http://www.youname.com/install/index. php, and then just enter the MYSQL database information and administrator account password. If "Database Unable to Connect" is displayed, it means that you entered the database information incorrectly.
Database information includes: database name, database password, database user.
Related recommendations: "dedecms tutorial"
Warm reminder:
a. Folder storage directory:
Many students do not Know which is the WEB directory in the server (FTP space). Generally, the website file directories in our FTP are web, wwwroot, public_htm, htdocs. If you still don’t know which website WEB file directory is, please consult the space provider you purchased. customer service.
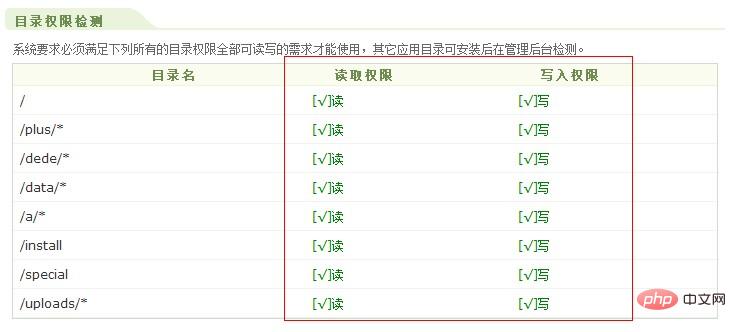
b. The folder must be readable and writable:

c. The MYSQL database information must be entered correctly to ensure that it can be installed normally.

#d, as long as you fill it in correctly, you can install it smoothly and enter the background.
Step 4: After installation, go to "System" - "Database Backup/Restore" in the background, click "Restore Data" - "Start Restore Data" in the upper right corner to restore the database.
Step 5: After restoring the database. In System Settings - System User Settings - Set your username and password.
Step 6: Enter the system - basic system parameters - fill in your root URL, remember not to add "/" and other parameters after it.
Step 7: Enter Generate - Generate the entire site with one click - Generate homepage (when generating the homepage. Check if the homepage template path is correct)
In this way, the entire installation is completed.
The above is the detailed content of How to install dedecms. For more information, please follow other related articles on the PHP Chinese website!

Hot AI Tools

Undresser.AI Undress
AI-powered app for creating realistic nude photos

AI Clothes Remover
Online AI tool for removing clothes from photos.

Undress AI Tool
Undress images for free

Clothoff.io
AI clothes remover

AI Hentai Generator
Generate AI Hentai for free.

Hot Article

Hot Tools

Notepad++7.3.1
Easy-to-use and free code editor

SublimeText3 Chinese version
Chinese version, very easy to use

Zend Studio 13.0.1
Powerful PHP integrated development environment

Dreamweaver CS6
Visual web development tools

SublimeText3 Mac version
God-level code editing software (SublimeText3)

Hot Topics
 How to install Android apps on Linux?
Mar 19, 2024 am 11:15 AM
Installing Android applications on Linux has always been a concern for many users. Especially for Linux users who like to use Android applications, it is very important to master how to install Android applications on Linux systems. Although running Android applications directly on Linux is not as simple as on the Android platform, by using emulators or third-party tools, we can still happily enjoy Android applications on Linux. The following will introduce how to install Android applications on Linux systems.
 How to install Podman on Ubuntu 24.04
Mar 22, 2024 am 11:26 AM
If you have used Docker, you must understand daemons, containers, and their functions. A daemon is a service that runs in the background when a container is already in use in any system. Podman is a free management tool for managing and creating containers without relying on any daemon such as Docker. Therefore, it has advantages in managing containers without the need for long-term backend services. Additionally, Podman does not require root-level permissions to be used. This guide discusses in detail how to install Podman on Ubuntu24. To update the system, we first need to update the system and open the Terminal shell of Ubuntu24. During both installation and upgrade processes, we need to use the command line. a simple
 How to Install and Run the Ubuntu Notes App on Ubuntu 24.04
Mar 22, 2024 pm 04:40 PM
While studying in high school, some students take very clear and accurate notes, taking more notes than others in the same class. For some, note-taking is a hobby, while for others, it is a necessity when they easily forget small information about anything important. Microsoft's NTFS application is particularly useful for students who wish to save important notes beyond regular lectures. In this article, we will describe the installation of Ubuntu applications on Ubuntu24. Updating the Ubuntu System Before installing the Ubuntu installer, on Ubuntu24 we need to ensure that the newly configured system has been updated. We can use the most famous "a" in Ubuntu system
 Detailed steps to install Go language on Win7 computer
Mar 27, 2024 pm 02:00 PM
Detailed steps to install Go language on Win7 computer Go (also known as Golang) is an open source programming language developed by Google. It is simple, efficient and has excellent concurrency performance. It is suitable for the development of cloud services, network applications and back-end systems. . Installing the Go language on a Win7 computer allows you to quickly get started with the language and start writing Go programs. The following will introduce in detail the steps to install the Go language on a Win7 computer, and attach specific code examples. Step 1: Download the Go language installation package and visit the Go official website
 Complete guide to install FTPS service on Linux system
Mar 19, 2024 am 11:39 AM
Title: A complete guide to installing FTPS service under Linux system In Linux system, setting up an FTP server is a common requirement. However, in order to enhance the security of data transmission, we can choose to install the FTPS service, which adds SSL/TLS encryption function based on the FTP protocol. Through the FTPS service, we can upload and download files while ensuring the security of data transmission. This article will provide a detailed guide for installing FTPS service under Linux system and provide specific instructions.
 How to install Go language under Win7 system?
Mar 27, 2024 pm 01:42 PM
Installing Go language under Win7 system is a relatively simple operation. Just follow the following steps to successfully install it. The following will introduce in detail how to install Go language under Win7 system. Step 1: Download the Go language installation package. First, open the Go language official website (https://golang.org/) and enter the download page. On the download page, select the installation package version compatible with Win7 system to download. Click the Download button and wait for the installation package to download. Step 2: Install Go language
 Essential PHP programs: Install these to run smoothly!
Mar 27, 2024 pm 05:54 PM
Essential PHP programs: Install these to run smoothly! PHP is a popular server-side scripting language that is widely used to develop web applications. To successfully run a PHP program, you first need to install some necessary software and tools on the server. In this article, we will introduce the software and tools that must be installed, along with specific code examples to help you run PHP programs smoothly. 1. PHP interpreter The core of the PHP program is the PHP interpreter, which is responsible for parsing and executing PHP code. To install the PHP interpreter, you can follow
 How to install Android adb driver? How to use Android adb driver?
Mar 18, 2024 pm 06:28 PM
The Android ADB driver is a driver used to connect Android devices to computers. When an Android device is connected to a computer, the ADB driver is required to ensure communication between the device and the computer. Generally speaking, if the user is using a Windows system, there is no need to manually download and install the ADB driver when connecting an Android device, because the Windows system will automatically identify and install the required driver. If users encounter problems with automatic installation, they can solve the problem by downloading and installing the ADB driver. Next, let the editor explain in detail what is the use of the Android adb driver? How to use Android adb driver! 1. What is the use of Android adb driver? ADB is AndroidDebug


