

How to give permission to dedecms


Linux space users can customize website directory permissions
data, templets, uploads, html (or a) Set these directory permissions to read and write , but cannot execute permissions. The Linux environment directory permission code is: 766

Related recommendations: "dedecms tutorial"
include, member, plus, and backend management directories (the default backend directory is: dede). Please set the permissions of these directories to read, execute, but not write permissions. The Linux environment directory permission code is: 755
Log in to the background for one-click update and see if the website can be updated normally. If so, the setup is complete!
The above is the detailed content of How to give permission to dedecms. For more information, please follow other related articles on the PHP Chinese website!

Hot AI Tools

Undresser.AI Undress
AI-powered app for creating realistic nude photos

AI Clothes Remover
Online AI tool for removing clothes from photos.

Undress AI Tool
Undress images for free

Clothoff.io
AI clothes remover

Video Face Swap
Swap faces in any video effortlessly with our completely free AI face swap tool!

Hot Article
Hot Tools

Notepad++7.3.1
Easy-to-use and free code editor

SublimeText3 Chinese version
Chinese version, very easy to use

Zend Studio 13.0.1
Powerful PHP integrated development environment

Dreamweaver CS6
Visual web development tools

SublimeText3 Mac version
God-level code editing software (SublimeText3)
Hot Topics
 1386
1386
 52
52

 Enable root permissions with one click (quickly obtain root permissions)
Jun 02, 2024 pm 05:32 PM
Enable root permissions with one click (quickly obtain root permissions)
Jun 02, 2024 pm 05:32 PM
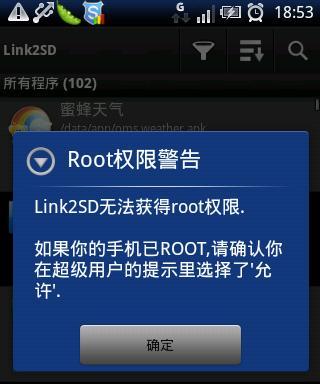
It allows users to perform more in-depth operations and customization of the system. Root permission is an administrator permission in the Android system. Obtaining root privileges usually requires a series of tedious steps, which may not be very friendly to ordinary users, however. By enabling root permissions with one click, this article will introduce a simple and effective method to help users easily obtain system permissions. Understand the importance and risks of root permissions and have greater freedom. Root permissions allow users to fully control the mobile phone system. Strengthen security controls, customize themes, and users can delete pre-installed applications. For example, accidentally deleting system files causing system crashes, excessive use of root privileges, and inadvertent installation of malware are also risky, however. Before using root privileges
 Discuz Forum Permission Management: Read Permission Setting Guide
Mar 10, 2024 pm 05:33 PM
Discuz Forum Permission Management: Read Permission Setting Guide
Mar 10, 2024 pm 05:33 PM
Discuz forum permission management: Read the permission setting guide In Discuz forum management, permission setting is a crucial part. Among them, the setting of reading permissions is particularly important, as it determines the scope of content that different users can see in the forum. This article will introduce in detail the reading permission settings of the Discuz forum and how to flexibly configure it for different needs. 1. Basic concepts of reading permissions In the Discuz forum, reading permissions mainly include the following concepts that need to be understood: Default reading permissions: Default after new user registration
 Where to set the permissions of shared folders? Tips for setting the permissions of shared folders in Win10 to be read-only and cannot be modified
Feb 29, 2024 pm 03:43 PM
Where to set the permissions of shared folders? Tips for setting the permissions of shared folders in Win10 to be read-only and cannot be modified
Feb 29, 2024 pm 03:43 PM
How to set shared folder read-only permissions in Win10? After the host shares the folder, some users only want others to access, read and view the files, but do not want others to modify the files on the host. This article is a tutorial on how to set the permissions of a shared folder to be read-only and cannot be modified. 1. First, share the folder according to the normal process. On the host side, right-click the folder that needs to be shared, and select: Properties-Sharing-Advanced Sharing-check Share this folder; 2. Then, click the permission option below. By default Everyone account, if there is not one, add an Everyone account; 3. Only check the read permission below, and then click OK; 4. Find the folder properties-security, and add an Ever
 Introduction to how to set everyone permissions on win7 computer
Mar 26, 2024 pm 04:11 PM
Introduction to how to set everyone permissions on win7 computer
Mar 26, 2024 pm 04:11 PM
1. Take e-disk as an example. Open [Computer], and click [eDisk], right-click [Properties]. As shown in the figure: 2. In the [Window] page, switch the interface to the [Security] option, and click the [Edit] option below. As shown in the figure: 3. In the [Permissions] option, click the [Add] option. As shown in the figure: 4. The users and groups window pops up and click the [Advanced] option. As shown in the figure: 5. Click to expand the [Find Now] - [Everyone] options in order. When completed, click OK. As shown in the figure: 6. When you see that the user [everyone] has been added to [Group or User] on the [E Disk Permissions] page, select [everyone] and check the box in front of [Full Control]. After the setting is completed, Just press [OK]
 No permission to modify hosts file
Mar 03, 2024 am 10:31 AM
No permission to modify hosts file
Mar 03, 2024 am 10:31 AM
Some users requested to modify the Hosts file, but encountered the problem of not being able to save it when saving. This is because the Hosts file is a system file and usually requires corresponding permissions before it can be edited. Therefore, if you also encounter the following problems, you can refer to the article. Methods to solve the problem of no permission to modify the hosts file 1. Open the hosts file and uncheck the read-only option in front of it 2. If it shows that there is no permission when opening it, right-click the file and select properties 3. Click Safe to enter 4. Then try again Enter Advanced 5. Please enter "administrator" in the white box and click OK.
 Where is the imperial cms resource network template?
Apr 17, 2024 am 10:00 AM
Where is the imperial cms resource network template?
Apr 17, 2024 am 10:00 AM
Empire CMS template download location: Official template download: https://www.phome.net/template/ Third-party template website: https://www.dedecms.com/diy/https://www.0978.com.cn /https://www.jiaocheng.com/Installation method: Download template Unzip template Upload template Select template
 How dedecms implements template replacement
Apr 16, 2024 pm 12:12 PM
How dedecms implements template replacement
Apr 16, 2024 pm 12:12 PM
Template replacement can be implemented in Dedecms through the following steps: modify the global.cfg file and set the required language pack. Modify the taglib.inc.php hook file and add support for language suffix template files. Create a new template file with a language suffix and modify the required content. Clear Dedecms cache.
 How to upload local videos to dedecms
Apr 16, 2024 pm 12:39 PM
How to upload local videos to dedecms
Apr 16, 2024 pm 12:39 PM
How to upload local videos using Dedecms? Prepare the video file in a format that is supported by Dedecms. Log in to the Dedecms management backend and create a new video category. Upload video files on the video management page, fill in the relevant information and select the video category. To embed a video while editing an article, enter the file name of the uploaded video and adjust its dimensions.
