

Compared with swfupload, the uploadify plug-in is simpler to configure and use, but it is a little slower for about a second when it first loads.
No more nonsense, let me just post the code for you.
<html xmlns=”http://www.w3.org/1999/xhtml”>
<head>
<meta http-equiv=”Content-Type” content=”text/html; charset=UTF-8″ />
<title>php jquery uploadify多文件上传</title>
<link href=”css/default.css” rel=”stylesheet” type=”text/css” />
<link href=”css/uploadify.css” rel=”stylesheet” type=”text/css” />
<script type=”text/javascript” src=”js/jquery-1.3.2.min.js”></script>
<script type=”text/javascript” src=”js/swfobject.js”></script>
<script type=”text/javascript” src=”js/jquery.uploadify.v2.1.0.min.js”></script>
<script type=”text/javascript”>
$(document).ready(function() {
$(“#fileInput2″).uploadify({
‘uploader': ‘js/uploadify.swf',//所需要的flash文件
‘cancelImg': ‘cancel.png',//单个取消上传的图片
'script': ‘js/uploadify.php',//实现上传的程序
‘folder': ‘uploads',//服务端的上传目录
//'auto': true,//自动上传
‘multi': true,//是否多文件上传
//'checkScript': ‘js/check.php',//验证 ,服务端的
‘displayData': 'speed',//进度条的显示方式
//'fileDesc': ‘Image(*.jpg;*.gif;*.png)',//对话框的文件类型描述
//'fileExt': ‘*.jpg;*.jpeg;*.gif;*.png',//可上传的文件类型
//'sizeLimit': 999999 ,//限制上传文件的大小
//'simUploadLimit' :3, //并发上传数据
//'queueSizeLimit' :5, //可上传的文件个数
//'buttonText' :'文件上传',//通过文字替换钮扣上的文字
‘buttonImg': ‘css/images/browseBtn.png',//替换上传钮扣
‘width': 80,//buttonImg的大小
‘height': 24,//
‘rollover': true,//button是否变换
onComplete: function (evt, queueID, fileObj, response, data) {
//alert(“Successfully uploaded: “+fileObj.filePath);
//alert(response);
getResult(response);//获得上传的文件路径
}
//onError: function(errorObj) {
// alert(errorObj.info+” “+errorObj.type);
//}
});
});
</script>
<script type=”text/javascript”>
function getResult(content){
//通过上传的图片来动态生成text来保存路径
var board = document.getElementById(“divTxt”);
board.style.display=””;
var newInput = document.createElement(“input”);
newInput.type = “text”;
newInput.size = “45″;
newInput.name=”myFilePath[]“;
var obj = board.appendChild(newInput);
var br= document.createElement(“br”);
board.appendChild(br);
obj.value=content;
}
</script>
</head>
<body>
<fieldset style=”border: 1px solid #CDCDCD; padding: 8px; padding-bottom:0px; margin: 8px 0″>
<legend> <strong> 多文件上传</strong></legend>
<div>
<input id=”fileInput2″ name=”fileInput2″ type=”file” />
<input type=”button” value=”确定上传” onclick=”javascript:$(‘#fileInput2′).uploadifyUpload();”>
||  <a href=”javascript:$(‘#fileInput2′).uploadifyClearQueue();”>清除上传列表</a></div>
<p></p>
</fieldset>
<FORM name=”form2″ METHOD=POST ACTION=”db.php”>
 <div id=”divTxt” style=”display:none”><span style=”color:red”><strong>已经上传的图片有:</strong></span& gt;<br></div><br>
<INPUT TYPE=”submit” value=”提 交”>
</FORM>
</body>
</html>ps: uploadify plug-in enables uploading and previewing multiple images
Use the uploadify plug-in to easily implement the image upload function. Compatible with ie6 and ie7.
After the upload is successful, use the plug-in's callback function to read the json data and preview the image based on the URL.
Rendering:

Click to browse the file to upload the image, and the preview effect of the image will be displayed on the right side.
Implementation:
The json data format is as follows:
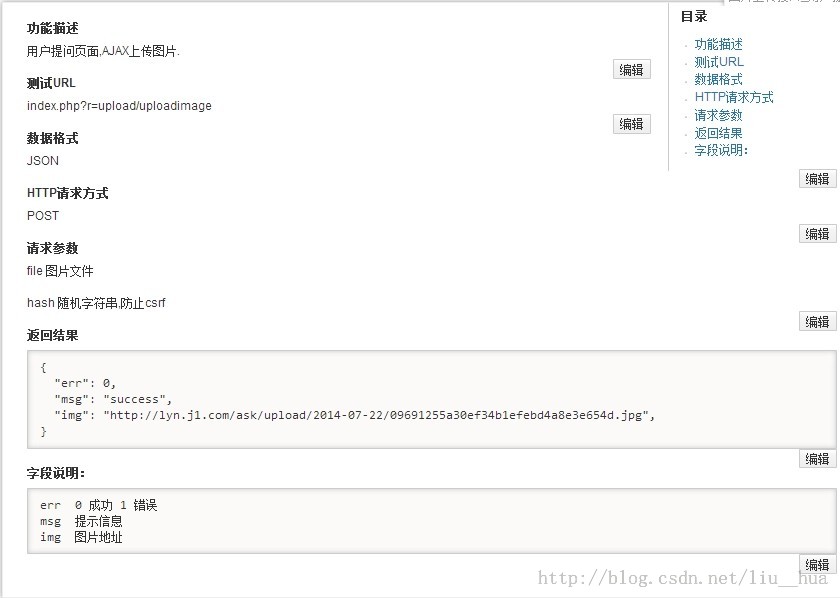
The page code is as follows:
Note: jQuery.js, uploadify.js, and uploadify files need to be quoted. . uploadify file download address: http://www.uploadify.com/download/
<html>
<head>
<script type="text/javascript" src="static/js/jquery.js">"></script>
<script type="text/javascript" src="static/js/jquery.select.js">"></script>
</head>
<body>
<div class="file-box">
<div id="divPreview">
<span style="float:left">(最多可上传五张图片)</span>
</div>
<input type="file" name="file" class="file" id="fileField" />
<input type="hidden" name="hash" id="hash" value="xoxo"/>
</div>
<script>
$(function() {
$("#fileField").uploadify({
'height' : 30,
'swf' : '<?php echoYii::app()->request->baseUrl ?>/static/uploadify/uploadify.swf?var='+(newDate()).getTime(),
'uploader' :'index.php?r=upload/uploadimage',
'width' : 120,
'onUploadSuccess' : function(file, data, response) {
var info = eval("("+data+")");
if(info.err==1){alert(info.msg);} //如果图片过大或者格式错误弹出错误信息
else{
$("#divPreview").append($("<img src='" + info.img + "'/ alt="uploadify multi-file upload parameter setting tips_jquery" >"));
$("#divPreview").append($("<input type='hidden' name='imgId[]' value='" + info.imgId + "'/>"));
}
},
'buttonText' : '浏览文件',
'uploadLimit' : 5, //上传最多图片张数
'removeTimeout' : 1,
'preventCaching': true, //不允许缓存
'fileSizeLimit' : 4100, //文件最大
'formData' : { '<?php echosession_name();?>' : '<?php echosession_id();?>','hash':$("#hash").val() } //hash
});
$("#SWFUpload_0").css({ //设置按钮样式,根据插件文档进行修改
'position' :'absolute',
'top': 20,
'left': 35,
'z-index' : 1
});
});
</script>
</body>
</html>Have encountered problems:
IE and 360 browsers are stricter about json data inspection and do not allow the last "," to exist. Other browsers will not report an error, so please pay attention.


![[Web front-end] Node.js quick start](https://img.php.cn/upload/course/000/000/067/662b5d34ba7c0227.png)


