

If you want to know more about springboot, you can click: JAVA Tutorial
It is very simple to create scheduled tasks using SpringBoot. There are currently three main ways to create them:
1. Based on annotations (@Scheduled)
2. Interface-based (SchedulingConfigurer) I believe everyone is familiar with the former, but in actual use we often want to read the specified time from the database to dynamically execute scheduled tasks. At this time, interface-based timing That’s where tasks come in handy.
3. Setting multi-threaded scheduled tasks based on annotations
1. Static: based on annotations
Based on annotations@ScheduledThe default is single thread. When multiple tasks are started, the execution time of the task will be affected by the execution time of the previous task.
1. Create a timer
#Using SpringBoot to create a scheduled task based on annotations is very simple and can be completed with just a few lines of code. The code is as follows:
@Component
@Configuration      //1.主要用于标记配置类,兼备Component的效果。
@EnableScheduling   // 2.开启定时任务
public class SaticScheduleTask {
    //3.添加定时任务
    @Scheduled(cron = "0/5 * * * * ?")
    //或直接指定时间间隔,例如:5秒
    //@Scheduled(fixedRate=5000)
    private void configureTasks() {
        System.err.println("执行静态定时任务时间: " + LocalDateTime.now());
    }
}Cron expression parameters respectively represent:
Seconds (0~59) For example, 0/5 means every 5 seconds
Minutes (0~59)
hour (0~23)
day (0~31), need to calculate
month (0~11)
Day of the week (can be filled in 1-7 or SUN/MON/TUE/WED/THU/FRI/SAT)
@Scheduled: In addition to supporting flexible parameter expression cron In addition, it also supports simple delay operations, such as fixedDelay and fixedRate, just fill in the corresponding number of milliseconds.
2. Start the test
Start the application and you can see the following information printed out on the console:
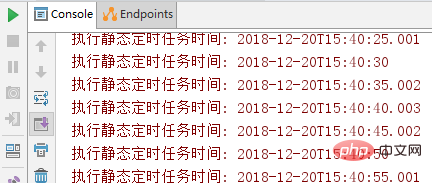
Obviously, using the @Scheduled annotation is very convenient, but the disadvantage is that when we adjust the execution cycle, we need to restart the application to take effect, which is somewhat inconvenient. In order to achieve real-time effect, you can use the interface to complete scheduled tasks.
2. Dynamic: Based on interface
Based on interface (SchedulingConfigurer)
1. Import dependency packages
<parent>
        <groupId>org.springframework.boot</groupId>
        <artifactId>spring-boot-starter</artifactId>
        <version>2.0.4.RELEASE</version>
    </parent>

    <dependencies>
        <dependency><!--添加Web依赖 -->
            <groupId>org.springframework.boot</groupId>
            <artifactId>spring-boot-starter-web</artifactId>
        </dependency>
        <dependency><!--添加MySql依赖 -->
             <groupId>mysql</groupId>
            <artifactId>mysql-connector-java</artifactId>
        </dependency>
        <dependency><!--添加Mybatis依赖 配置mybatis的一些初始化的东西-->
            <groupId>org.mybatis.spring.boot</groupId>
            <artifactId>mybatis-spring-boot-starter</artifactId>
            <version>1.3.1</version>
        </dependency>
        <dependency><!-- 添加mybatis依赖 -->
            <groupId>org.mybatis</groupId>
            <artifactId>mybatis</artifactId>
            <version>3.4.5</version>
            <scope>compile</scope>
        </dependency>
</dependencies>2. Add database records
Open the local database mysql, open the query window at will, and then execute the script content, as follows:
DROP DATABASE IF EXISTS `socks`;
CREATE DATABASE `socks`;
USE `SOCKS`;
DROP TABLE IF EXISTS `cron`;
CREATE TABLE `cron`  (
  `cron_id` varchar(30) NOT NULL PRIMARY KEY,
  `cron` varchar(30) NOT NULL
);
INSERT INTO `cron` VALUES ('1', '0/5 * * * * ?');
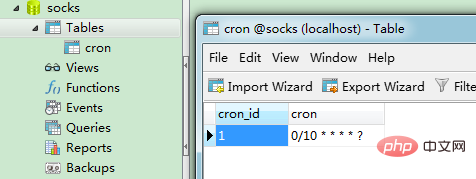
Then add the data source to application.yml in the project:
spring:
  datasource:
    url: jdbc:mysql://localhost:3306/socks
    username: root
password: 1234563. Create a timer
After the database prepares the data, we write the scheduled task. Note that the TriggerTask is added here for the purpose of loop reading. Get the execution cycle we set in the database and the content of executing related scheduled tasks.
The specific code is as follows:
@Component
@Configuration      //1.主要用于标记配置类,兼备Component的效果。
@EnableScheduling   // 2.开启定时任务
public class DynamicScheduleTask implements SchedulingConfigurer {

    @Mapper
    public interface CronMapper {
        @Select("select cron from cron limit 1")
        public String getCron();
    }

    @Autowired      //注入mapper
    @SuppressWarnings("all")
    CronMapper cronMapper;

    /**
     * 执行定时任务.
     */
    @Override
    public void configureTasks(ScheduledTaskRegistrar taskRegistrar) {

        taskRegistrar.addTriggerTask(
                //1.添加任务内容(Runnable)
                () -> System.out.println("执行动态定时任务: " + LocalDateTime.now().toLocalTime()),
                //2.设置执行周期(Trigger)
                triggerContext -> {
                    //2.1 从数据库获取执行周期
                    String cron = cronMapper.getCron();
                    //2.2 合法性校验.
                    if (StringUtils.isEmpty(cron)) {
                        // Omitted Code ..
                    }
                    //2.3 返回执行周期(Date)
                    return new CronTrigger(cron).nextExecutionTime(triggerContext);
                }
        );
    }

}4. Start the test
After starting the application, check the console and the printing time is We expected once every 10 seconds:
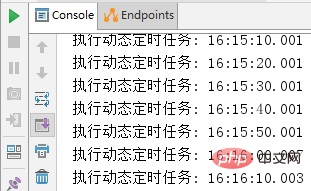
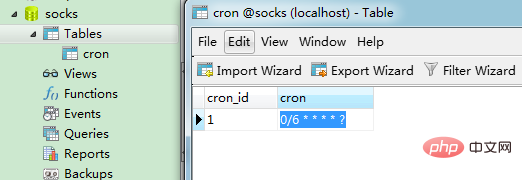
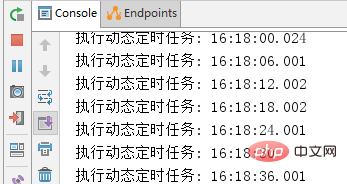
Note: If a format error occurs when the database is modified, the scheduled task will stop, even if the modification is correct; at this time, only Restart the project to restore.
3. Multi-threaded scheduled tasks
#Set multi-threaded scheduled tasks based on annotations1. Create multi-threaded scheduled tasks Task//@Component注解用于对那些比较中立的类进行注释;
//相对与在持久层、业务层和控制层分别采用 @Repository、@Service 和 @Controller 对分层中的类进行注释
@Component
@EnableScheduling // 1.开启定时任务
@EnableAsync // 2.开启多线程
public class MultithreadScheduleTask {
@Async
@Scheduled(fixedDelay = 1000) //间隔1秒
public void first() throws InterruptedException {
System.out.println("第一个定时任务开始 : " + LocalDateTime.now().toLocalTime() + "\r\n线程 : " + Thread.currentThread().getName());
System.out.println();
Thread.sleep(1000 * 10);
}
@Async
@Scheduled(fixedDelay = 2000)
public void second() {
System.out.println("第二个定时任务开始 : " + LocalDateTime.now().toLocalTime() + "\r\n线程 : " + Thread.currentThread().getName());
System.out.println();
}
}2. Start the test
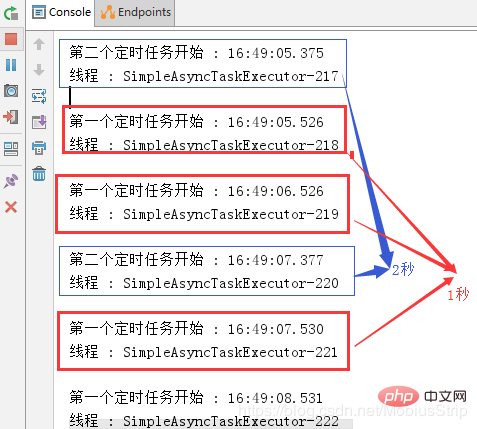
As can be seen from the console, the first scheduled task and the second scheduled task do not affect each other;
Furthermore, Since multi-threading is enabled, the execution time of the first task is also It is not limited by its own execution time, so please note that repeated operations may cause data anomalies.
The above is the detailed content of How to create a springboot scheduled task. For more information, please follow other related articles on the PHP Chinese website!
 SpringBoot project building steps
 What is the difference between j2ee and springboot
 What are the basic components of a computer?
 How to solve server load incompatibility
 How to turn off ics network sharing
 Solution to Win7 folder properties not sharing tab page
 What is the file format of mkv?
 What is javascript mainly used for?