

How to update empire cms

There are two ways to enter the data update interface, which are enumerated below:
Method 1. Through the shortcut menu: click the "Data Update" shortcut menu, see Figure 1 below, enter the data update interface:
Method 2. Click the "System" menu "Data Update Center" submenu to enter the data update interface:
Introduction to data update interface operations
(1) Page refresh management: perform batch generation operations on all major pages of the entire site.
| #Refresh the main page of the entire site | |
| [Refresh the homepage] | Generate the website homepage.|
| [Refresh all information column pages] | Generate all column pages and topic pages.|
| [Refresh all information content pages] | Generate all content pages.|
| Refresh all: Update the generated content pages together. | |
| [Refresh all information JS calls] | Generate all JS call files.|
| [Batch update dynamic pages] | Generate control panel templates, login status, login JS and other dynamic pages.|
| Other page refresh | |
| [Batch refresh voting JS] | Generate the JS file of the voting plug-in.|
| [Batch refresh advertising JS] | Generate the JS file of the advertising plug-in.|
| [Batch update model form] | Generate publishing and submission forms (generally used when the website is moved).|
| Update column navigation: Update the column selected when submitting. | |
| [Batch update feedback form] | Generate a custom feedback form (generally used when the website is moved).|
| [Update database cache] | Update the system cache (usually for website relocation) when used).|
| [Restore column directory] | Re-create the column directory (usually used when the website is moved).|
| [Delete column cache files] | Re-update the column list under the "Information Management" menu and the management under the "Column Management" menu Column page (usually used when the website is moved).|
| [Update column relationship] | This function is generally used after modifying the parent column to which the column belongs.|
| [Clear temporary files and data] | Clear temporary and cache files, clear the generated temporary files, and update dynamic pages Used when template is used to replace the template in real time.
| ##[Refresh all custom pages] | Generate all custom pages. (Column>Customized page)|
| [Generate all custom lists] | Refresh all custom lists. (Column>Customized List)|
| [Refresh all custom JS] | Generate all custom JS. (Column>Customized JS)
Using the multi-column generation function provided by the system, you can generate multiple columns at the same time:
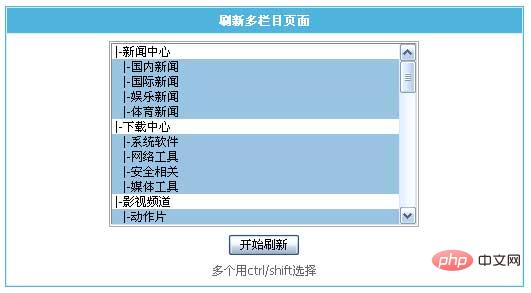
(5) Refresh the multi-topic page: select multiple specified topics for generation operation.
 Using the multi-topic generation function provided by the system, you can generate multiple topics at the same time:
(6) Refresh the information content page according to conditions: Generate information content pages in the specified range according to conditions.
| Select the data table to generate the content page. | |
|---|---|
| Select the column to generate a content page (if you select the parent column, all sub-columns will be refreshed). | |
| Generate the content page of "add information time" in a certain time period (leaving it empty will refresh all pages). | |
| Generate a content page whose "information ID" is in a certain ID segment (two values of 0 will refresh all pages). | |
| Also update the generated content pages. |
| Data table | Select the data table with related links to which you want to update information. |
|---|---|
| Column | Select the column with relevant links to update information (if you select the parent column, all sub-columns will be updated). |
| Update by time | Update the relevant links of the "Add Information Time" information in a certain time period (leaving it blank will update all information). |
| Update by ID | Update the relevant links of the "information ID" in a certain ID segment (two values of 0 will update all information). |
If you change the number of related links displayed on the content page from 5 to 10, the operation is:
1. Click the menu "Column" "Management" Column" submenu, after the management column interface appears, select the column where the content page that needs to be modified is located, click the "Modify" operation button,
Enter the column modification interface, enter the "Generation Options" column property page, modify the "Related Link Display Records", click the "Submit" button to complete the modification operation of the number of related links;
2. Perform the "Batch Update Related Links" operation;
3. Perform "Refresh all information content pages (select Refresh All) ” operation, open the front page, and you can see the modifications you are making.
Recommended: Empire cms website building tutorial
The above is the detailed content of How to update empire cms. For more information, please follow other related articles on the PHP Chinese website!

Hot AI Tools

Undresser.AI Undress
AI-powered app for creating realistic nude photos

AI Clothes Remover
Online AI tool for removing clothes from photos.

Undress AI Tool
Undress images for free

Clothoff.io
AI clothes remover

Video Face Swap
Swap faces in any video effortlessly with our completely free AI face swap tool!

Hot Article
Hot Tools

Notepad++7.3.1
Easy-to-use and free code editor

SublimeText3 Chinese version
Chinese version, very easy to use

Zend Studio 13.0.1
Powerful PHP integrated development environment

Dreamweaver CS6
Visual web development tools

SublimeText3 Mac version
God-level code editing software (SublimeText3)
Hot Topics


 Where are the settings for the mobile version of Empire CMS?
Apr 17, 2024 pm 12:12 PM
Where are the settings for the mobile version of Empire CMS?
Apr 17, 2024 pm 12:12 PM
The mobile settings of Empire CMS are located in the "Mobile Template" of the "Template Management" module. The specific steps include: enabling the template, selecting the application channel, editing the template content, and saving the settings.
 Where is the imperial cms website map?
Apr 17, 2024 am 10:48 AM
Where is the imperial cms website map?
Apr 17, 2024 am 10:48 AM
The Empire CMS sitemap can be found by accessing the config.inc.php file and checking the dositemap settings. If set to "on", sitemap is enabled. The sitemap path is located in the sitemapurl setting and can be accessed via a browser or downloaded via FTP.
 Where can I put the empire cms template file for easy use?
Apr 17, 2024 am 07:22 AM
Where can I put the empire cms template file for easy use?
Apr 17, 2024 am 07:22 AM
The ideal location for the Empire CMS template file is /e/template/default/skin/default/. Secondly, it can also be placed in /e/data/skins/ and /e/skin/. You need to pay attention to maintaining the folder structure and setting file permissions. and regular backups.
 Where to find the empire cms database configuration file
Apr 17, 2024 am 06:42 AM
Where to find the empire cms database configuration file
Apr 17, 2024 am 06:42 AM
The Imperial CMS database configuration file is located in the website root directory e/config/db.inc.php. It contains the following configuration information: $dbhost: database server address $dbuser: database user name $dbpass: database password $dbname: database name $dbport :Database port $dbcharset: Database character set
 Where is the automatic publishing interface of Empire CMS?
Apr 17, 2024 am 09:03 AM
Where is the automatic publishing interface of Empire CMS?
Apr 17, 2024 am 09:03 AM
The automatic publishing interface of Empire CMS is located at /e/api/web/postinfo.php. The usage steps are as follows: visit /e/api/web/postinfo.php address and use HTTP POST to submit the article title, column ID, category ID, author and article The content and other data interfaces will return a response in JSON format, which contains the publishing results and article ID.
 Where is the imperial cms resource network template?
Apr 17, 2024 am 10:00 AM
Where is the imperial cms resource network template?
Apr 17, 2024 am 10:00 AM
Empire CMS template download location: Official template download: https://www.phome.net/template/ Third-party template website: https://www.dedecms.com/diy/https://www.0978.com.cn /https://www.jiaocheng.com/Installation method: Download template Unzip template Upload template Select template
 Where is the Baidu active push plug-in for Imperial CMS?
Apr 17, 2024 am 11:00 AM
Where is the Baidu active push plug-in for Imperial CMS?
Apr 17, 2024 am 11:00 AM
The imperial cms Baidu active push plug-in is located in the root directory /e/api/baidu/push.php. The specific configuration steps are as follows: 1. Upload the plug-in file to the specified path. 2. Configure the "Baidu Active Push" option in the Imperial CMS background, including push address, API Key and push interval. 3. Get Baidu push information: Push address: https://data.zz.baidu.com/urls?site=YOUR_SITE&token=YOUR_API_KEY, API Key: log in to Baidu search resource platform to obtain. 4. Update the API Key regularly and set a reasonable push interval.
 Is empire cms free?
Apr 17, 2024 am 11:24 AM
Is empire cms free?
Apr 17, 2024 am 11:24 AM
Yes, Empire CMS is a free and open source content management system (CMS). It is a lightweight CMS that is feature-rich and easy to use. Empire CMS is licensed under the GNU General Public License (GPL), which means it is free to download, install and use. For commercial use, it offers a paid version that offers additional features and support such as ad management, online payments, and premium technical support.
