How to use the empire cms mobile template
If you want to know more about empire cms. You can click: Empire cms tutorial
The following is Detailed operation steps:
1. Set the unified access address of all access terminals
Backstage>System>System parameter settings:
Website address: Do not add a domain name to this address, for example, set it to: / (The domain name is not added after the default installation. If you have modified it yourself, please remove the domain name.)
Attachment address : This address must add a domain name, for example, set it to: http://www.xx.com/d/file/ or bind a second level to the attachment directory /d/file/ Domain name, and then set it to the bound second-level domain name address, such as: http://file.xx.com/
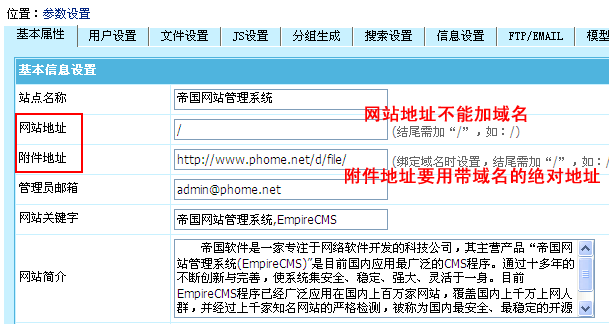
In this way, the access addresses of all ends are all Unified.
Related instructions: If you change the website address, remember to go to the backend > System > Data Update > Update Information Page Address: Re-update the content page address. No modifications required.
2. Add the template group used by the access terminal
(1) Add the template group used by the access terminal
1. Export the default template group
Backstage>Template>Template Group Management>Import/Export Template Group: Export the "Default Template Group" template group, and save the exported template group *.temp file.
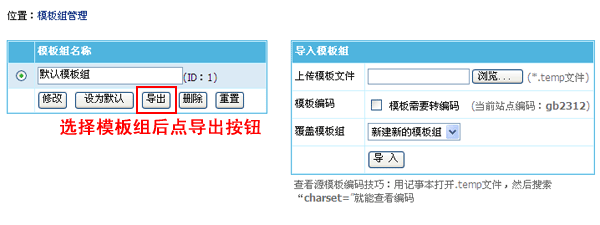
2. Add the template group used by the access terminal by importing the default template group
Backend> Template >Template Group Management>Import/Export Template Group: Import the template group *.temp file just exported.
Overwrite template group: Be sure to select "Create a new template group".
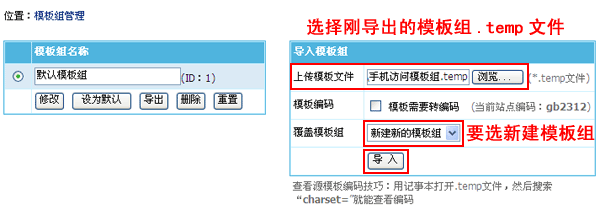
3. After the import is completed, return to the management template group page and modify the name of the imported template group:
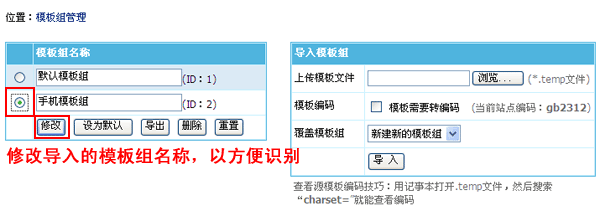
4. At this point, the template group for the new access terminal has been added.
(2) How to modify the template of the subsequent client template group
1. Method 1: Modify directly in the background template management
Backstage>Template: There is a "Default Template Group" drop-down box at the top of the left menu. You can select the template under which template group you want to modify, and then you can modify the template of this access terminal.
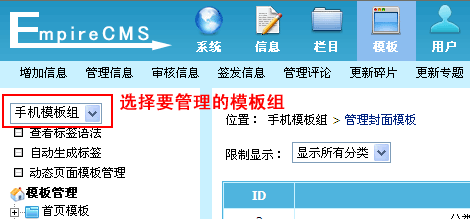
2. Method 2: You can install a local copy of the templates used by Empire CMS to manage and debug this access template group
(1) After installing Empire locally, export the template group of the new access terminal, and then import the template group into the local Empire CMS background, so that the template can be modified locally.
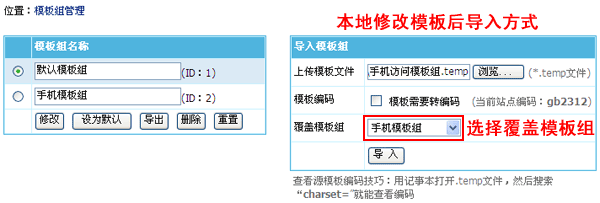
(2). After modifying the template under the template group of the new access terminal, export the template group, and then import the template group in the website background, but overwrite the template group: To select the template group of this access terminal Template group to achieve the effect of covering the template.
##3. Create a new access directory and copy a copy of the Empire CMS program file into it
(1) Create a new access directory : You can create a new one in any directory. (Note: Do not create a subdirectory under the main access directory. Be careful to set the directory permissions.) Generally, it is enough to create a subdirectory under the main access end. For example: Create the "phone" directory under the root directory of the Empire CMS to serve as the mobile access directory.
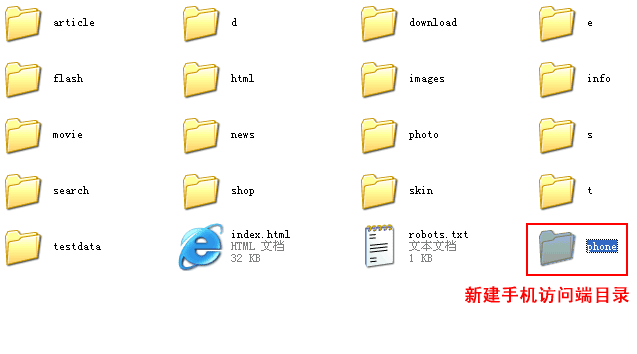
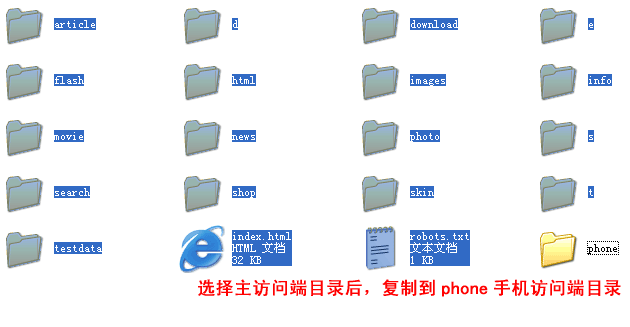
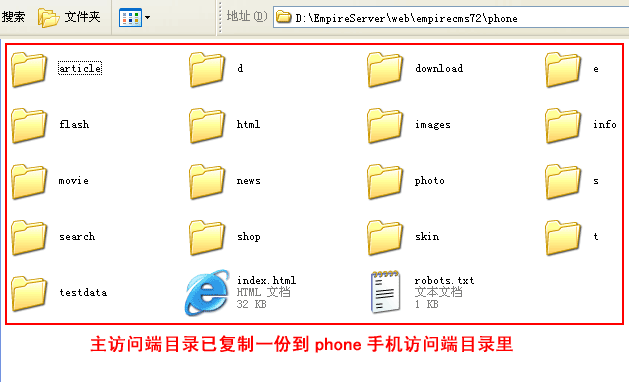
(2) Copy the main access directory to the new access directory. For example: copy to the "phone" directory I created above.
Select the directory and files and copy:
Paste the directories and files into the "phone" directory of the mobile phone access terminal:
Related instructions:
1. After copying the directory, remember to set the access directory permissions. For the list of required directory permissions, see the installation instructions of Empire CMS , and the column directory permissions of the website.
2. You can also copy a brand new Empire CMS program to the new access terminal directory, but remember to delete the e/install installation directory after copying, and copy the e/config/config.php configuration file of the main access terminal. . Then set the directory permissions.
4. Bind a second-level domain name to the new access directory
For example: put m. xx.com is bound to the newly created access phone directory above. (Local testing can modify the hosts file to achieve the effect of binding domain names.)
Related instructions: The general steps for domain name binding are as follows
1. Set the domain name control panel to resolve to the server IP
2. Set the binding domain name to the directory in the server (set in apache/iis)
3. Restart apache or iis after setting.
The domain name binding operation needs to be operated on the server or space, and is not within the scope of the Empire CMS operation. You can search on Baidu for detailed operation steps.
5. Add "website access terminal" to the main access terminal backend
(1). Main access terminal backend> ;System>Website Multiple Access Terminals>Manage website access terminals, click "Add Access Terminal":
Access Terminal Name: For example, fill in "Mobile Access Terminal";
Access terminal address: Fill in the bound second-level domain name address, for example: http://m.xx.com/
Access Directory: Fill in the absolute path to the new access directory above, for example: d:/EmpireServer/web/empirecms72/phone/
Communication Key: Fill in 100 characters Any characters within.
Use template group: Select the access template group added above.
Page Mode:
Select "Force Dynamic Page Mode": the access terminal is dynamically displayed and does not need to refresh the page to update;
Select "With "Same as main terminal": If the main terminal adopts static page mode, the page needs to be refreshed in the background of this access terminal before it will be displayed synchronously.
Close the access terminal: Uncheck.
Close submission: If this access terminal does not use submission, choose to close it.
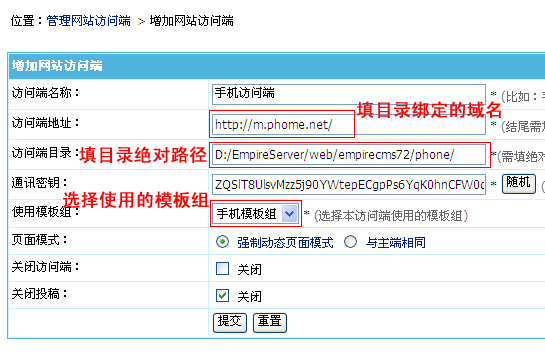
After setting, click the "Submit" button. After adding, return to "Manage Website Access Terminal" to see the ID of the website access terminal and write it down.

(2) Return to "Manage Website Access Terminal", click "Update All Access Terminal Cache and Dynamic Pages", and click "Submit" directly button to update the cache.

## 6. Go to the new access directory and modify the configuration file parameters
Modify the /e/config/config.php configuration file in the new access directory (such as the phone directory above) and set the following two parameters: (The UTF-8 version must not be modified with Notepad, otherwise the file content will be converted to GBK, it is recommended to use Dreamweaver to modify.)| $ecms_config['sets']['selfmoreportid']=0; //Current website access terminal ID, 0 is the main access terminal |
| $ecms_config['sets']['deftempid']=2; //Default template group ID $ecms_config['sets'] ['selfmoreportid']=2; //Current website access terminal ID, 0 is the main access terminal |
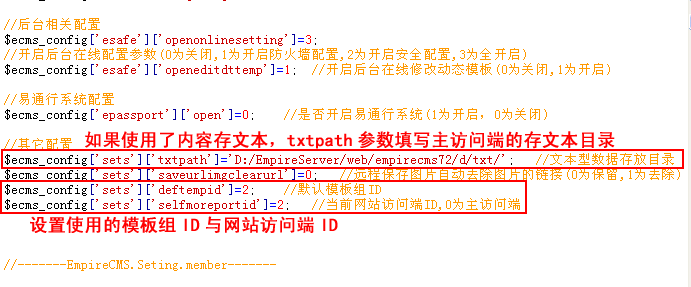
7. At this point, the new access terminal has been added. You can visit the new terminal address to check the effect. All that's left is to modify the template on the access side.
Related instructions:
1. It is recommended to add other website access terminals after the main access terminal template is completed. 2. After modifying the website access configuration parameters in the main access background, all access database caches must be updated to take effect. 3. After the access terminal is closed in the background of the main access terminal, all dynamic pages in the front desk of the access terminal will be unavailable, but the static pages will not be affected by the access. 4. The dynamic templates of each multi-access terminal are independent. If the dynamic pages are also different, log in to the background of each access terminal to modify the dynamic page template to achieve comprehensive personalization.Differences between the two solutions for the mobile version of Empire CMS7.2:
1. Multi-terminal access function:
Supports the production of N types of access terminals. You need to copy multiple copies of the empire, and then create independent access terminal templates for each terminal, and each terminal page is independent, supporting browsing and dynamic interaction, and is highly comprehensive.2. WAP mobile access function:
If the mobile terminal only provides the function of browsing information, it is more convenient to use WAP. There is no need to copy multiple empires and make WAP templates. That’s it.The above is the detailed content of How to use the empire cms mobile template. For more information, please follow other related articles on the PHP Chinese website!

Hot AI Tools

Undresser.AI Undress
AI-powered app for creating realistic nude photos

AI Clothes Remover
Online AI tool for removing clothes from photos.

Undress AI Tool
Undress images for free

Clothoff.io
AI clothes remover

AI Hentai Generator
Generate AI Hentai for free.

Hot Article

Hot Tools

Notepad++7.3.1
Easy-to-use and free code editor

SublimeText3 Chinese version
Chinese version, very easy to use

Zend Studio 13.0.1
Powerful PHP integrated development environment

Dreamweaver CS6
Visual web development tools

SublimeText3 Mac version
God-level code editing software (SublimeText3)

Hot Topics
 Where is the imperial cms website map?
Apr 17, 2024 am 10:48 AM
The Empire CMS sitemap can be found by accessing the config.inc.php file and checking the dositemap settings. If set to "on", sitemap is enabled. The sitemap path is located in the sitemapurl setting and can be accessed via a browser or downloaded via FTP.
 Where are the settings for the mobile version of Empire CMS?
Apr 17, 2024 pm 12:12 PM
The mobile settings of Empire CMS are located in the "Mobile Template" of the "Template Management" module. The specific steps include: enabling the template, selecting the application channel, editing the template content, and saving the settings.
 Where is the imperial cms resource network template?
Apr 17, 2024 am 10:00 AM
Empire CMS template download location: Official template download: https://www.phome.net/template/ Third-party template website: https://www.dedecms.com/diy/https://www.0978.com.cn /https://www.jiaocheng.com/Installation method: Download template Unzip template Upload template Select template
 Where to find the empire cms database configuration file
Apr 17, 2024 am 06:42 AM
The Imperial CMS database configuration file is located in the website root directory e/config/db.inc.php. It contains the following configuration information: $dbhost: database server address $dbuser: database user name $dbpass: database password $dbname: database name $dbport :Database port $dbcharset: Database character set
 Where can I put the empire cms template file for easy use?
Apr 17, 2024 am 07:22 AM
The ideal location for the Empire CMS template file is /e/template/default/skin/default/. Secondly, it can also be placed in /e/data/skins/ and /e/skin/. You need to pay attention to maintaining the folder structure and setting file permissions. and regular backups.
 Is empire cms free?
Apr 17, 2024 am 11:24 AM
Yes, Empire CMS is a free and open source content management system (CMS). It is a lightweight CMS that is feature-rich and easy to use. Empire CMS is licensed under the GNU General Public License (GPL), which means it is free to download, install and use. For commercial use, it offers a paid version that offers additional features and support such as ad management, online payments, and premium technical support.
 Where is the automatic publishing interface of Empire CMS?
Apr 17, 2024 am 09:03 AM
The automatic publishing interface of Empire CMS is located at /e/api/web/postinfo.php. The usage steps are as follows: visit /e/api/web/postinfo.php address and use HTTP POST to submit the article title, column ID, category ID, author and article The content and other data interfaces will return a response in JSON format, which contains the publishing results and article ID.
 Where is the Imperial CMS member center?
Apr 17, 2024 am 04:45 AM
The Imperial CMS Member Center is located in the "Member Management" menu in the background or at the following URL: Browser side: https://your domain name/e/member/user.php Server side: /e/member/user.php Functions included in the Member Center Including member management, member group management, personal center, points management, level management, etc., to facilitate administrators and members to manage website account information.


