How to configure opencv in python

Configure the opencv library in python and use the pycharm environment
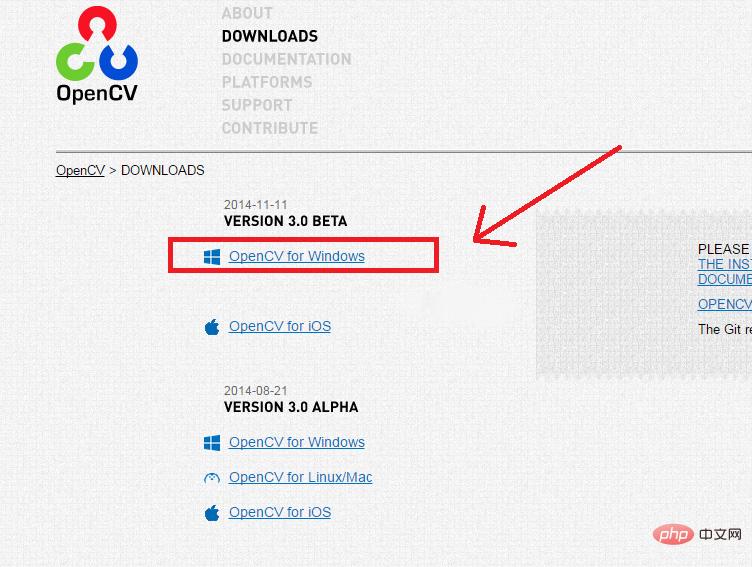
1. Download from the official website: Click to open the link, official website There are all openCV versions on the website. Find the version and system you want. After clicking, a new page will pop up. No operation is required and it will be downloaded automatically. Note: There is no difference between 32-bit and 64-bit. The installation program will automatically choose to install the 32-bit or 64-bit version according to your computer system. As shown in the picture:
2. Double-click to run openCV_xxx.exe to execute the program
Select the directory where you want to install the files, then click extract and install all the way. , that’s it. As shown in the figure:

Related recommendations: "Python Video Tutorial"
3. Configure openCV environment variables
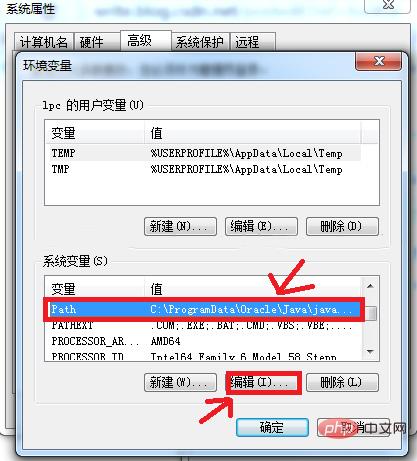
The first step is to select "Computer", right-click and select "Properties", "Advanced System Settings"->"Environment Variables". Find the "System Variables" -> "path" value under environment variables, and then select "Edit" as shown in the figure:
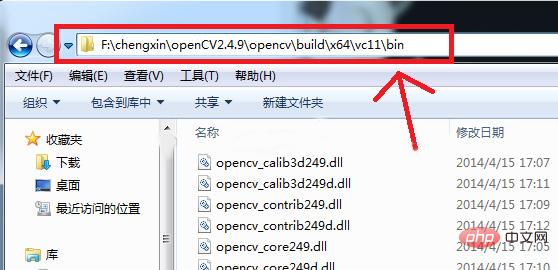
Then add the "bin" of openCV Folder location, this "bin" is the directory where you just installed the openCV program. For example, my installation location is "F:\chengxin\openCV2.4.9\opencv\build\x64\vc11\bin". Note: "X64" here means that my computer is a 64-bit system. If your computer is 32-bit, you should look for it under "x86". "VC11" means that my computer is installed with vs2012. If your computer is If VS2010 is installed on your computer, you should be in the "vc10" folder. If it is VS2013, it should be in the "vc12" folder, as shown in the figure:
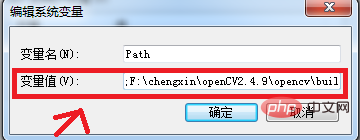
in the pop-up In the window, add ";" and the directory just now after "Variable Value", that is, add this string ";F:\chengxin\openCV2.4.9\opencv\build\x64\vc11\bin". As shown in the figure:
#The installation and configuration of openCV ends here.
Configure python's openCV reference.
After installing python and openCV, how to connect them? First find the "cv2.pyd" file in your openCV installation directory. My 64-bit system directory is "F:\chengxin\openCV2.4.9\opencv\build\python\2.7\x64". If you are a 32-bit system, then you should be under "x86". As shown in the picture:
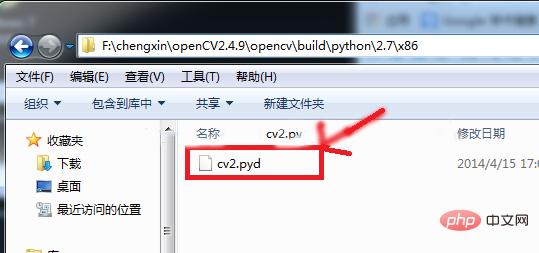
Copy and paste this file into the "Python27\Lib\site-packages" of the python installation directory. Mine is "C:\Python27 \Lib\site-packages". As shown in the picture:
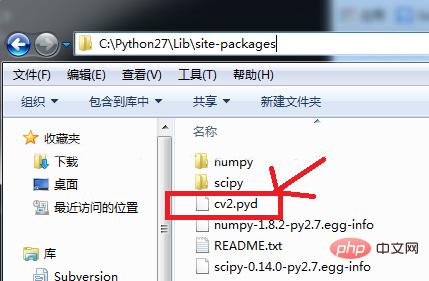
#OK, the installation is complete at this time. Through the cmd console, we can try to run some examples written in python that come with openCV. These examples can be seen under "opencv\sources\samples\python".
Output the histogram of a color image:
import cv2import numpy as npfrom matplotlib import pyplot as plt
img = cv2.imread('/home/aobo/Pictures/IMG_4137.JPG')color = ('b','g','r')# enumerate():python里的一个新函数
# 它的作用:同时遍历索引(i)和元素(col)for i,col in enumerate(color):
    histr = cv2.calcHist([img], [i], None, [256], [0, 256])
    plt.plot(histr, color = col)
plt.xlim([0, 256])plt.show()The above is the detailed content of How to configure opencv in python. For more information, please follow other related articles on the PHP Chinese website!

Hot AI Tools

Undresser.AI Undress
AI-powered app for creating realistic nude photos

AI Clothes Remover
Online AI tool for removing clothes from photos.

Undress AI Tool
Undress images for free

Clothoff.io
AI clothes remover

AI Hentai Generator
Generate AI Hentai for free.

Hot Article

Hot Tools

Notepad++7.3.1
Easy-to-use and free code editor

SublimeText3 Chinese version
Chinese version, very easy to use

Zend Studio 13.0.1
Powerful PHP integrated development environment

Dreamweaver CS6
Visual web development tools

SublimeText3 Mac version
God-level code editing software (SublimeText3)

Hot Topics
 1378
1378
 52
52
 HadiDB: A lightweight, horizontally scalable database in Python
Apr 08, 2025 pm 06:12 PM
HadiDB: A lightweight, high-level scalable Python database HadiDB (hadidb) is a lightweight database written in Python, with a high level of scalability. Install HadiDB using pip installation: pipinstallhadidb User Management Create user: createuser() method to create a new user. The authentication() method authenticates the user's identity. fromhadidb.operationimportuseruser_obj=user("admin","admin")user_obj.
 Navicat's method to view MongoDB database password
Apr 08, 2025 pm 09:39 PM
It is impossible to view MongoDB password directly through Navicat because it is stored as hash values. How to retrieve lost passwords: 1. Reset passwords; 2. Check configuration files (may contain hash values); 3. Check codes (may hardcode passwords).
 The 2-Hour Python Plan: A Realistic Approach
Apr 11, 2025 am 12:04 AM
You can learn basic programming concepts and skills of Python within 2 hours. 1. Learn variables and data types, 2. Master control flow (conditional statements and loops), 3. Understand the definition and use of functions, 4. Quickly get started with Python programming through simple examples and code snippets.
 Python: Exploring Its Primary Applications
Apr 10, 2025 am 09:41 AM
Python is widely used in the fields of web development, data science, machine learning, automation and scripting. 1) In web development, Django and Flask frameworks simplify the development process. 2) In the fields of data science and machine learning, NumPy, Pandas, Scikit-learn and TensorFlow libraries provide strong support. 3) In terms of automation and scripting, Python is suitable for tasks such as automated testing and system management.
 How to optimize MySQL performance for high-load applications?
Apr 08, 2025 pm 06:03 PM
MySQL database performance optimization guide In resource-intensive applications, MySQL database plays a crucial role and is responsible for managing massive transactions. However, as the scale of application expands, database performance bottlenecks often become a constraint. This article will explore a series of effective MySQL performance optimization strategies to ensure that your application remains efficient and responsive under high loads. We will combine actual cases to explain in-depth key technologies such as indexing, query optimization, database design and caching. 1. Database architecture design and optimized database architecture is the cornerstone of MySQL performance optimization. Here are some core principles: Selecting the right data type and selecting the smallest data type that meets the needs can not only save storage space, but also improve data processing speed.
 How to use AWS Glue crawler with Amazon Athena
Apr 09, 2025 pm 03:09 PM
As a data professional, you need to process large amounts of data from various sources. This can pose challenges to data management and analysis. Fortunately, two AWS services can help: AWS Glue and Amazon Athena.
 How to start the server with redis
Apr 10, 2025 pm 08:12 PM
The steps to start a Redis server include: Install Redis according to the operating system. Start the Redis service via redis-server (Linux/macOS) or redis-server.exe (Windows). Use the redis-cli ping (Linux/macOS) or redis-cli.exe ping (Windows) command to check the service status. Use a Redis client, such as redis-cli, Python, or Node.js, to access the server.
 How to read redis queue
Apr 10, 2025 pm 10:12 PM
To read a queue from Redis, you need to get the queue name, read the elements using the LPOP command, and process the empty queue. The specific steps are as follows: Get the queue name: name it with the prefix of "queue:" such as "queue:my-queue". Use the LPOP command: Eject the element from the head of the queue and return its value, such as LPOP queue:my-queue. Processing empty queues: If the queue is empty, LPOP returns nil, and you can check whether the queue exists before reading the element.


