How to open the database in navicat

1. Open Navicat and click the ‘Conection’ button in the upper left corner.
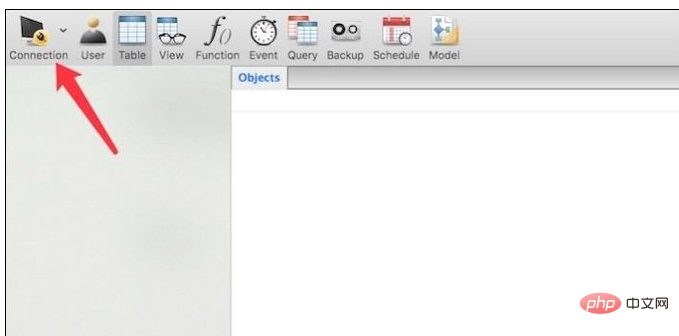
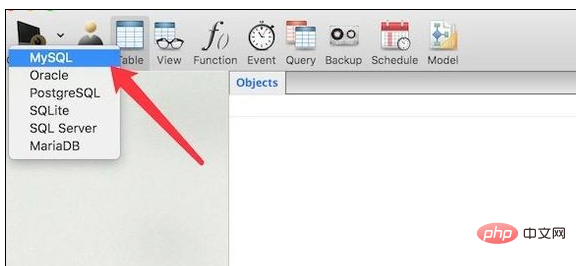
2. After clicking, a menu will pop up. We need to choose which type of database it is. Just choose it according to the type of database you deploy locally. I choose MySql here.
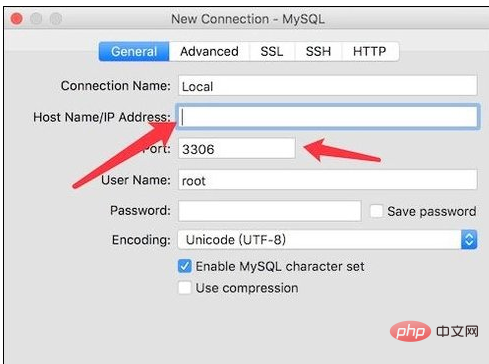
#3. After selection, a window will pop up. In this window, we first enter the Host name or IP address of the database. If it is local, just fill in "localhost". . The default port is 3306. If you use another local port, you need to fill in the real port number.
Related recommendations: "Navicat for mysql graphic tutorial"
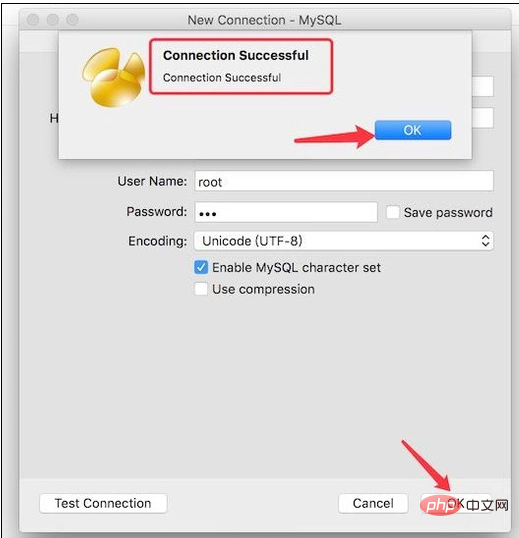
4. Then you need to fill in the connection database username and password. After filling it out, you can click the test button on the lower left.
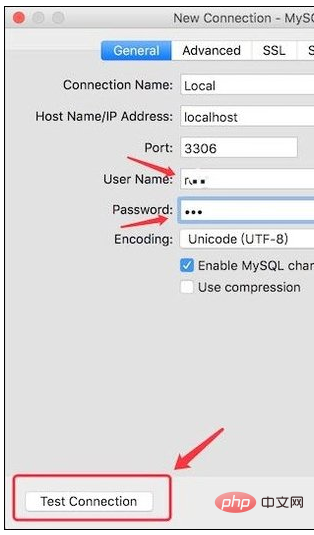
#5. After clicking, if the pop-up window shows "successful", then the settings are correct and the connection can be successful. If not, it means you have filled in the wrong place. . If there is no problem, click the ‘ok’ button.
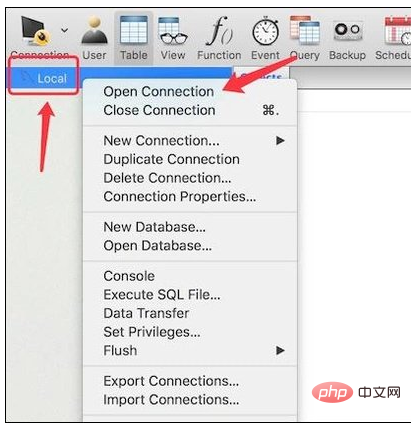
#6. Return to the main window, right-click on the database you just connected to, and click ‘Open Connection’.
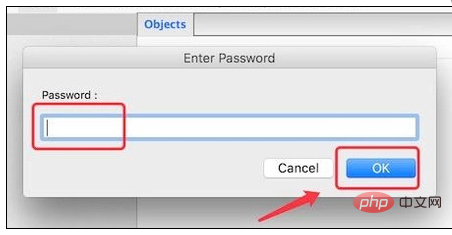
7. After clicking, a window will pop up. You need to fill in the access password for this database, enter the password, and click the ‘ok’ button.
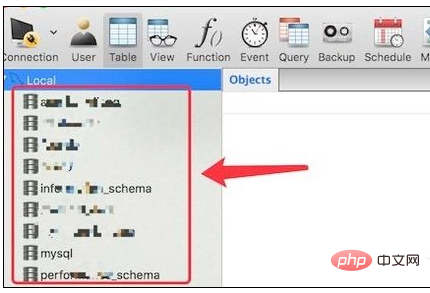
#8. We can open the locally deployed database and use this tool to perform various operations on the database.
The above is the detailed content of How to open the database in navicat. For more information, please follow other related articles on the PHP Chinese website!

Hot AI Tools

Undresser.AI Undress
AI-powered app for creating realistic nude photos

AI Clothes Remover
Online AI tool for removing clothes from photos.

Undress AI Tool
Undress images for free

Clothoff.io
AI clothes remover

AI Hentai Generator
Generate AI Hentai for free.

Hot Article

Hot Tools

Notepad++7.3.1
Easy-to-use and free code editor

SublimeText3 Chinese version
Chinese version, very easy to use

Zend Studio 13.0.1
Powerful PHP integrated development environment

Dreamweaver CS6
Visual web development tools

SublimeText3 Mac version
God-level code editing software (SublimeText3)

Hot Topics
 1376
1376
 52
52
 How to use navicat keygen patch
Apr 09, 2025 am 07:18 AM
Navicat Keygen Patch is a key generator that activates Navicat Premium, allowing you to use the full functionality of the software without purchasing a license. How to use: 1) Download and install Keygen Patch; 2) Start Navicat Premium; 3) Generate the serial number and activation code; 4) Copy the key; 5) Activate Navicat Premium, and Navicat Premium can be activated.
 Navicat's solution to the database cannot be connected
Apr 08, 2025 pm 11:12 PM
The following steps can be used to resolve the problem that Navicat cannot connect to the database: Check the server connection, make sure the server is running, address and port correctly, and the firewall allows connections. Verify the login information and confirm that the user name, password and permissions are correct. Check network connections and troubleshoot network problems such as router or firewall failures. Disable SSL connections, which may not be supported by some servers. Check the database version to make sure the Navicat version is compatible with the target database. Adjust the connection timeout, and for remote or slower connections, increase the connection timeout timeout. Other workarounds, if the above steps are not working, you can try restarting the software, using a different connection driver, or consulting the database administrator or official Navicat support.
 Does navicat support Dameng database?
Apr 08, 2025 pm 11:18 PM
Navicat is a powerful database management tool that supports Dameng database. It provides comprehensive features such as connection management, SQL queries, data modeling, performance monitoring, and user management. With its intuitive user interface and in-depth support for Dameng database, Navicat provides database administrators and developers with solutions to efficiently manage and operate Dameng databases.
 How to create stored procedures with navicat
Apr 08, 2025 pm 11:36 PM
You can use Navicat to create a stored procedure, the steps are as follows: Open the database object list and expand the "Procedures" node. Right-click the Procedures node and select Create Procedure. Enter the stored procedure name and body and set the parameters (if required). Select Compile in the File menu to compile the stored procedure. By executing a query or using "E in the "Procedures" list
 How to create navicat premium
Apr 09, 2025 am 07:09 AM
Create a database using Navicat Premium: Connect to the database server and enter the connection parameters. Right-click on the server and select Create Database. Enter the name of the new database and the specified character set and collation. Connect to the new database and create the table in the Object Browser. Right-click on the table and select Insert Data to insert the data.
 Troubleshooting Navicat database connection issues
Apr 08, 2025 pm 11:09 PM
If Navicat cannot connect to the database, you can troubleshoot the following steps: Verify the connection parameters: Check the user name, password, database address, and port. Check firewall settings: Make sure that the firewall does not block Navicat from accessing the database server. Verify the database server: Confirm that the server is running and can receive the request. Check network connections: Make sure that the computer is connected to the database server. Verify database version: Make sure Navicat and database server versions are compatible. Disable SSH tunneling: Try to connect directly to the server. Check Navicat settings: Verify the connection settings, including character set, encoding, and try resetting the settings. Contact Technical Support: If the above steps are invalid, please seek technical support.
 How to write sql statements in navicat
Apr 08, 2025 pm 11:24 PM
Navicat steps to write SQL statements: Connect to the database to create a new query window. Write SQL statements to execute query and save query examples SQL statements: SELECT * FROM table_name;INSERT INTO table_name (column1, column2) VALUES (value1, value2);UPDATE table_name SET column1 = value1 WHERE column2 = value2;DELETE FROM table_name WHERE column1 =
 How to roll back navicat
Apr 09, 2025 am 06:15 AM
Navicat provides rollback functionality to undo database changes. The rollback steps are as follows: Connect the database to expand the database to be rolled back in the object browser. Right-click the table and select "Rolleepback" to select the rollback time point. Click "OK"


