How to create a table using navicat

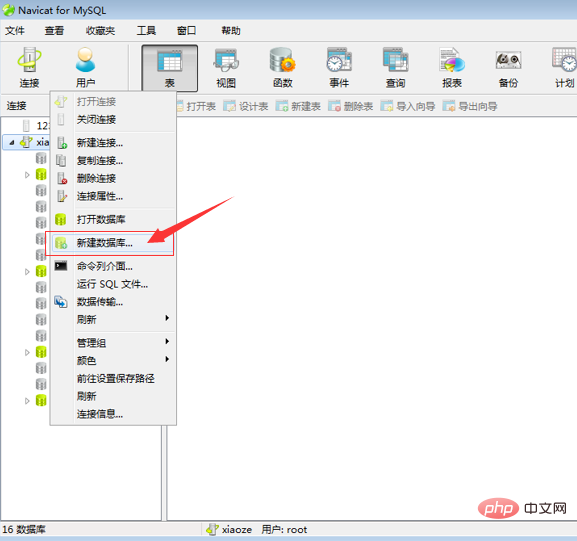
Step 1: After opening Navicat for MySql, right-click on the left side of the mouse and select New Database.
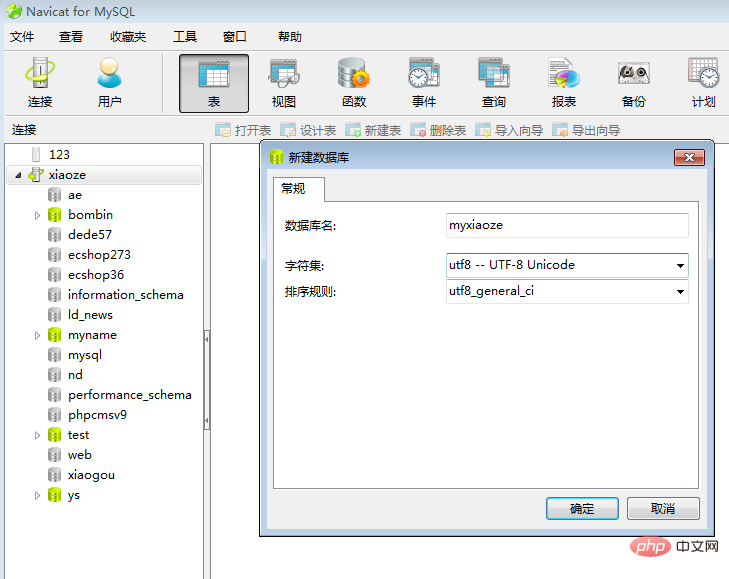
Step 2: Enter the page to create a database. Name the database myxiaoze; fill in utf8 -- UTF-8 Unicode for the character set; fill in utf8_general_ci for the sorting rule. After filling in, click OK:
Related recommendations: "Navicat for mysql usage graphic tutorial"
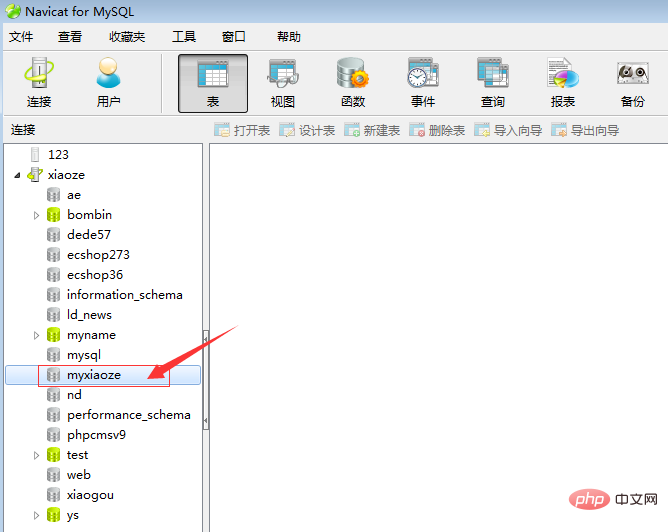
The third step: in Right-click on the left side to refresh, and you can see the database you just created, as shown below:
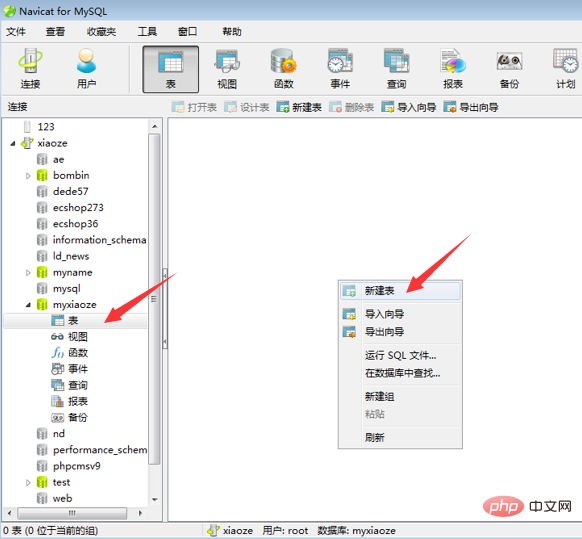
Step 4: Double-click to open the database you just created, click on the table, Right-click in the blank space on the right and select New Table, as shown in the figure:
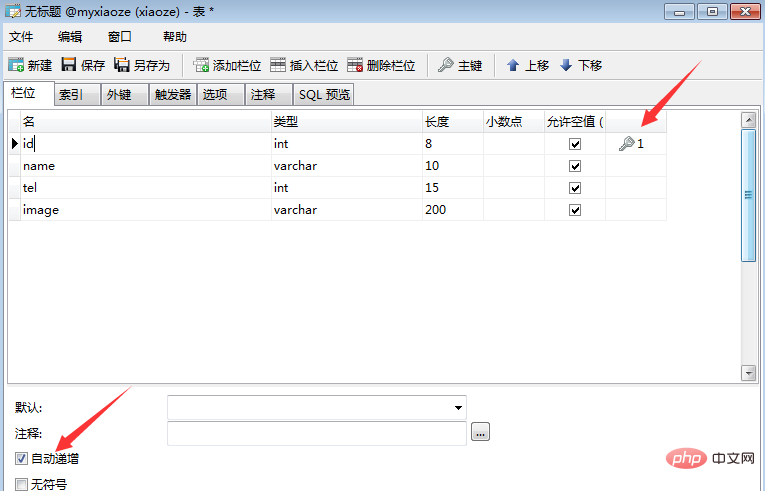
Step 5: Enter the page to create a table. The next step is to create fields, set the primary key and Automatic increment. The function of automatic increment is that every time a piece of data is added, the id will automatically increase without us inputting it.
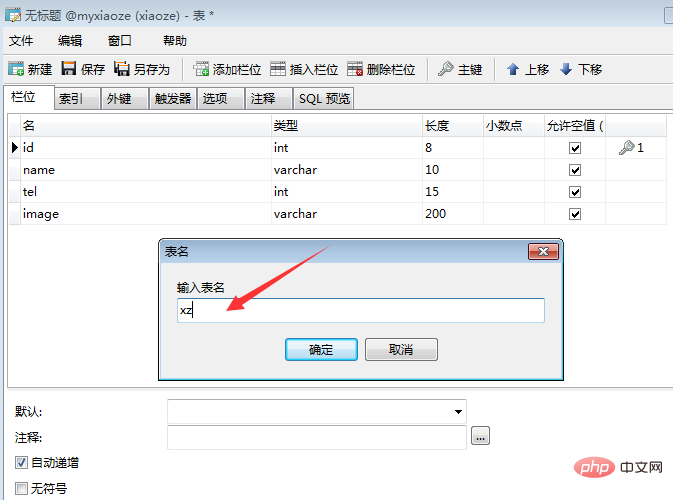
Step 6: Press Ctrl s at the same time to save the data table, and fill in the data table name, naming it xz. Through the above steps, we can perfectly realize the creation of database and data table.
The above is the detailed content of How to create a table using navicat. For more information, please follow other related articles on the PHP Chinese website!

Hot AI Tools

Undresser.AI Undress
AI-powered app for creating realistic nude photos

AI Clothes Remover
Online AI tool for removing clothes from photos.

Undress AI Tool
Undress images for free

Clothoff.io
AI clothes remover

AI Hentai Generator
Generate AI Hentai for free.

Hot Article

Hot Tools

Notepad++7.3.1
Easy-to-use and free code editor

SublimeText3 Chinese version
Chinese version, very easy to use

Zend Studio 13.0.1
Powerful PHP integrated development environment

Dreamweaver CS6
Visual web development tools

SublimeText3 Mac version
God-level code editing software (SublimeText3)

Hot Topics
 How to adjust the interface font size in navicat
Apr 24, 2024 pm 04:24 PM
Steps to adjust interface font size in Navicat: Enter the required database connection. Click the Tools menu. Select "Options". Select the Environment tab. Under User Interface Settings, find the Font Size setting. Select the desired font size and click OK.
 How to export the er diagram of navicat
Apr 24, 2024 pm 04:21 PM
The steps to export an ER diagram in Navicat are: 1. Open the ER diagram pane; 2. Connect to the database; 3. Export the ER diagram. The exported ER diagram is saved as an image file, showing the entities, relationships, and properties of the database.
 Where is the navicat cache file?
Apr 24, 2024 pm 06:06 PM
Navicat cache file storage location: Windows: %APPDATA%\PremiumSoft\Navicat\Cache; Mac: /Users/[username]/Library/Application Support/PremiumSoft/Navicat/Cache. Cache file types: .ncache, .ncache2, .ncache3. Purpose: Store recently opened connections, query history and DBMS metadata. Clear cache files: After closing Navicat, delete the corresponding files in the above location, and then restart Navicat.
 How to copy database to another database in navicat
Apr 24, 2024 pm 07:24 PM
Steps to copy a database using Navicat: Connect the source and target databases. Select the database objects (tables, views, stored procedures) to be copied. Right-click the object and select Copy Database Object. Select the target database and customize replication options (data copy, rename tables, discard constraints). Click "Start" to perform the copy. Check the replication results in the target database to verify the correctness of data and constraints.
 How to recover accidentally deleted table in navicat
Apr 24, 2024 pm 06:21 PM
Navicat accidentally deleted table recovery method: Check whether there is an accidentally deleted table in the recycle bin and restore it. Use binary log recovery: open the binary log, find the start and stop positions, recover the table from the binary log file and import it back to the database. Use a third-party backup tool to back up your database regularly, allowing recovery in the event of accidental deletion.
 How to export table structure to word using navicat
Apr 24, 2024 pm 07:57 PM
To export a table structure to Word in Navicat: Select the table to export. Select the Export Wizard and select Word format. Custom export options (including table headers, single table export, and merged files). Select the output file location and name. Export and open the file to view the table structure including table names, column names, data types, constraints, and more.
 How to undo the previous step in navicat
Apr 24, 2024 pm 05:48 PM
Navicat can undo the previous operation. The specific steps are as follows: Open Navicat and connect to the database. Perform the action you want to undo. Click the Undo button under the Edit menu in the menu bar (or use the shortcut Ctrl+Z/Cmd+Z). Confirm the undo operation.
 Can Navicat not install the database?
Apr 24, 2024 pm 04:39 PM
Navicat is a database management tool that requires a database connection to function. Specifically, it is compatible with database systems such as MySQL, MariaDB, and PostgreSQL, and allows users to perform operations such as querying, creating tables, and modifying data by establishing sessions. Therefore, the database must be installed first, otherwise Navicat cannot be used.


