Constraints in the database are divided into the following types
●Primary Key constraint (Primary Key constraint): The primary key column data is required to be unique and is not allowed to be empty.
●Unique constraint (Unique constraint): The column is required to be unique and is allowed to be empty, but only one null value can appear.
●Check constraint (Check constraint): Limits on the value range of a certain column, format restrictions, etc., such as constraints on age, email (must have @).
●Default constraint (Default constraint): The default value of a certain column. If there are many duplicates of data in the database, it can be set as the default value.
●Foreign Key constraint (Foreign Key constraint): used to establish a relationship between two tables, you need to specify which column of the main table is referenced.
Recommended tutorial: MySQL introductory video tutorial
Now we will introduce the creation process of foreign key constraints to you. .
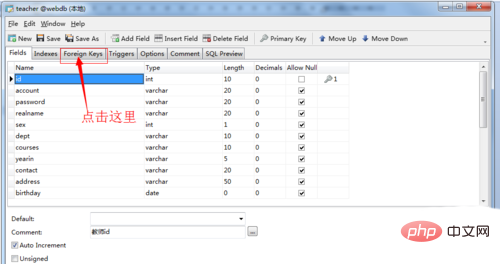
First introduce the basic situation. Now there are two tables, one is the teacher table and the other is the dept table. Now I want to set the dept attribute in the teacher table as a foreign key and associate the code attribute in the dept table. The specific situation is as shown in the figure; OK, now that the basic situation is introduced, let’s start teaching you how to set foreign keys in navicat for mysql.

1. Open my navicat, then find my teacher table, select it, and then click ‘design table’ on the menu bar.

#2. Find "Foreign Keys" in the pop-up dialog box, and then stand alone.

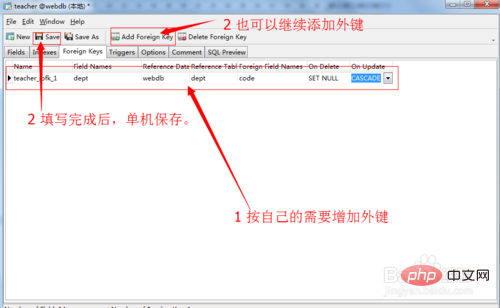
#3. Then an interface for setting foreign keys will appear, with a total of seven columns. Let’s briefly introduce the meaning of these columns.
‘name’: You don’t need to fill it in. The system will automatically generate it after you save it successfully.
‘FieldName’: Which key you want to set as a foreign key. Here select ‘dept’
‘Reference DadaBase’: the database associated with the foreign key.
'Reference Table': The associated table, here is the dept table
'Forgin filed Names': The associated field, here is the code
'ondelete': It is the action selected when deleting. My choice here is setNull, which means that when the associated table is deleted, the teacher>dept field will be set to null.
‘onupdate’: It is the action selected when updating. My choice here is CASCADE, which means that when the associated table is updated, the teacher>dept field will be set to cascade update.

#4. After the settings are completed, click ‘save’ to save and exit. You can also click ‘add Foreign Key’ to add another foreign key.

The above is the detailed content of How to create table constraints in Navicat. For more information, please follow other related articles on the PHP Chinese website!