How to connect navicat to msql on ubuntu

1. The mysql configuration file is in /etc/mysql/my.cnf, as shown in the figure below. The content in the configuration file is very rich. We can see the mysql user, listening port number, data file storage directory, etc.

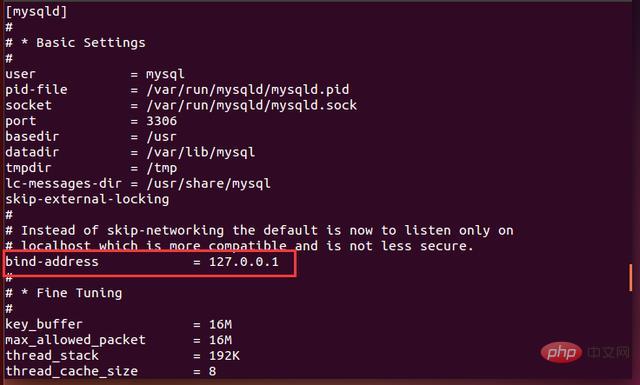
#2. Use the cat command to view the contents of my.cnf. As shown in the figure below, in the my.cnf configuration file, the default IP of bind-address is 127.0.0.1, which means that connections are limited to the local IP. If mysql is not configured, Navicat or other remote connection tools cannot be used to connect to the database.
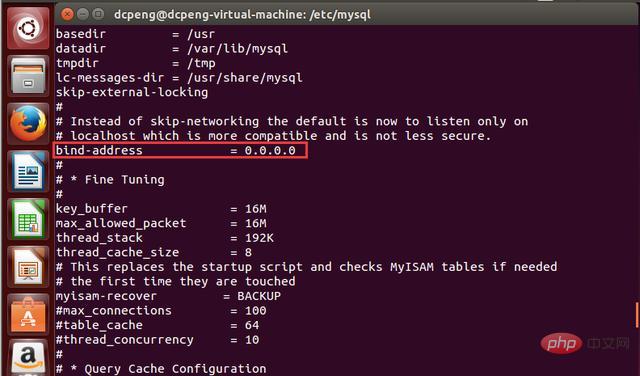
#3. In order to allow other external IPs to access it normally, the IP corresponding to bind-address needs to be set to 0.0.0.0. Use vi or vim to edit the my.cnf configuration file. After the configuration is completed, as shown in the following figure:
4. After changing the configuration file my.cnf, you need to modify mysql To restart, enter the command: sudo service mysql restart, as shown in the following figure:

Enter the process view command. You can see that the mysqld process already exists, indicating that mysql has started successfully.
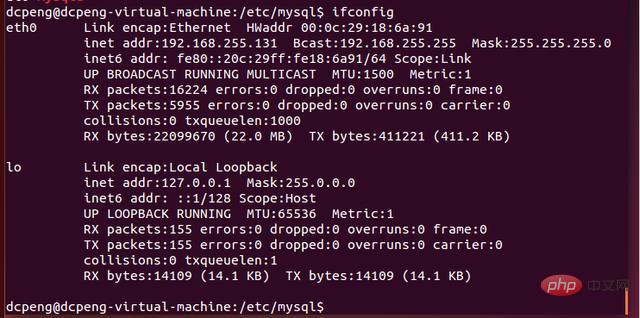
5. Next, connect to the database remotely through Navicat. Check the IP through ifconfig. You can see that the IP address is 192.168.255.131.
Related recommendations: "Navicat for mysql graphic tutorial"
6. Open Navicat, and then click New Connection, as follows As shown in the picture:
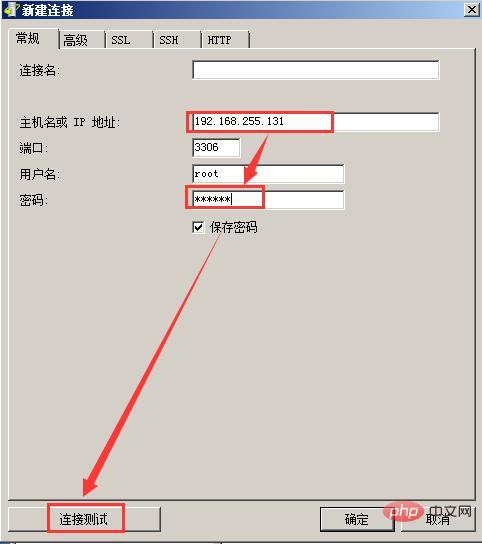
#7. Click "Connection Test" and the following interface will pop up. It means that the connection test failed because we have not yet authorized the mysql remote connection. The permission issue of Mysql is very strict. Even though we have opened the IP address, we have not yet authorized the root user because the connection still fails. In other words, after we authorize the root user, we will be able to access the database normally even if the IP address is not 127.0.0.1 in the future. If not set, by default, except for local localhost connections, other external IP connections will be invalid. Although their IP is bound on 0.0.0.0, they still have no permissions.
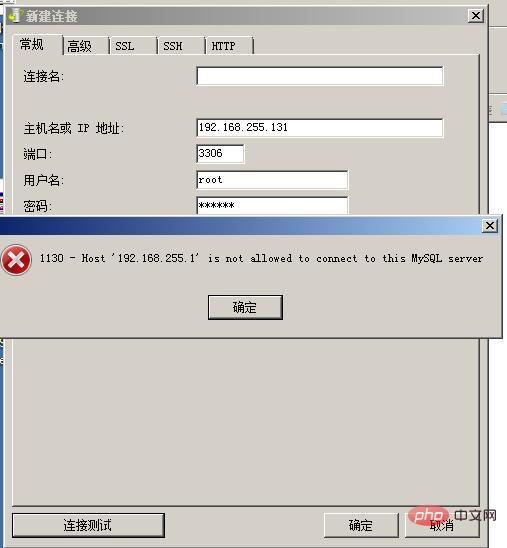
8. Next, we continue to enter mysql in Ubuntu.
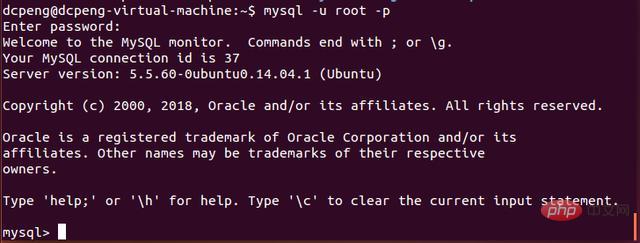
9. Enter the remote authorization command. The syntax template is as follows: grant all privileges on library name.table name to 'username'@'IP address' identified by 'password' with grant option;
Here, the editor enters the command in the Ubuntu command line according to his own situation: grant all privileges on *.* to 'root'@'% ' identified by '123456' with grant option ;
*.* is a regular expression, which represents authorization for all tables; root represents the root user; % represents all external IPs; 123456 represents the password.
As shown in the figure below:

10. After authorization, enter the command: "flush privileges;" to refresh the permissions, as shown in the figure above. After that, you can exit the mysql database.
11. At this time, go to Navicat and try the connection test again, as shown in the figure below. At this point you can see that the test connection is successful.
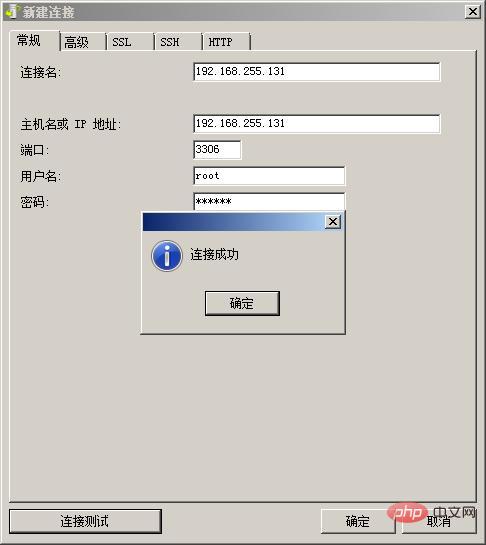
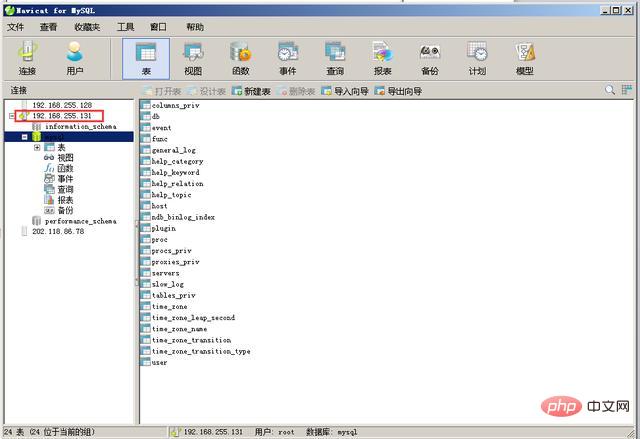
12. Click OK, and then you can see on the Navicat main page that the database with the IP address 192.168.255.131 is already in Navicat.

13. Double-click the 192.168.255.131 database on the left to see the database information. After that, you can remotely operate the database in Navicat, which is synchronized with the database in Ubuntu.
The above is the detailed content of How to connect navicat to msql on ubuntu. For more information, please follow other related articles on the PHP Chinese website!

Hot AI Tools

Undresser.AI Undress
AI-powered app for creating realistic nude photos

AI Clothes Remover
Online AI tool for removing clothes from photos.

Undress AI Tool
Undress images for free

Clothoff.io
AI clothes remover

Video Face Swap
Swap faces in any video effortlessly with our completely free AI face swap tool!

Hot Article

Hot Tools

Notepad++7.3.1
Easy-to-use and free code editor

SublimeText3 Chinese version
Chinese version, very easy to use

Zend Studio 13.0.1
Powerful PHP integrated development environment

Dreamweaver CS6
Visual web development tools

SublimeText3 Mac version
God-level code editing software (SublimeText3)

Hot Topics
 1663
1663
 14
14
 1420
1420
 52
52
 1315
1315
 25
25
 1266
1266
 29
29
 1239
1239
 24
24
 How to use navicat keygen patch
Apr 09, 2025 am 07:18 AM
Navicat Keygen Patch is a key generator that activates Navicat Premium, allowing you to use the full functionality of the software without purchasing a license. How to use: 1) Download and install Keygen Patch; 2) Start Navicat Premium; 3) Generate the serial number and activation code; 4) Copy the key; 5) Activate Navicat Premium, and Navicat Premium can be activated.
 How to see if navicat is activated
Apr 09, 2025 am 07:30 AM
How to check if Navicat is activated: View the Registration Information section in the "About Navicat" of the Help menu: Activated: Show valid registration information (name, organization, expiration date) Not activated: Show "Not Registered" or "Register Information Not Available" Check the activation icon in the toolbar: The green icon indicates that the active observation trial period countdown: The trial version will show the countdown at startup, the activated version will not view feature limitations: The trial version may limit advanced features, and the activated version will unlock all functions
 How to import sql file into navicat
Apr 09, 2025 am 06:24 AM
How to import SQL files using Navicat? Open Navicat and connect to the database. Open the SQL Editor. Import SQL files. Set import options (optional). Perform import. Check the import results.
 How to execute sql in navicat
Apr 08, 2025 pm 11:42 PM
Steps to perform SQL in Navicat: Connect to the database. Create a SQL Editor window. Write SQL queries or scripts. Click the Run button to execute a query or script. View the results (if the query is executed).
 How to export the results of a navicat query
Apr 09, 2025 am 06:21 AM
Export query results with Navicat can be performed step by step: 1. Select the data to export 2. Select the export format: CSV, Excel, XML, or JSON 3. Configure the export options: Select columns, separators, and filters 4. Select the save location 5. Start exporting 6. Verify the results
 How to create stored procedures with navicat
Apr 08, 2025 pm 11:36 PM
You can use Navicat to create a stored procedure, the steps are as follows: Open the database object list and expand the "Procedures" node. Right-click the Procedures node and select Create Procedure. Enter the stored procedure name and body and set the parameters (if required). Select Compile in the File menu to compile the stored procedure. By executing a query or using "E in the "Procedures" list
 What to do if the error is running sql file in navicat
Apr 09, 2025 am 09:09 AM
To resolve errors when Navicat runs SQL files, follow these steps: 1. Check for SQL syntax errors; 2. Make sure the database connection is established; 3. Check file encoding; 4. Adjust server settings; 5. Check temporary space; 6. Disable certain plugins; 7. Contact Navicat Support if necessary.
 How to roll back navicat
Apr 09, 2025 am 06:15 AM
Navicat provides rollback functionality to undo database changes. The rollback steps are as follows: Connect the database to expand the database to be rolled back in the object browser. Right-click the table and select "Rolleepback" to select the rollback time point. Click "OK"


