How to connect to navicat in java

In actual applications, most of them need to use the database to query and operate data, because the database supports powerful SQL statements and can perform transaction processing. Next, I will introduce how to use the API and database provided by JDBC for information delivery in Java applications.
First of all, you need to install the MySQl database, install the installed database, establish the database, and create tables, you also need to operate the database through JDBC.
Java operates the database by using the API provided by JDBC. JDBC operates different databases only with different connection methods. After the application using JDBC establishes contact with the database, it can operate it.
Using JDBC requires the following operations:
·Establish a connection with the database
·Send SQL statements to the connected database
·Processing the results returned by SQL statements
After the MySQL database service is started, a connection must first be established with the database on the database server. Java uses JDBC to call the local JDBC-database driver and establish a connection with the corresponding database. The Java running environment converts the JDBC database driver into a special protocol used by DBMS (database management system) to implement information interaction with specific DBMS, as shown below:
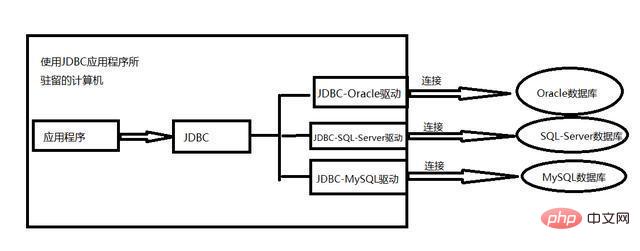
Using JDBC- There are two steps required to establish a connection between the database driver and the database:
(1) Load the JDBC-database driver
(2) Establish a connection with the specified database
Download first JDBC-MySQL database driver, JDBC download URL:
https://dev.mysql.com/downloads/file/?id=474258. Unzip the downloaded zip file, find the mysql-connector-java-5.1.45-bin.jar file inside, and copy it to the JDK extension directory, for example, mine is in the D:StudyJava1.8.0jrelibext directory.
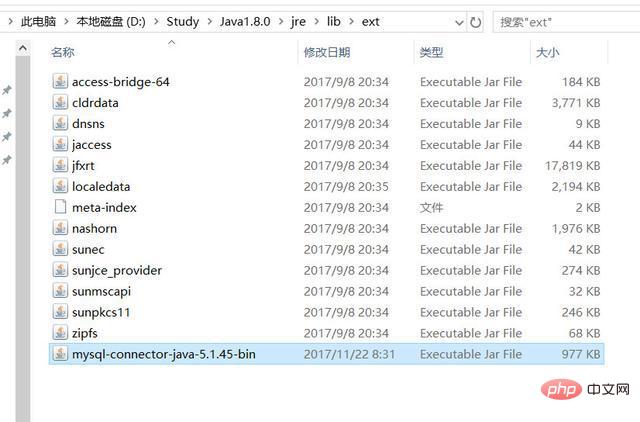
Related recommendations: "Navicat for mysql graphic tutorial"
At the same time, because there will be an additional JRE when installing the JDK , it is best to copy the mysql-connector-java-5.1.45-bin.jar file to that directory, mine is the D:StudyJRE1.8.0libext directory, to ensure that the environment is enabled in time to run the program, and there will be the necessary drivers.
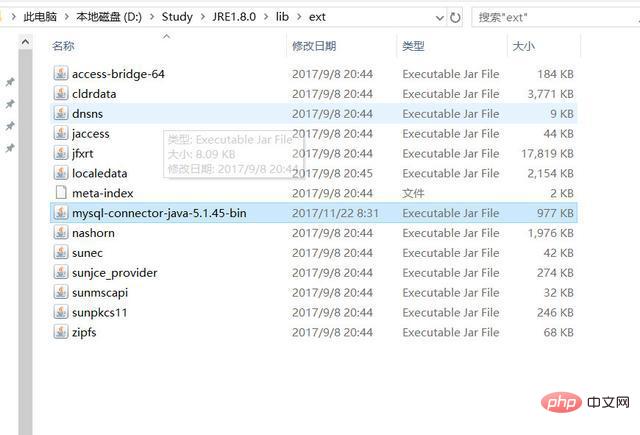
The next step is to load the JDBC-MySQL database driver. The code is as follows:
try {
Class.forName("com.mysql.jdbc.Driver");
}
catch (Excepton e) { }The MySQL database driver is encapsulated in the Driver class, and the package name is com .mysql.jdbc, it is not a class in the Java runtime environment class library, so it needs to be placed in the extension directory of jre.
The DriverManager class in the java.sql package has two class methods (static methods) for establishing connections:
·Connection getConnection(java.lang.String ,java.lang.String,java.lang.String)
·Connection getConnection(java.lang.String)
Find MySQL Notifier on the computer and run it, Then right-click its icon on the taskbar, select MySQL57-Stopped-->Start to start the database
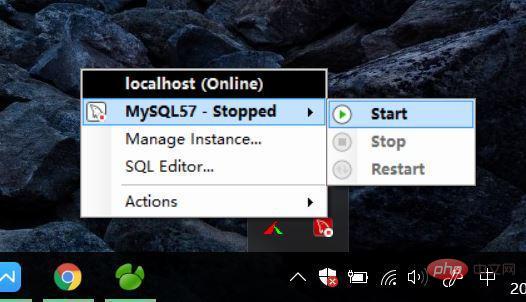
Then open Navicat for MySQL, open the connection, and establish a connection with the database server Finally, right-click the connection name and select the "New Database" command, fill in the corresponding information in the pop-up dialog box, as shown below, and create a database named Study.
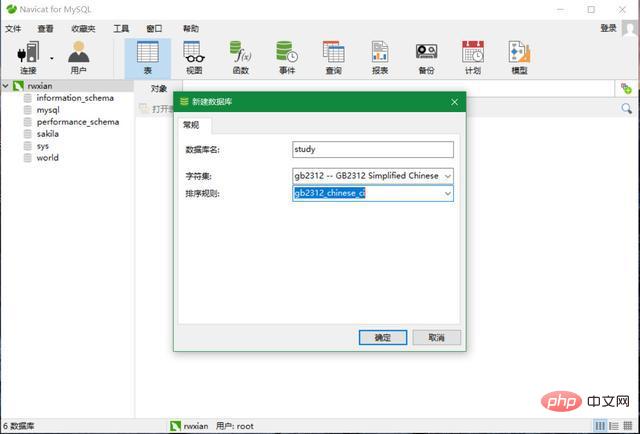
After establishing the database, right-click "Table" under Study and select "New Table", fill in the corresponding column names and various attributes of the column names,
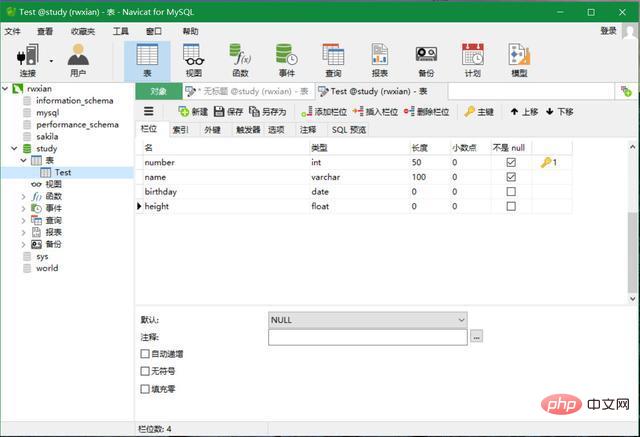
Click save, enter the table name to save, then double-click the table name, fill in the corresponding information, add a new row, and click " ".
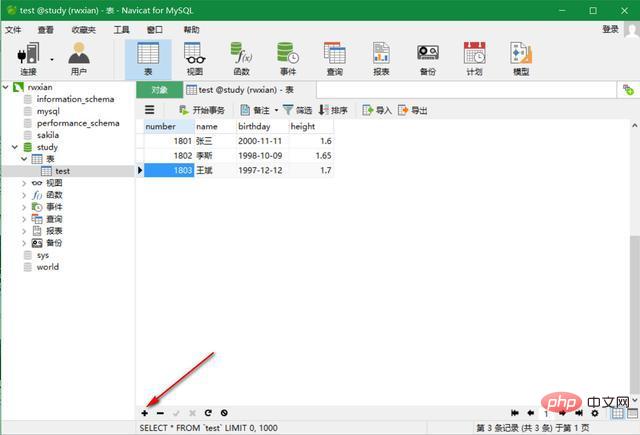
#Next, use a small program to test the query operation on the database.
Create a new Java project, the code is as follows:
import
java.sql.*;public class MysqlTest { public static void main(String[]
args) { //加载JDBC-MySQL驱动 try { Class.forName("com.mysql.jdbc.Driver"); }
catch (Exception e) {}
//同数据库建立连接,其中ip地址后的3306是端口号,study是数据库名称,加上用户名和密码等信息 //设置useSSL为true
//如果表中记录有汉字,请加上characterEncoding参数,取值为gb2312或utf-8 Connection con =
null; String uri =
"jdbc:mysql://192.168.199.240:3306/study?user=root&password=****&useSSL=true&characterEncoding=utf-8";
try { con = DriverManager.getConnection(uri); //连接代码 } catch
(SQLException e) { System.out.println(e); } //向数据库发送SQL查询语句 try {
Statement sql = con.createStatement(); //声明并创建SQL语句对象 ResultSet rs =
sql.executeQuery("SELECT * FROM test"); //查询test表
System.out.println("查询结果:"); while (rs.next()) { //循环读取表test每行的数据并输出
String number = rs.getString(1); String name = rs.getString(2); Date
date = rs.getDate(3); float height = rs.getFloat(4);
System.out.printf("%s   ",number); System.out.printf("%s    ",name);
System.out.printf("%s   ",date); System.out.printf("%s  ",height);
System.out.println(); } con.close(); //关闭数据库连接 } catch (SQLException e) {
System.out.println(e); } }}Run this program, the output result is as follows:
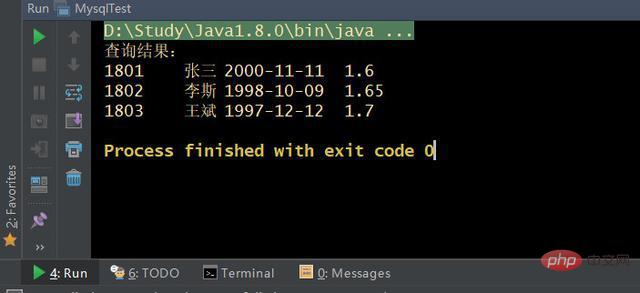
At this point, Java connects to the MySQL database Successfully implemented sequential query.
The above is the detailed content of How to connect to navicat in java. For more information, please follow other related articles on the PHP Chinese website!

Hot AI Tools

Undresser.AI Undress
AI-powered app for creating realistic nude photos

AI Clothes Remover
Online AI tool for removing clothes from photos.

Undress AI Tool
Undress images for free

Clothoff.io
AI clothes remover

AI Hentai Generator
Generate AI Hentai for free.

Hot Article

Hot Tools

Notepad++7.3.1
Easy-to-use and free code editor

SublimeText3 Chinese version
Chinese version, very easy to use

Zend Studio 13.0.1
Powerful PHP integrated development environment

Dreamweaver CS6
Visual web development tools

SublimeText3 Mac version
God-level code editing software (SublimeText3)

Hot Topics
 1378
1378
 52
52
 How to use navicat keygen patch
Apr 09, 2025 am 07:18 AM
Navicat Keygen Patch is a key generator that activates Navicat Premium, allowing you to use the full functionality of the software without purchasing a license. How to use: 1) Download and install Keygen Patch; 2) Start Navicat Premium; 3) Generate the serial number and activation code; 4) Copy the key; 5) Activate Navicat Premium, and Navicat Premium can be activated.
 Navicat's solution to the database cannot be connected
Apr 08, 2025 pm 11:12 PM
The following steps can be used to resolve the problem that Navicat cannot connect to the database: Check the server connection, make sure the server is running, address and port correctly, and the firewall allows connections. Verify the login information and confirm that the user name, password and permissions are correct. Check network connections and troubleshoot network problems such as router or firewall failures. Disable SSL connections, which may not be supported by some servers. Check the database version to make sure the Navicat version is compatible with the target database. Adjust the connection timeout, and for remote or slower connections, increase the connection timeout timeout. Other workarounds, if the above steps are not working, you can try restarting the software, using a different connection driver, or consulting the database administrator or official Navicat support.
 PHP vs. Python: Understanding the Differences
Apr 11, 2025 am 12:15 AM
PHP and Python each have their own advantages, and the choice should be based on project requirements. 1.PHP is suitable for web development, with simple syntax and high execution efficiency. 2. Python is suitable for data science and machine learning, with concise syntax and rich libraries.
 Does navicat support Dameng database?
Apr 08, 2025 pm 11:18 PM
Navicat is a powerful database management tool that supports Dameng database. It provides comprehensive features such as connection management, SQL queries, data modeling, performance monitoring, and user management. With its intuitive user interface and in-depth support for Dameng database, Navicat provides database administrators and developers with solutions to efficiently manage and operate Dameng databases.
 How to create navicat premium
Apr 09, 2025 am 07:09 AM
Create a database using Navicat Premium: Connect to the database server and enter the connection parameters. Right-click on the server and select Create Database. Enter the name of the new database and the specified character set and collation. Connect to the new database and create the table in the Object Browser. Right-click on the table and select Insert Data to insert the data.
 How to create stored procedures with navicat
Apr 08, 2025 pm 11:36 PM
You can use Navicat to create a stored procedure, the steps are as follows: Open the database object list and expand the "Procedures" node. Right-click the Procedures node and select Create Procedure. Enter the stored procedure name and body and set the parameters (if required). Select Compile in the File menu to compile the stored procedure. By executing a query or using "E in the "Procedures" list
 How to analyze navicat explanation
Apr 09, 2025 am 07:33 AM
Navicat provides data analysis capabilities, including: Create pivot tables: Aggregate data by field. Draw charts: Visualize data patterns. Writing SQL queries: perform complex analysis.
 How to create a new connection to mysql in navicat
Apr 09, 2025 am 07:21 AM
You can create a new MySQL connection in Navicat by following the steps: Open the application and select New Connection (Ctrl N). Select "MySQL" as the connection type. Enter the hostname/IP address, port, username, and password. (Optional) Configure advanced options. Save the connection and enter the connection name.


