bootstrap table from scratch
The editor of this article will take you from scratch and tell you step by step how to use the bootstrap Table plug-in to display a table on the front end
First, download the bootstrap Table plug-in Necessary js, address: https://github.com/wenzhixin/bootstrap-table
Official document address: http://bootstrap-table.wenzhixin.net .cn/zh-cn/documentation/
Recommended tutorial: bootstrap tutorial
The editor has circled the points that need attention in this article with a red pen
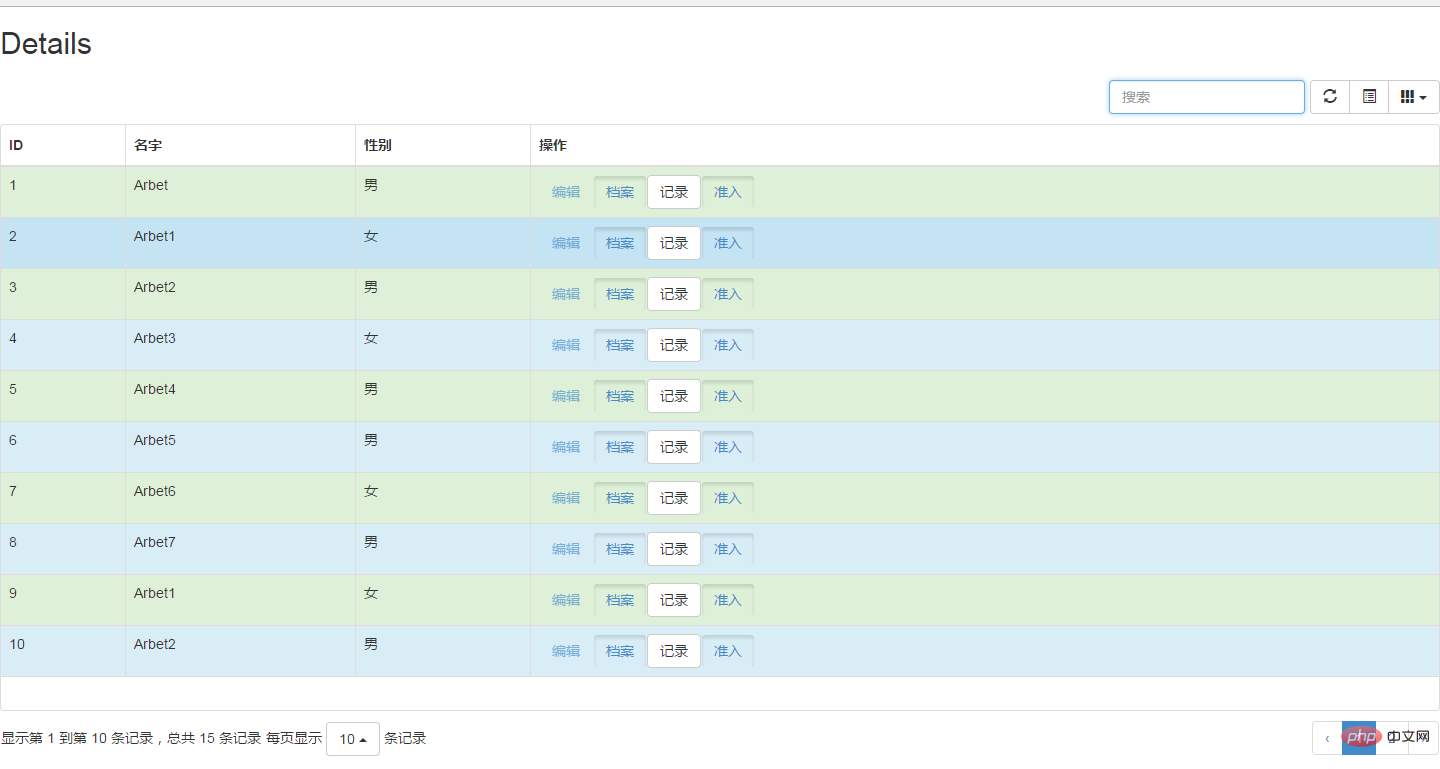
Show the renderings first
Then start using the bootstrap Table plug-in to create Table
Put the plug-in js downloaded from the above address into the project, which are js, css, fonts
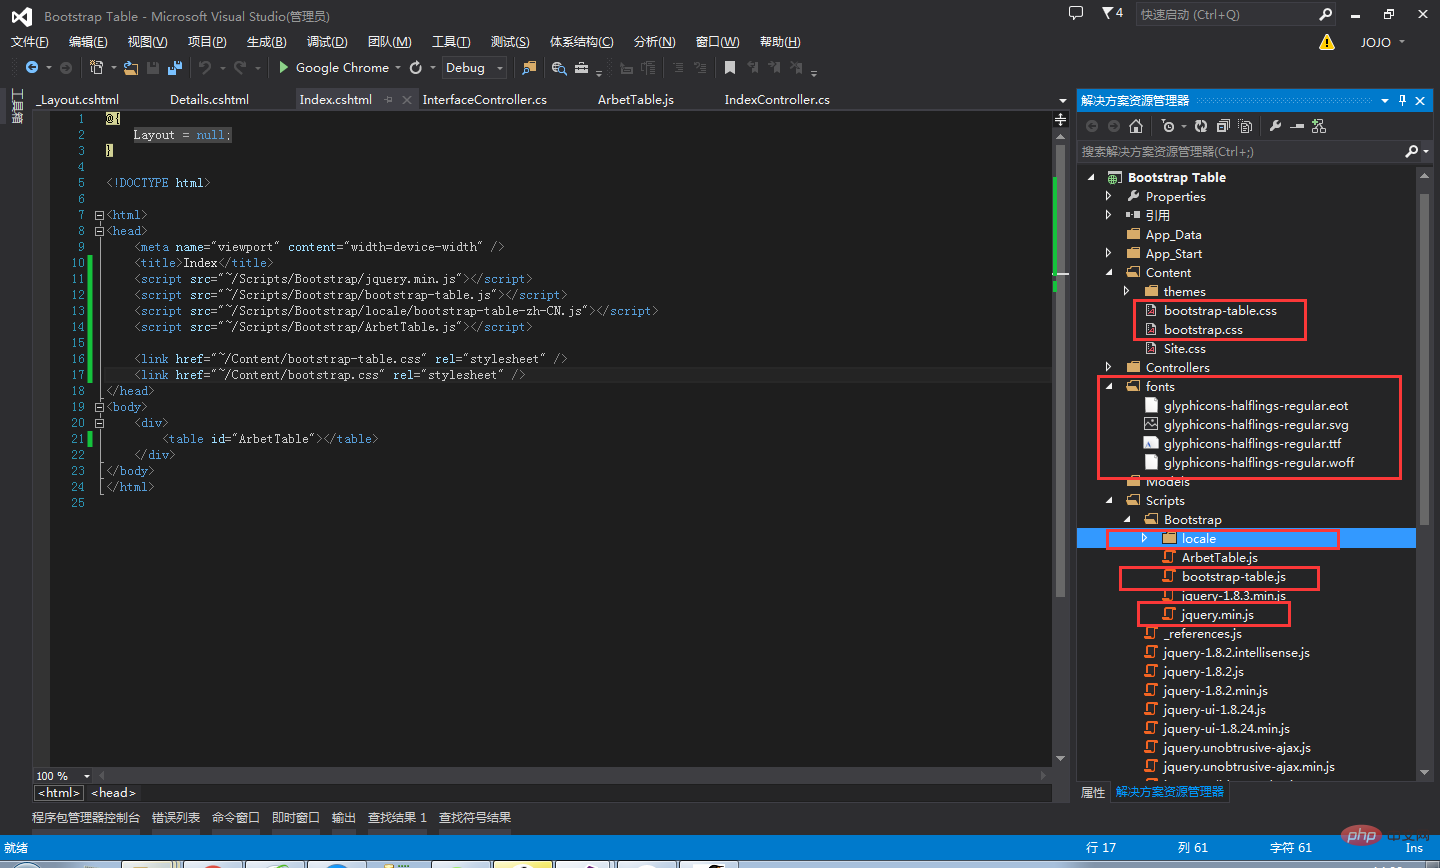
There is a detail here: The name of the locale folder cannot be modified, and all language js inside must be pasted in. This article uses MVC as an example, of course WebForm is also possible
Usage steps:
1. Create a new controller and view, which references the _Layout master version
2. Reference the corresponding js in the view
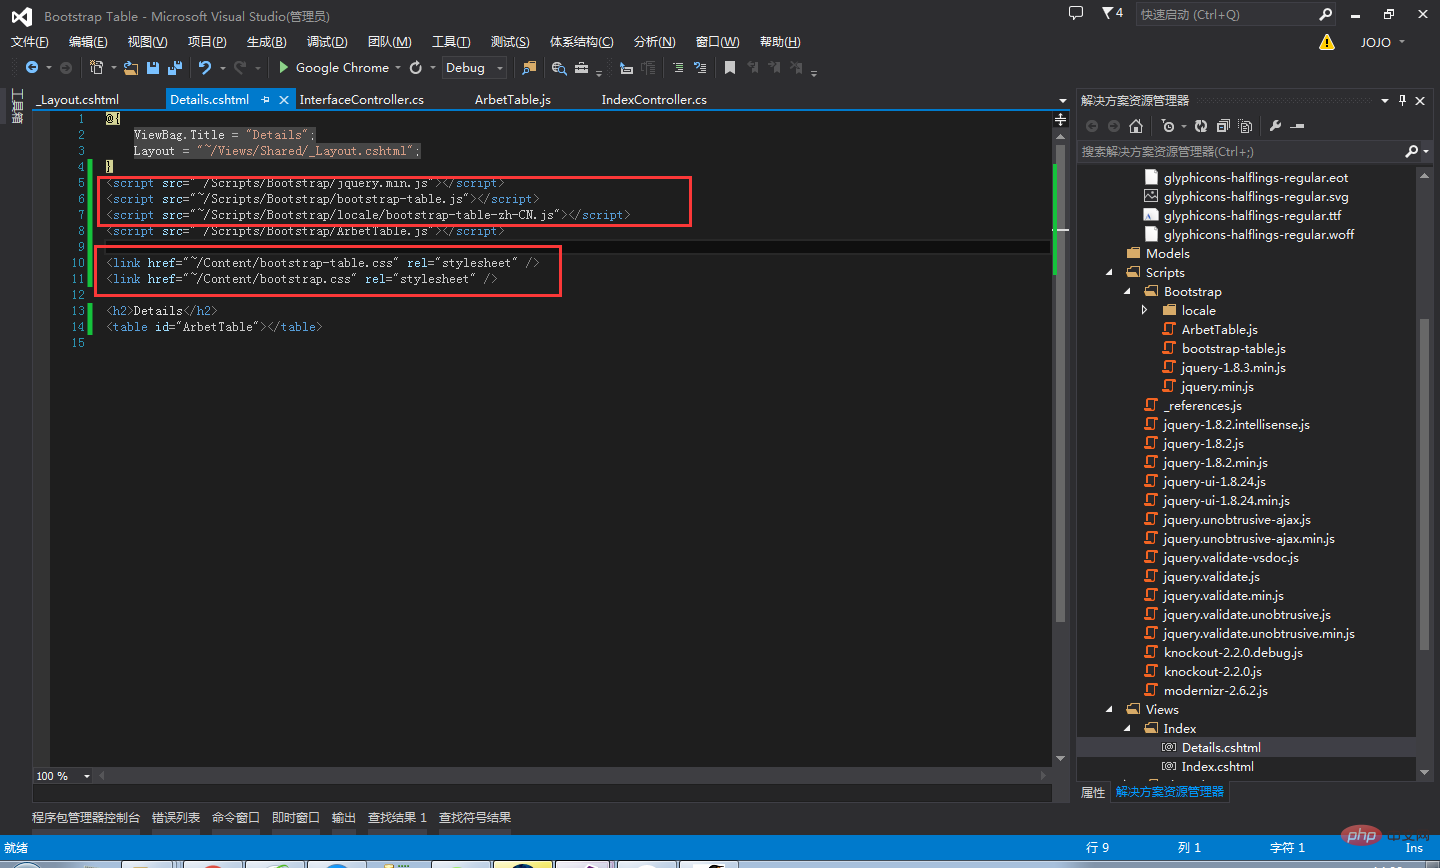
Write a table table container on the page. This sentence must contain
<table id="ArbetTable"></table>
3. Initialize bootstrap Table
##
$(function () {
     //1.初始化Table
     var oTable = new TableInit();
      oTable.Init();
});4. Use bootstrap Table
var TableInit = function () {
var oTableInit = new Object();
//初始化Table
oTableInit.Init = function () {
$('#ArbetTable').bootstrapTable({
url: '/Interface/GetData', //请求后台的URL(*)
method: 'get', //请求方式(*)
toolbar: '#toolbar', //工具按钮用哪个容器
striped: true, //是否显示行间隔色
cache: false, //是否使用缓存,默认为true,所以一般情况下需要设置一下这个属性(*)
pagination: true, //是否显示分页(*)
sortable: false, //是否启用排序
sortOrder: "asc", //排序方式
queryParams: oTableInit.queryParams,//传递参数(*)
sidePagination: "server", //分页方式:client客户端分页,server服务端分页(*)
pageNumber: 1, //初始化加载第一页,默认第一页
pageSize: 10, //每页的记录行数(*)
pageList: [10, 25, 50, 100], //可供选择的每页的行数(*)
search: true, //是否显示表格搜索,此搜索是客户端搜索,不会进服务端,所以,个人感觉意义不大
contentType: "application/x-www-form-urlencoded",
strictSearch: true,
showColumns: true, //是否显示所有的列
showRefresh: true, //是否显示刷新按钮
minimumCountColumns: 2, //最少允许的列数
clickToSelect: true, //是否启用点击选中行
height: 700, //行高,如果没有设置height属性,表格自动根据记录条数觉得表格高度
uniqueId: "no", //每一行的唯一标识,一般为主键列
showToggle: true, //是否显示详细视图和列表视图的切换按钮
cardView: false, //是否显示详细视图
detailView: false, //是否显示父子表
columns: [
{
field: 'ID',
title: 'ID'
}, {
field: 'Name',
title: '名字'
}, {
field: 'Sex',
title: '性别'
},
{
field: 'operate',
title: '操作',
formatter: operateFormatter //自定义方法,添加操作按钮
},
],
rowStyle: function (row, index) {
var classesArr = ['success', 'info'];
var strclass = "";
if (index % 2 === 0) {//偶数行
strclass = classesArr[0];
} else {//奇数行
strclass = classesArr[1];
}
return { classes: strclass };
},//隔行变色
});
};
//得到查询的参数
oTableInit.queryParams = function (params) {
var temp = { //这里的键的名字和控制器的变量名必须一直,这边改动,控制器也需要改成一样的
limit: params.limit, //页面大小
offset:params.offset
};
return temp;
};
return oTableInit;
};
function operateFormatter(value, row, index) {//赋予的参数
return [
'<a class="btn active disabled" href="#">编辑</a>',
'<a class="btn active" href="#">档案</a>',
'<a class="btn btn-default" href="#">记录</a>',
'<a class="btn active" href="#">准入</a>'
].join('');
}4. Backend url returns data
public ActionResult GetData(int limit, int offset)
        {
            var data = new List<object>(){new { ID=1, Name="Arbet", Sex="男"},
                new { ID= 2, Name="Arbet1", Sex="女" },
                new {ID=3, Name="Arbet2",Sex="男" },
                new {ID=4, Name="Arbet3",Sex="女" },
                new {ID=5, Name="Arbet4",Sex="男" },
                new {ID=6, Name="Arbet5",Sex="男" },
                new {ID=7, Name="Arbet6",Sex="女" },
                new {ID=8, Name="Arbet7",Sex="男" },
                new { ID=9, Name="Arbet1", Sex="女" },
                new {ID=10, Name="Arbet2",Sex="男" },
                new {ID=11, Name="Arbet3",Sex="女" },
                new {ID=12, Name="Arbet4",Sex="男" },
                new {ID=13, Name="Arbet5",Sex="男" },
                new {ID=14, Name="Arbet6",Sex="女" },
                new {ID=15, Name="Arbet7",Sex="男" }
            };
            var total = data.Count;
            var rows = data.Skip(offset).Take(limit).ToList();
            return Json(new { total = total, rows = rows }, JsonRequestBehavior.AllowGet);
}The returned parameters must be total and rows, total returns the total number of data sets, and rows returns the json format of the table
5. Display effect
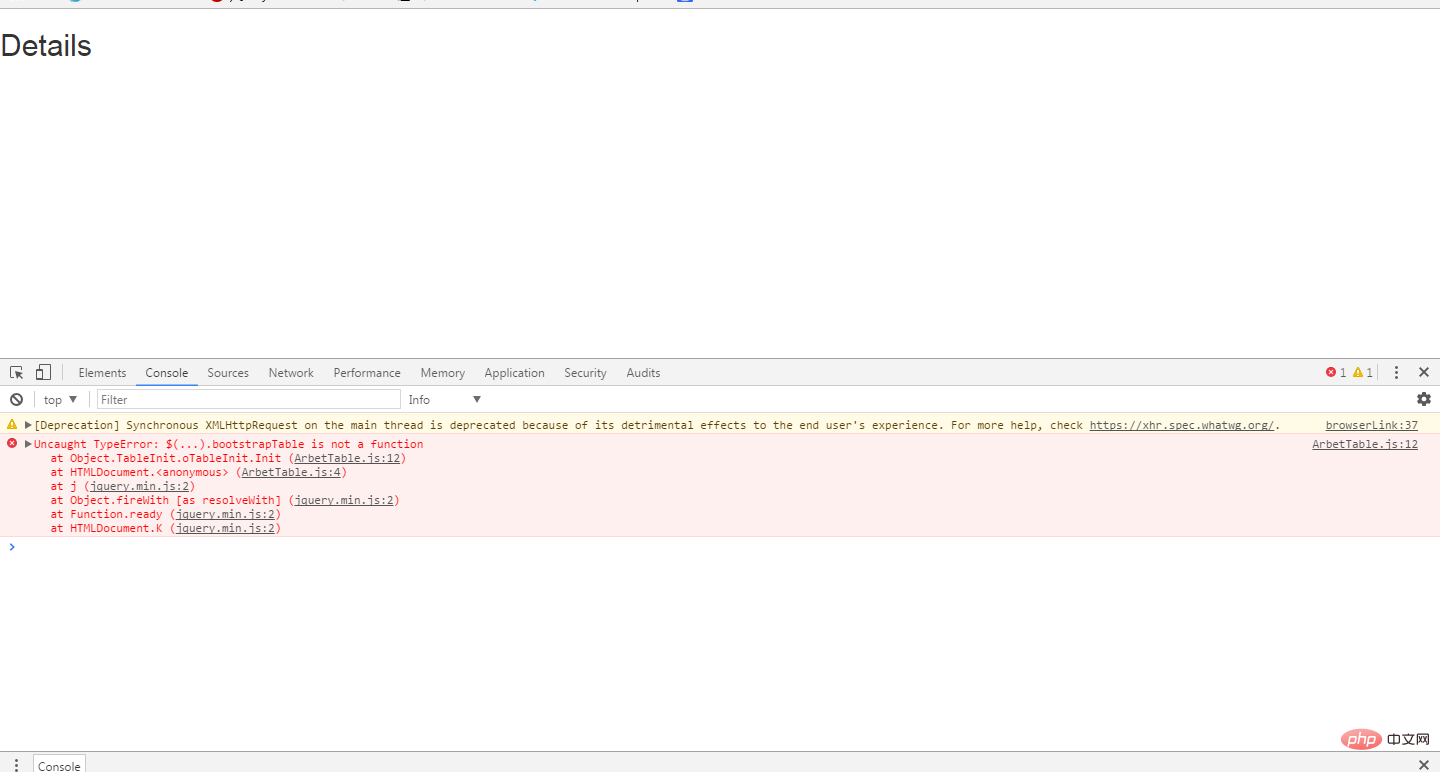
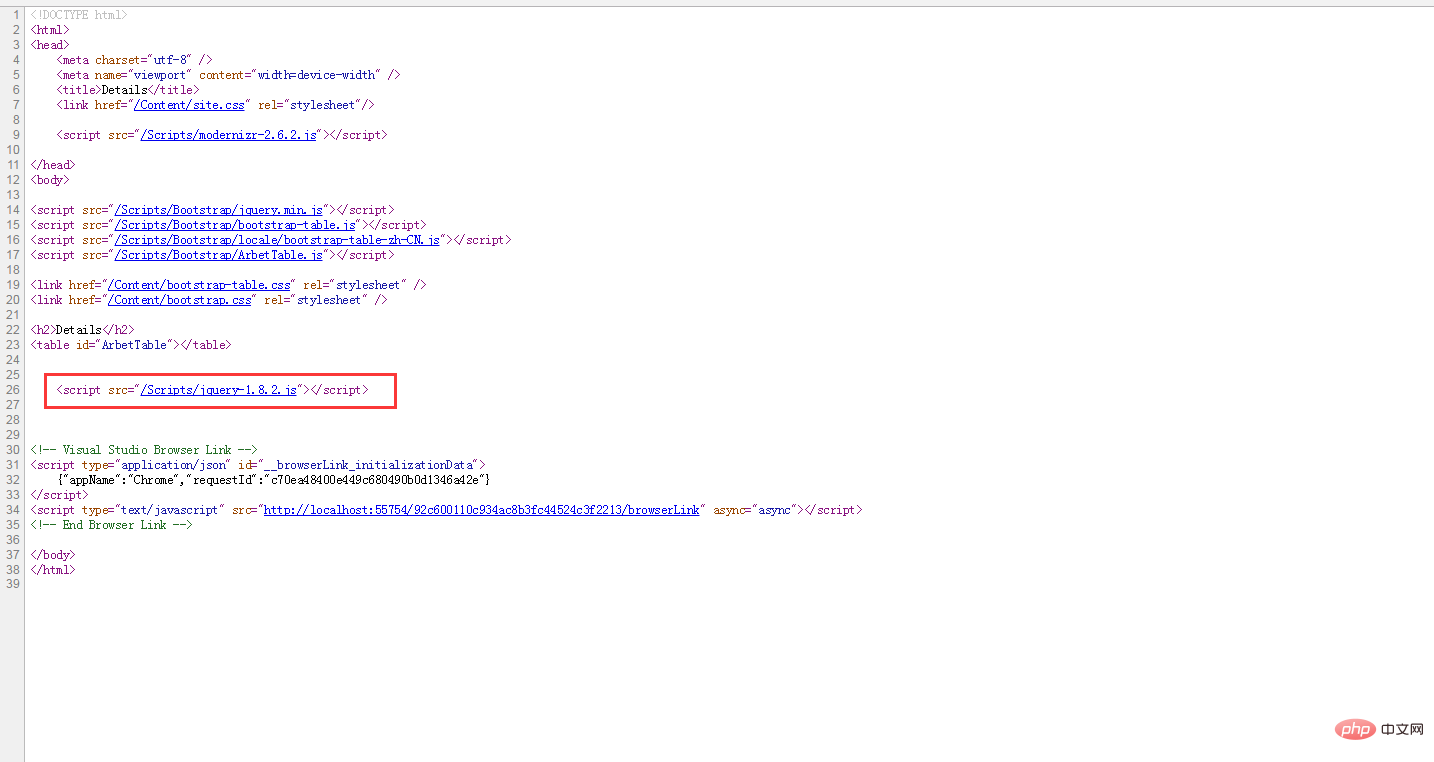
<!DOCTYPE html>
<html>
<head>
    <meta charset="utf-8" />
    <meta name="viewport" content="width=device-width" />
    <title>@ViewBag.Title</title>
    @Styles.Render("~/Content/css")
    @Scripts.Render("~/bundles/modernizr")
</head>
<body>
    @RenderBody()

    @*@Scripts.Render("~/bundles/jquery")*@
    @RenderSection("scripts", required: false)
</body>
</html> and find it successful! This is because the references to JS library files are in order, 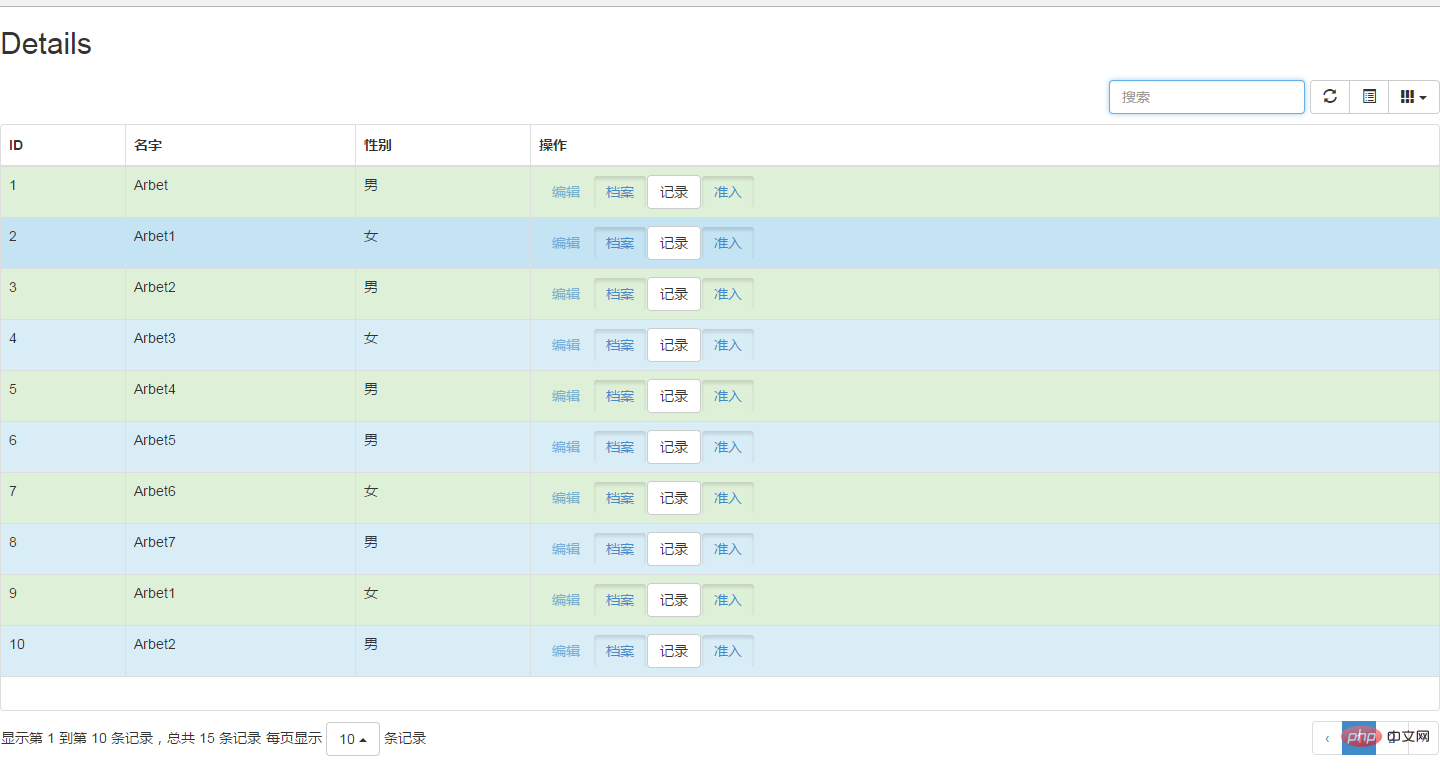 must first reference the JQuery library file, and then reference the plug-in js
The above is the detailed content of bootstrap table from scratch. For more information, please follow other related articles on the PHP Chinese website!

Hot AI Tools

Undresser.AI Undress
AI-powered app for creating realistic nude photos

AI Clothes Remover
Online AI tool for removing clothes from photos.

Undress AI Tool
Undress images for free

Clothoff.io
AI clothes remover

Video Face Swap
Swap faces in any video effortlessly with our completely free AI face swap tool!

Hot Article

Hot Tools

Notepad++7.3.1
Easy-to-use and free code editor

SublimeText3 Chinese version
Chinese version, very easy to use

Zend Studio 13.0.1
Powerful PHP integrated development environment

Dreamweaver CS6
Visual web development tools

SublimeText3 Mac version
God-level code editing software (SublimeText3)

Hot Topics
 1387
1387
 52
52
 Do I need to use flexbox in the center of the Bootstrap picture?
Apr 07, 2025 am 09:06 AM
There are many ways to center Bootstrap pictures, and you don’t have to use Flexbox. If you only need to center horizontally, the text-center class is enough; if you need to center vertically or multiple elements, Flexbox or Grid is more suitable. Flexbox is less compatible and may increase complexity, while Grid is more powerful and has a higher learning cost. When choosing a method, you should weigh the pros and cons and choose the most suitable method according to your needs and preferences.
 How to get the bootstrap search bar
Apr 07, 2025 pm 03:33 PM
How to use Bootstrap to get the value of the search bar: Determines the ID or name of the search bar. Use JavaScript to get DOM elements. Gets the value of the element. Perform the required actions.
 How to do vertical centering of bootstrap
Apr 07, 2025 pm 03:21 PM
Use Bootstrap to implement vertical centering: flexbox method: Use the d-flex, justify-content-center, and align-items-center classes to place elements in the flexbox container. align-items-center class method: For browsers that do not support flexbox, use the align-items-center class, provided that the parent element has a defined height.
 How to write split lines on bootstrap
Apr 07, 2025 pm 03:12 PM
There are two ways to create a Bootstrap split line: using the tag, which creates a horizontal split line. Use the CSS border property to create custom style split lines.
 Bootstrap Accessibility: Building Inclusive and User-Friendly Websites
Apr 07, 2025 am 12:04 AM
Building an inclusive and user-friendly website with Bootstrap can be achieved through the following steps: 1. Enhance screen reader support with ARIA tags; 2. Adjust color contrast to comply with WCAG standards; 3. Ensure keyboard navigation is friendly. These measures ensure that the website is friendly and accessible to all users, including those with barriers.
 How to resize bootstrap
Apr 07, 2025 pm 03:18 PM
To adjust the size of elements in Bootstrap, you can use the dimension class, which includes: adjusting width: .col-, .w-, .mw-adjust height: .h-, .min-h-, .max-h-
 How to use bootstrap button
Apr 07, 2025 pm 03:09 PM
How to use the Bootstrap button? Introduce Bootstrap CSS to create button elements and add Bootstrap button class to add button text
 How to set up the framework for bootstrap
Apr 07, 2025 pm 03:27 PM
To set up the Bootstrap framework, you need to follow these steps: 1. Reference the Bootstrap file via CDN; 2. Download and host the file on your own server; 3. Include the Bootstrap file in HTML; 4. Compile Sass/Less as needed; 5. Import a custom file (optional). Once setup is complete, you can use Bootstrap's grid systems, components, and styles to create responsive websites and applications.


