How to create automatically numbered third-level headings for documents

Open the Word document and enter text.
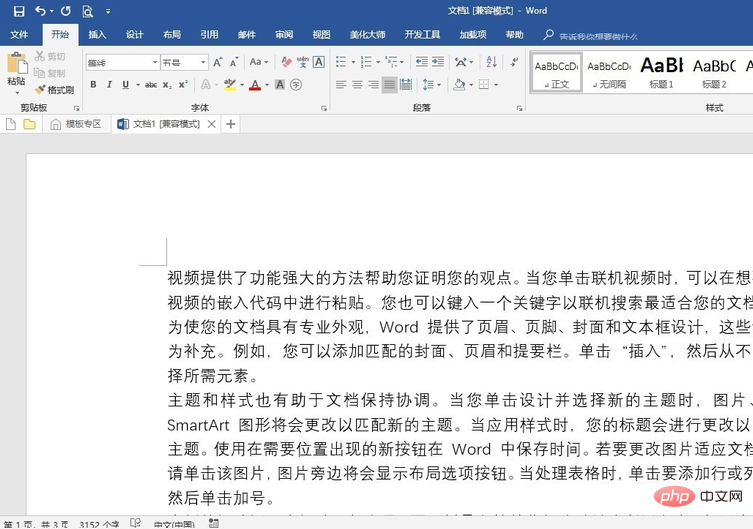
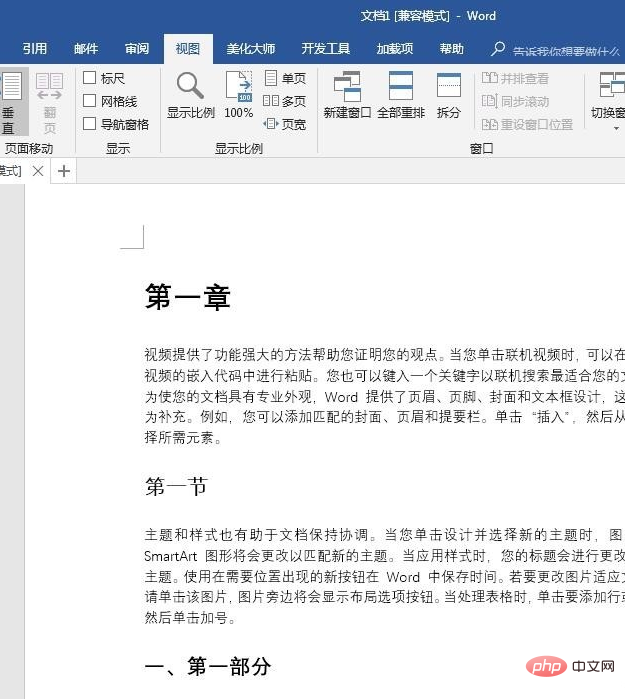
Apply heading styles to headings at all levels. "Chapter 1" or "1" corresponds to the "first-level title", "Section 1" or "1.1" corresponds to the "second-level title", "I," or "1.1.1" corresponds to the "third-level title", " (1)" or "1.1.1.1" corresponds to "fourth-level headings" and so on.
Related recommendations: "Word Beginner's Tutorial"
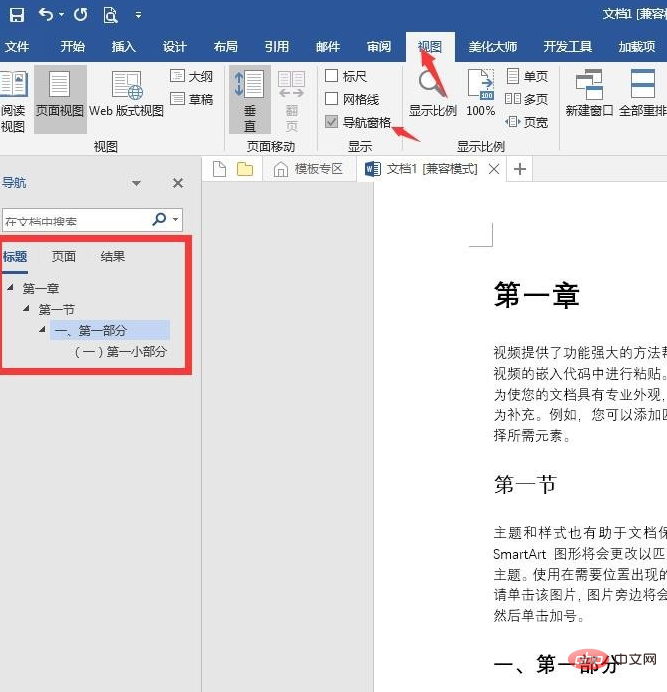
Open the "Navigation Pane" and you can see the items that exist in the document title.
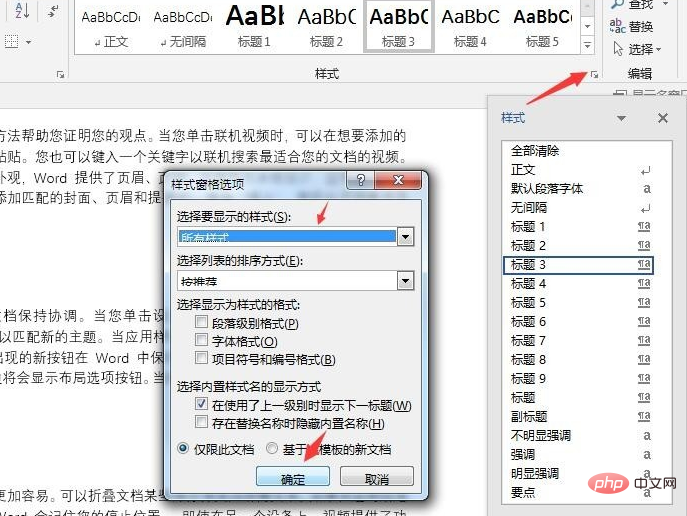
If there is no "third-level title" or "fourth-level title" style in the default style box, you need to perform the operation in the figure below to call up the title style.
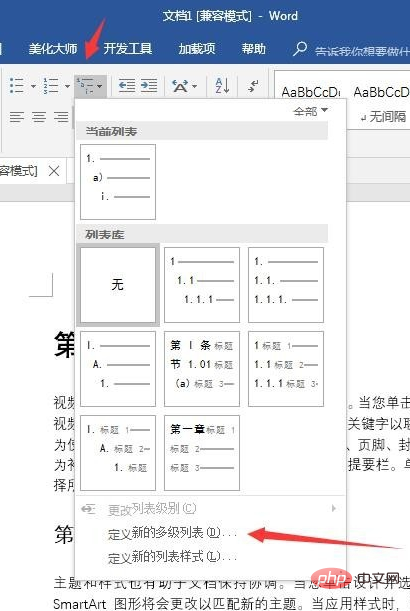
Key steps: Set automatic numbering for title styles. Click on a heading style, click "Multi-level list" in "Paragraph", and click "Define new multi-level list".
Click "More" in the pop-up settings window to open all options.
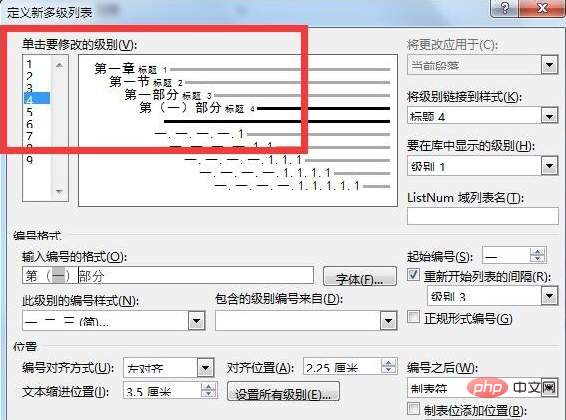
Click "1" in the upper left corner to set a first-level title, click "Link level to style" and select "Title 1". In the "Input number format", enter the text according to the text content of the first-level title (note: do not change the gray numbers). Select "One Two Three" in "Numbering style for this level".

Similarly, set up multi-level lists for other levels of titles.

After this setting, when a new title needs to be inserted or changed, the subsequent titles will automatically be numbered to maintain consistency.
The above is the detailed content of How to create automatically numbered third-level headings for documents. For more information, please follow other related articles on the PHP Chinese website!

Hot AI Tools

Undresser.AI Undress
AI-powered app for creating realistic nude photos

AI Clothes Remover
Online AI tool for removing clothes from photos.

Undress AI Tool
Undress images for free

Clothoff.io
AI clothes remover

AI Hentai Generator
Generate AI Hentai for free.

Hot Article

Hot Tools

Notepad++7.3.1
Easy-to-use and free code editor

SublimeText3 Chinese version
Chinese version, very easy to use

Zend Studio 13.0.1
Powerful PHP integrated development environment

Dreamweaver CS6
Visual web development tools

SublimeText3 Mac version
God-level code editing software (SublimeText3)

Hot Topics
 1381
1381
 52
52
 Insufficient memory or disk space to repagin or print this document Word error
Feb 19, 2024 pm 07:15 PM
This article will introduce how to solve the problem of insufficient memory or disk space to repage or print the document in Microsoft Word. This error usually occurs when users try to print a Word document. If you encounter a similar error, please refer to the suggestions provided in this article to resolve it. Insufficient memory or disk space to repage or print this document Word error How to resolve the Microsoft Word printing error "There is not enough memory or disk space to repage or print the document." Update Microsoft Office Close memory-hogging applications Change your default printer Start Word in safe mode Rename the NorMal.dotm file Save the Word file as another
 How to add redline to Word document
Mar 01, 2024 am 09:40 AM
It is 395 words, which is 495. This article will show you how to add red lines in Word documents. Redlining a document refers to making modifications to the document so that users can clearly see the changes. This feature is very important when multiple people are editing a document together. What redline means Marking a document Redlining means using red lines or callouts to indicate changes, edits, or revisions to a document. The term was inspired by the practice of using a red pen to mark printed documents. Redline comments are widely used in different scenarios, such as clearly showing recommended changes to authors, editors, and reviewers when editing a document. Propose changes and modifications in legal agreements or contracts Provide constructive criticism and suggestions on papers, presentations, etc. How to give W
 Can't open hyperlink in word document
Feb 18, 2024 pm 06:10 PM
In recent years, with the continuous development of network technology, our lives are inseparable from various digital tools and the Internet. When processing documents, especially in writing, we often use word documents. However, sometimes we may encounter a difficult problem, that is, the hyperlink in the word document cannot be opened. This issue will be discussed below. First of all, we need to make it clear that hyperlinks refer to links added in word documents to other documents, web pages, directories, bookmarks, etc. When we click on these links, I
 Learn the os.Stdout.Write function in the Go language documentation to implement standard output
Nov 03, 2023 pm 03:48 PM
Learn the os.Stdout.Write function in the Go language documentation to implement standard output. In the Go language, standard output is implemented through os.Stdout. os.Stdout is a variable of type *os.File, which represents the standard output device. In order to output content to standard output, you can use the os.Stdout.Write function. This article will introduce how to use the os.Stdout.Write function to implement standard output and provide specific code examples. os.
 Word document is blank when opening on Windows 11/10
Mar 11, 2024 am 09:34 AM
When you encounter a blank page issue when opening a Word document on a Windows 11/10 computer, you may need to perform repairs to resolve the situation. There are various sources of this problem, one of the most common being a corrupted document itself. Furthermore, corruption of Office files may also lead to similar situations. Therefore, the fixes provided in this article may be helpful to you. You can try to use some tools to repair the damaged Word document, or try to convert the document to another format and reopen it. In addition, checking whether the Office software in the system needs to be updated is also a way to solve this problem. By following these simple steps, you may be able to fix Word document blank when opening Word document on Win
 Interpretation of Java documentation: Detailed introduction to the substring() method of the StringBuilder class
Nov 03, 2023 pm 04:31 PM
Interpretation of Java documentation: Detailed introduction to the substring() method of the StringBuilder class Introduction: In Java programming, string processing is one of the most common operations. Java provides a series of classes and methods for string processing, among which the StringBuilder class is a commonly used choice for frequent string operations. In the StringBuilder class, the substring() method is a very useful method for intercepting substrings of strings. This article will
 How to implement the basic usage of Workerman documents
Nov 08, 2023 am 11:46 AM
Introduction to how to implement the basic usage of Workerman documents: Workerman is a high-performance PHP development framework that can help developers easily build high-concurrency network applications. This article will introduce the basic usage of Workerman, including installation and configuration, creating services and listening ports, handling client requests, etc. And give corresponding code examples. 1. Install and configure Workerman. Enter the following command on the command line to install Workerman: c
 How to connect PHP to Taobao product search API documentation
Jul 01, 2023 pm 10:16 PM
How to connect PHP to Taobao Product Search API Documentation Taobao is one of the largest e-commerce platforms in China, with a huge product inventory and user base. For developers, by connecting to Taobao's API interface, they can obtain product information, promotion activities, transactions and other functions, thereby realizing personalized business applications. This article will introduce how to use PHP language to connect to Taobao product search API to help developers quickly build their own e-commerce applications. Step 1: Register as a Taobao developer. Before starting, you need to register as a Taobao developer.


