
1. Start and shut down the mysql server:
service mysql start
service mysql stop
2. Restart the MySQL service:
service mysql restart
3. Confirm whether the startup is successful. The mysql node is in the LISTEN state, which means the startup is successful:
sudo netstat -tap | grep mysql

4. Enter the mysql shell interface:
mysql -u root -p
5. Connect to MYSQL:
Format: mysql -h host address -u username -p user password (Note: u and root are not required Add spaces, and the same applies to others)
1. Connect to MYSQL on this machine
Find the installation directory of mysql. Generally, you can type the command mysql -uroot -p directly, and you will be prompted after pressing Enter. Enter the password. If MYSQL has just been installed, the super user root does not have a password, so just press Enter to enter MYSQL.
2. Connect to MYSQL on the remote host
Assume that the IP of the remote host is: 10.0.0.1, the user name is root, and the password is 123. Then type the following command:
mysql -h10.0.0.1 -uroot -p123
6. Exit the MYSQL command:
exit (回车)
7. Query the process mysql is executing:
show processlist;
8. View user:
use mysql;
select * from user;
9. Create new user:
CREATE USER 'user_name'@'host' IDENTIFIED BY 'password';
user_name: The name of the user to be created.
host: Indicates which computer the newly created user is allowed to log in from. If only login from the local machine is allowed, fill in 'localhost'. If login from remote is allowed, fill in '%'
password: The login database password of the newly created user. If there is no password, you don’t need to write it.
Example:
CREATE USER  ‘aaa’@‘localhost’ IDENTIFED BY ‘123456’; //表示创建的新用户,名为aaa,这个新用户密码为123456,
只允许本机登陆
CREATE USER  'bbb'@'%' IDENTIFED BY '123456';//表示新创建的用户,名为bbb,这个用户密码为123456,
可以从其他电脑远程登陆mysql所在服务器
CREATE USER  ‘ccc’@‘%’ ;//表示新创建的用户ccc,没有密码,可以从其他电脑远程登陆mysql服务器
10. Authorized user:
GRANT privileges ON databasename.tablename TO ‘username’@‘host’
privileges: Indicates what rights are to be granted, for example, there can be select, insert, delete, update, etc., if you want to grant all rights, fill in ALL
databasename.tablename: Indicates which database and which table the user's permissions can be used in. If you want the user's permissions to apply to all databases, table, fill in * . *, * is a wildcard character, indicating all.
'username'@'host': Indicates which user is authorized.
For example:
grant all on *.* to 'test'@'localhost'; #给test用户授权,让test用户能给所有库所有表实行所有的权力
GRANT  select,insert  ON  zje.zje  TO ‘aaa’@‘%’;//表示给用户aaa授权,让aaa能给zje库中的zje表 实行 insert
和 select。
Note:
Users authorized with the above command cannot authorize other users. If you want this user to be able to authorize other users, you must add it after On WITH GRANT OPTION
For example: GRANT ALL ON *.* TO 'aaa'@'%' WITH GRANT OPTION;
Related recommendations: "mysql tutorial"
11. Restrict IP login:
For example, set mysql so that only 172.29.8.72 and 192.168.3.39 can connect to it
GRANT ALL ON *.* TO 'username'@'172.29.8.72' IDENTIFIED BY 'password' WITH GRANT OPTION;
GRANT ALL  ON *.* TO 'username'@'192.168.3.39' IDENTIFIED BY 'password' WITH GRANT OPTION;
flush privileges;
##12. Delete user:
Command: DROP USER 'user_name'@'host'Example:drop user 'test'@'%'; #删除用户test
13. Display data table mode:
use database name; show columns from table name;14. mysql data type:
MySQL supports multiple Types can be roughly divided into three categories: numerical, date/time and string (character) types. MySQL supports all standard SQL numeric data types. As an extension of the SQL standard, MySQL also supports integer types TINYINT, MEDIUMINT and BIGINT15. Insert data:
INSERT INTO table_name ( field1, field2,...fieldN )
                       VALUES
( value1, value2,...valueN );16. Query data:
   SELECT column_name,column_name
    FROM table_name
    [WHERE Clause]
[LIMIT N][ OFFSET M]17. Limit and offset usage
Paging in mysql is generally implemented with limit1. select* from article LIMIT 1,32. select * from article LIMIT 3 OFFSET 1The above two ways of writing both mean to take three pieces of data 2, 3, and 4When limit is followed by two parameters , the first number indicates the quantity to be skipped, and the last digit indicates the quantity to be fetched. For example, select* from article LIMIT 1,3 means to skip 1 piece of data and start fetching from the 2nd piece of data. , fetch 3 pieces of data, that is, fetch 2, 3, and 4 pieces of data When limit is followed by a parameter, the parameter indicates the number of data to be fetchedFor example, select* from article LIMIT 3 means to directly fetch the first three pieces of data, similar to the top syntax in sqlserver. When limit and offset are used in combination, there can only be one parameter after limit, indicating the quantity to be taken, and offset indicating the quantity to be skipped. For example, select * from article LIMIT 3 OFFSET 1 means skipping 1 piece of data, starting from the 2nd piece of data, and taking 3 pieces of data, that is, taking 2, 3, and 4 pieces of data.18. Update data:
UPDATE table_name SET field1=new-value1, field2=new-value2
[WHERE Clause]
你可以在 WHERE 子句中指定任何条件。
你可以在一个单独表中同时更新数据。
19、模糊查询:
select c field1,field2,…fieldN
from table_name
where field1 like condition1 [and[or]] field2=‘somevalue’;
通配符的分类:
%百分号通配符: 表示任何字符出现任意次数 (可以是0次).
_下划线通配符:表示只能匹配单个字符,不能多也不能少,就是一个字符。
20、排序
SELECT field1, field2,...fieldN FROM table_name1, table_name2...
ORDER BY field1 [ASC [DESC][默认 ASC]], [field2...] [ASC [DESC][默认 ASC]]
可以添加 WHERE…LIKE 子句来设置条件
21、分组
GROUP BY 语句根据一个或多个列对结果集进行分组。在分组的列上我们可以使用 COUNT, SUM, AVG等函数。
SELECT column_name, function(column_name)
FROM table_name
WHERE column_name operator value
GROUP BY column_name;
例子:
SELECT name, COUNT(*) FROM employee_tbl GROUP BY name;
22、null值处理
MySQL 中处理 NULL 使用 IS NULL 、 IS NOT NULL 、<=>运算符。
IS NULL: 当列的值是 NULL,此运算符返回 true。
IS NOT NULL: 当列的值不为 NULL, 运算符返回 true。
<=>: 比较操作符(不同于=运算符),当比较的的两个值为 NULL 时返回 true。
23、in
in常用于where表达式中,其作用是查询某个范围内的数据。
用法:select * from table where field in (value1,value2,value3,…);
例子:
查询book表中id为2和4的所有数据:
select * from book where id in(2,4)
24、not in
not in与in作用相反,用法和示例如下:
用法:select * from where field not in (value1,value2,value3,…);
25、exists
本示例所示查询查找由位于以字母 B 开头的城市中的任一出版商出版的书名:
SELECT title
FROM titles
WHERE EXISTS
    (SELECT *
    FROM publishers
    WHERE pub_id = titles.pub_id
AND city LIKE 'B%')用IN:
SELECT title
FROM titles
WHERE pub_id IN
    (SELECT pub_id
    FROM publishers
WHERE city LIKE 'B%')26、导入数据:
mysql 命令导入
使用 mysql 命令导入语法格式为:
mysql -u用户名 -p密码 < 要导入的数据库数据(runoob.sql)
实例:
# mysql -uroot -p123456 < runoob.sql
以上命令将将备份的整个数据库 runoob.sql 导入。
source 命令导入
source 命令导入数据库需要先登录到数库终端:
mysql> create database abc;      # 创建数据库
mysql> use abc;                  # 使用已创建的数据库
mysql> set names utf8;           # 设置编码
mysql> source /home/abc/abc.sql  # 导入备份数据库
使用 LOAD DATA 导入数据
MySQL 中提供了LOAD DATA INFILE语句来插入数据。 以下实例中将从当前目录中读取文件 dump.txt ,将该文件中的数据插入到当前数据库的 mytbl 表中。
mysql> LOAD DATA LOCAL INFILE 'dump.txt' INTO TABLE mytbl;
如果指定LOCAL关键词,则表明从客户主机上按路径读取文件。如果没有指定,则文件在服务器上按路径读取文件。
你能明确地在LOAD DATA语句中指出列值的分隔符和行尾标记,但是默认标记是定位符和换行符。
使用 mysqlimport 导入数据
mysqlimport 客户端提供了 LOAD DATA INFILEQL 语句的一个命令行接口。mysqlimport 的大多数选项直接对应 LOAD DATA INFILE 子句。
从文件 dump.txt 中将数据导入到 mytbl 数据表中, 可以使用以下命令:
$ mysqlimport -u root -p --local mytbl dump.txt
password *****
27、导出数据:
使用SELECT…INTO OUTFILE语句来简单的导出数据到文本文件上。
#将数据表 runoob_tbl 数据导出到 /tmp/runoob.txt 文件中:
mysql> SELECT * FROM runoob_tbl
    -> INTO OUTFILE '/tmp/runoob.txt';

#通过命令选项来设置数据输出的指定格式,以下实例为导出 CSV 格式:
    mysql> SELECT * FROM passwd INTO OUTFILE '/tmp/runoob.txt'
    -> FIELDS TERMINATED BY ',' ENCLOSED BY '"'
    -> LINES TERMINATED BY '\r\n';
#生成一个文件,各值用逗号隔开。这种格式可以被许多程序使用。
    SELECT a,b,a+b INTO OUTFILE '/tmp/result.text'
    FIELDS TERMINATED BY ',' OPTIONALLY ENCLOSED BY '"'
    LINES TERMINATED BY '\n'
FROM test_table;SELECT … INTO OUTFILE 语句有以下属性:
LOAD DATA INFILE是SELECT … INTO
OUTFILE的逆操作,SELECT句法。为了将一个数据库的数据写入一个文件,使用SELECT … INTO
OUTFILE,为了将文件读回数据库,使用LOAD DATA INFILE。
SELECT…INTO OUTFILE
'file_name’形式的SELECT可以把被选择的行写入一个文件中。该文件被创建到服务器主机上,因此您必须拥有FILE权限,才能使用此语法。
输出不能是一个已存在的文件。防止文件数据被篡改。
你需要有一个登陆服务器的账号来检索文件。否则 SELECT … INTO OUTFILE 不会起任何作用。
导出表作为原始数据
mysqldump 是 mysql 用于转存储数据库的实用程序。它主要产生一个 SQL 脚本,其中包含从头重新创建数据库所必需的命令 CREATE TABLE INSERT 等。
使用 mysqldump 导出数据需要使用 --tab 选项来指定导出文件指定的目录,该目标必须是可写的。
以下实例将数据表 runoob_tbl 导出到 /tmp 目录中:
$ mysqldump -u root -p --no-create-info
–tab=/tmp RUNOOB runoob_tbl
password ******
导出 SQL 格式的数据
导出 SQL 格式的数据到指定文件,如下所示:
$ mysqldump -u root -p RUNOOB runoob_tbl > dump.txt
password ******
如果你需要将数据拷贝至其他的 MySQL 服务器上, 你可以在 mysqldump 命令中指定数据库名及数据表。
在源主机上执行以下命令,将数据备份至 dump.txt 文件中:
$ mysqldump -u root -p database_name table_name > dump.txt
password *****
如果完整备份数据库,则无需使用特定的表名称。
如果你需要将备份的数据库导入到MySQL服务器中,可以使用以下命令,使用以下命令你需要确认数据库已经创建:
$ mysql -u root -p database_name < dump.txt
password *****
你也可以使用以下命令将导出的数据直接导入到远程的服务器上,但请确保两台服务器是相通的,是可以相互访问的:
$ mysqldump -u root -p database_name
| mysql -h other-host.com database_name
以上命令中使用了管道来将导出的数据导入到指定的远程主机上。
28、 MySQL 事务
MySQL 事务主要用于处理操作量大,复杂度高的数据。比如说,在人员管理系统中,你删除一个人员,你即需要删除人员的基本资料,也要删除和该人员相关的信息,如信箱,文章等等,这样,这些数据库操作语句就构成一个事务!
在 MySQL 中只有使用了 Innodb 数据库引擎的数据库或表才支持事务。
事务处理可以用来维护数据库的完整性,保证成批的 SQL 语句要么全部执行,要么全部不执行。
事务用来管理 insert,update,delete 语句
一般来说,事务是必须满足4个条件(ACID)::原子性(Atomicity,或称不可分割性)、一致性(Consistency)、隔离性(Isolation,又称独立性)、持久性(Durability)。
MYSQL 事务处理主要有两种方法:
1、用 BEGIN, ROLLBACK, COMMIT来实现
BEGIN 开始一个事务
ROLLBACK 事务回滚
COMMIT 事务确认
2、直接用 SET 来改变 MySQL 的自动提交模式:
SET AUTOCOMMIT=0 禁止自动提交
SET AUTOCOMMIT=1 开启自动提交
29、字符集设置:
Ubuntu下设置MySQL字符集为utf8
1.mysql配置文件地址
/etc/mysql/my.cnf
2.在[mysqld]在下方添加以下代码
[mysqld]
init_connect='SET collation_connection = utf8_unicode_ci'
init_connect='SET NAMES utf8'
character-set-server=utf8
collation-server=utf8_unicode_ci
skip-character-set-client-handshake
3.重启mysql服务
sudo service mysql restart
4.检测字符集是否更新成utf8.
进入mysql,mysql -u root -p,输入show variables like '%character%' 查看字符集
+--------------------------+----------------------------+
| Variable_name | Value |
+--------------------------+----------------------------+
| character_set_client | utf8 |
| character_set_connection | utf8 |
| character_set_database | utf8 |
| character_set_filesystem | binary |
| character_set_results | utf8 |
| character_set_server | utf8 |
| character_set_system | utf8 |
| character_sets_dir | /usr/share/mysql/charsets/ |
+--------------------------+----------------------------+
注意事项:在修改字符集之前已经建立的数据库,character_set_database值不会发生改变,往数据库中插入中文数据仍然会显示乱码,所以最好在安装完MySQL后就将字符集改成utf8,否则后续修改会较麻烦。
字符集修改:
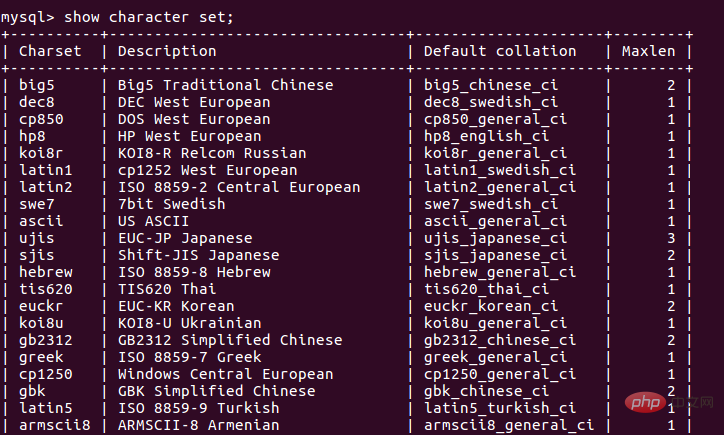
show character set; #查看当前MySQL服务实例支持的字符集、字符序以及字符集占用的最大字节长度等信息
如下图:

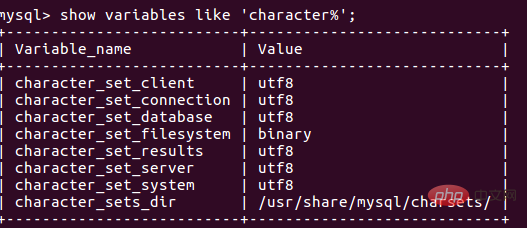
show variables like 'character%';#查看当前MySQL会话使用的字符集
结果如图:

character_set_client: 客户端来源数据使用的字符集
character_set_connection: 数据通信链路的字符集,当MySQL客户机向服务器发送请求时,数据以该字符集进行编码
character_set_database: 数据库字符集
character_set_filesystem: MySQL服务器文件系统的字符集,该值是固定的binary。
character_set_results: 结果集的字符集,MySQL服务器向MySQL客户机返回执行结果时,执行结果以该字符集进行编码
character_set_server: 内部操作字符集(MySQL服务实例字符集) character_set_system: 元数据(字段名、表名、数据库名等)的字符集默认为utf8
修改字符集:
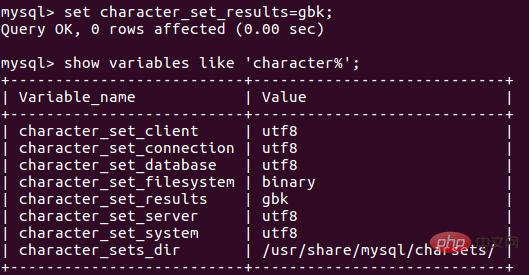
set character_set_results=gbk;
如图:

30、时间同步:
tzselect设置时区命令,根据选项选到中国的北京时间即可。
执行如下命令:
vi .bash_profile
在末尾加入这两行:
TZ='Asia/Shanghai'
export TZ
然后运行命令刷新配置:
source .bash_profile
再次运行date命令发现时区已经成功修改:
hadoop@Master:~$ date -R
Tue, 30 Jul 2019 19:42:41 +0800
linux时区重新设置后,发现mysql插入的数据还是原来时区的时间,下面是重新设置mysql时区的方法:
进入mysql控制台运行如下指令查看mysql时间。
select CURTIME();
查询后发现和date命令查询出来的时间不一样,下面开始修改:
运行临时解决命令:
SET time_zone = '+8:00';
刷新配置:
flush privileges;
修改配置文件使得下次重启mysql服务之后永久生效
vi /etc/my.cnf
添加如下配置:
[mysqld]
default_time_zone = '+8:00'
31、grep命令:
1.作用
Linux系统中grep命令是一种强大的文本搜索工具,它能使用正则表达式搜索文本,并把匹 配的行打印出来。grep全称是Global Regular Expression Print,表示全局正则表达式版本,它的使用权限是所有用户。
2.格式
grep [options]
简单实例:
$ grep ‘test’ d* #显示所有以d开头的文件中包含 test的行。
$ grep ‘test’ aa bb cc  #显示在aa,bb,cc文件中匹配test的行。
32、awk命令:
awk是一个强大的文本分析工具,相对于grep的查找,sed的编辑,awk在其对数据分析并生成报告时,显得尤为强大。简单来说awk就是把文件逐行的读入,以空格为默认分隔符将每行切片,切开的部分再进行各种分析处理。
使用方法 : awk '{pattern + action}' {filenames}
The above is the detailed content of MySQL common operations and basic knowledge. For more information, please follow other related articles on the PHP Chinese website!